Simultaneously, I had purchased the European Maple one-piece back, as a solid wood billet, with sides, and neck billet. Additionally, I ordered the European Spruce front plate blank from International Violin Company in Baltimore Maryland.
At the time when I last posted, I had just begun varnishing the viola and had only applied the yellow base coats of varnish. Obviously, the intent is that this yellow base will provide the “golden glow” shining from within the subsequent darker-color coats of varnish.
However, as I added increasingly dark varnish layers, the changes were increasingly slight. As noted earlier, the change from raw wood to sealer was obvious. Furthermore, the change from sealed wood to yellow varnish was amazing. But the subsequent steps move more gently into the final iteration.
Front with the first color coatBack view with the first color coat
Second Color Coat
Front with a second color coat.Back with two cor coats.
Third Color-Coat
Front view with three color coats.Back with three color coats.Three color coats from an angle showing off the figured Spruce.
And Assembly!
To begin with the varnish procedure, I had removed the fingerboard and nut, to allow full access to the front plate for varnish-prep, varnishing and polishing. However, now it is time to replace those parts and begin final assembly.
I installed the soundpost, too, so that the instrument corpus could begin “getting used to” that pressure from within.
Then I re-installed the fingerboard and nut, and scraped the joint to make it completely smooth. Obviously, I will have to retouch the varnish on some of those areas.
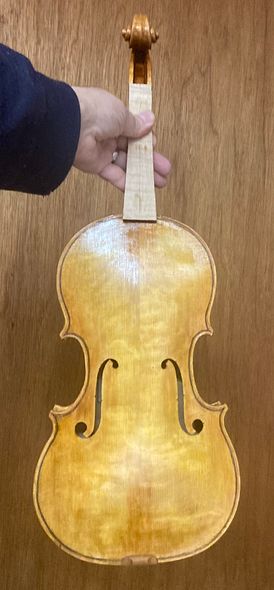
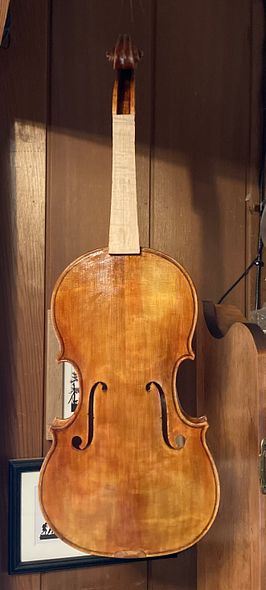
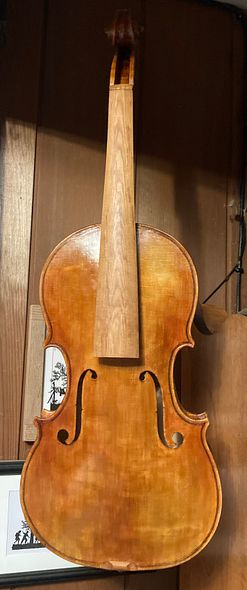
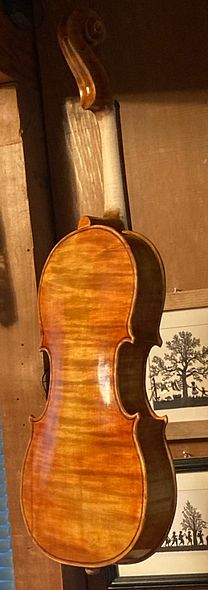
Front at final color, with Fingerboard.
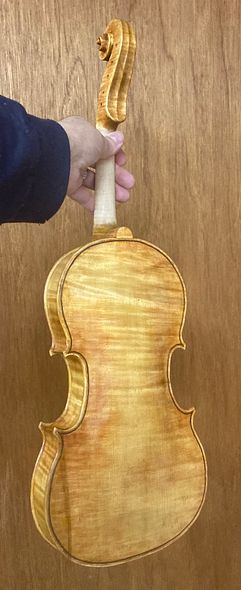
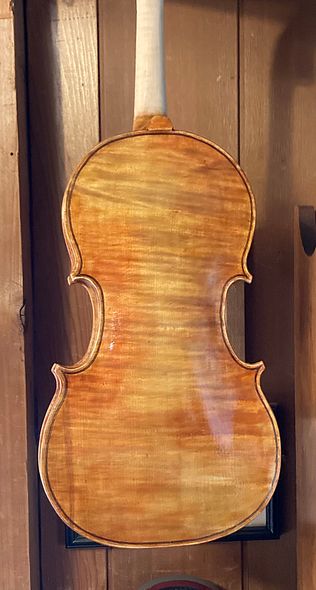
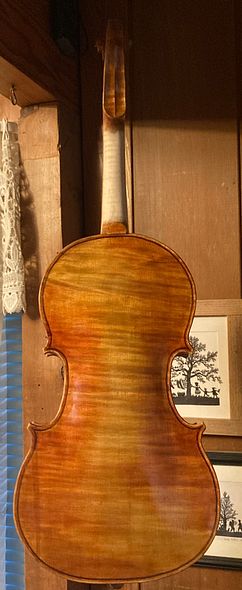
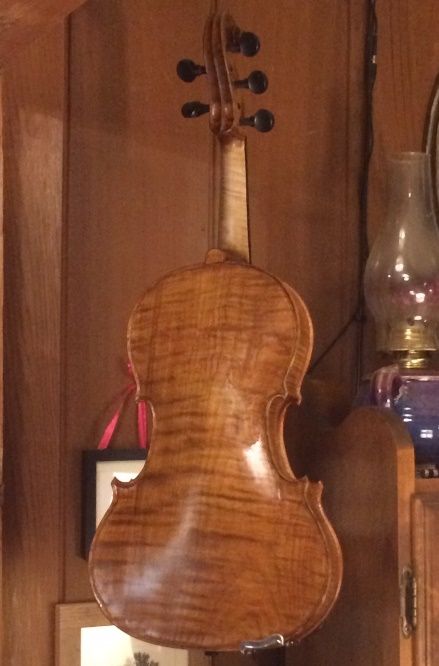
Back view at final varnish color.
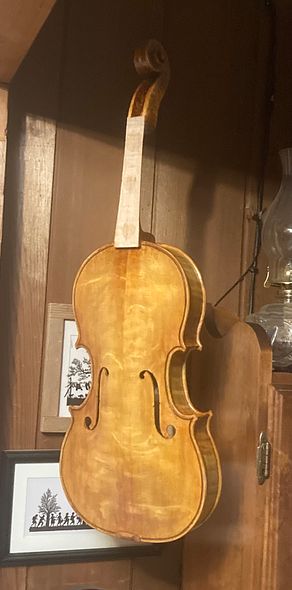
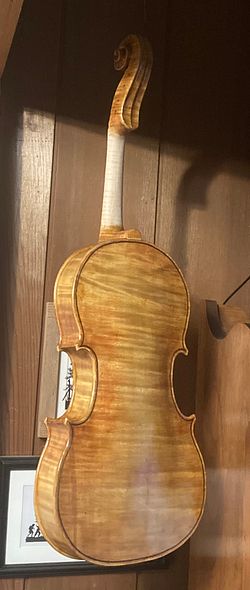
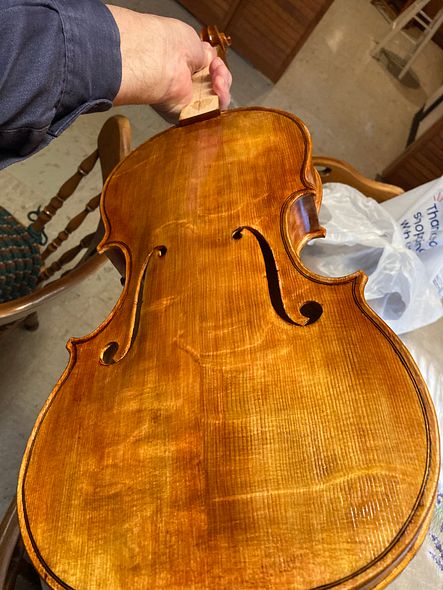
Three-quarter view, showing varnish contrasts.
What’s Next?
Following this, the next thing will be to install the “Knilling Perfection” (internally geared) tuning pegs.; Afterward, I will continue with final set-up. I can install the pegs now, but the final set-up will have to wait for the varnish to harden a little more.
To begin with, last year, a professional violist in Switzerland contacted me, asking about commissioning a 15-3/4″ 5-string viola. With this in mind, we discussed the project at length. We ascertained her specific requirements. Obviously, that is her privilege, since she was ordering a commissioned instrument.
Meanwhile, I had undergone surgery on both eyes. As a result, I could not do anydetailed work until my eyes healed. The client was very patient: I chose the wood for her instrument, to her approval (European Spruce and Maple,) and ordered the special material for her fittings.
Choosing Materials
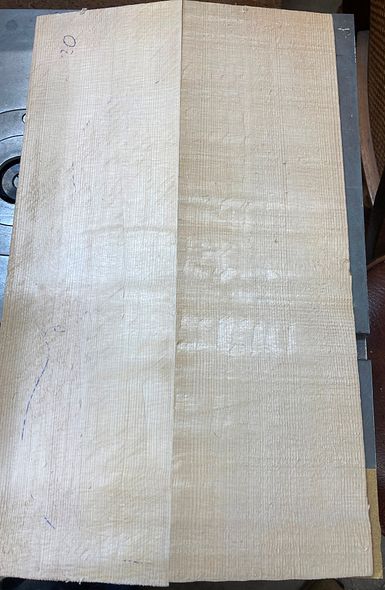
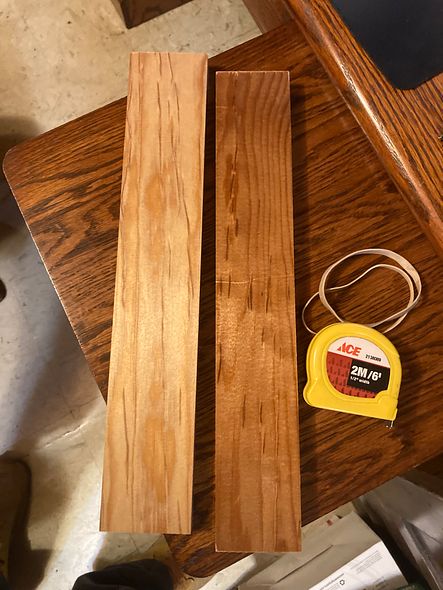
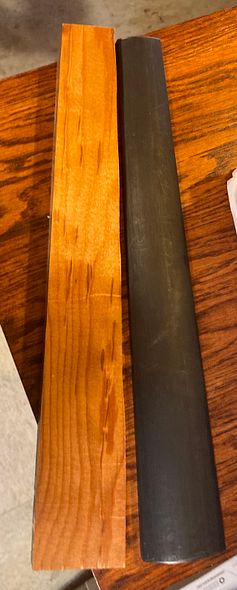
European Spruce front plate materialOne-Piece European Maple Back PlateSonowood for fittings, as the billets arrived
Out of concern for endangered tropical woods, the request specified that I use a Swiss product, “Sonowood” for the fingerboard and other fittings. In this case, the Sonowood is Spruce. They heated it enough to liquefy the internal lignin. Next, they compressed it to three times its natural density. The resulting product is as hard and wear-resistant as ebony. But Sonowood is not endangered: it is Spruce!
Carving The Fittings
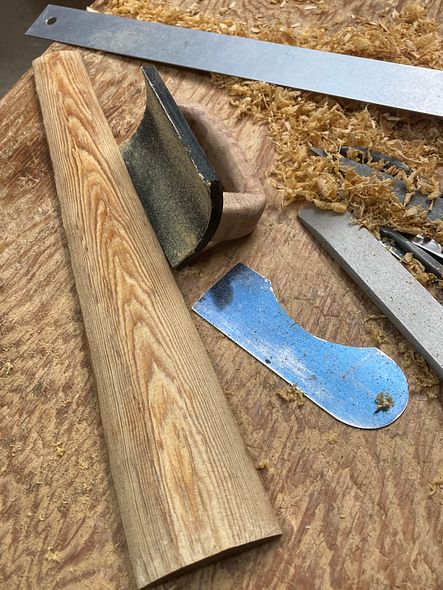
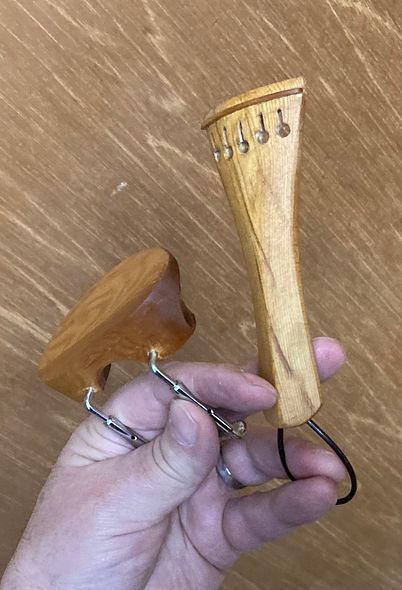
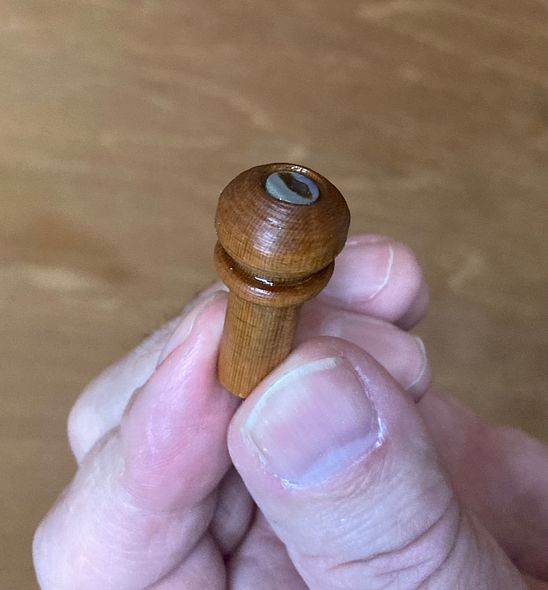
On the other hand, Sonowood is expensive and difficult to work with. It was good that I ordered it early. It took a long time to arrive, and I learned its working properties by carving the fingerboard. Then I made the chinrest, the tailpiece, and the end button. I saved the nut and saddle for last, as I had to fit them to the fingerboard and front plate.
Fingerboard footprint copied from Ebony fingerboard billet.Carving the fingerboardHandmade Chinrest and TailpieceEnd Button, with Paua Shell dot
Beginning the Rib Garland
While I was waiting to receive the Sonowood billets, I had prepared the ribstock, bent the ribs, and installed them into the mold.
Ribs installed in GarlandRib Garland with linings installed
Beginning the Plates
Next, I installed the linings, traced the plates and began carving.
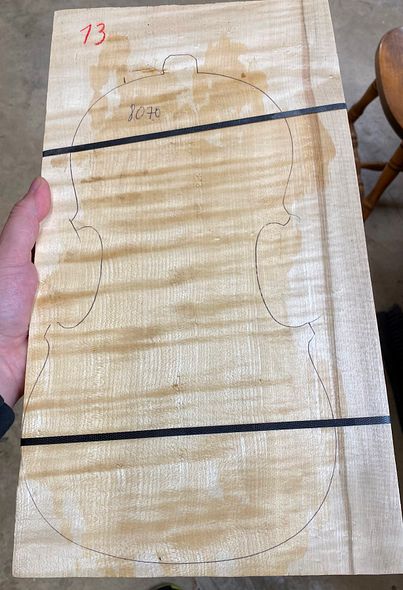
Footprint of front and back plates, ready to carve. Dark streak on back plate is heartwood.
Neck and Scroll
Simultaneously, I also laid out and began carving the neck and scroll.
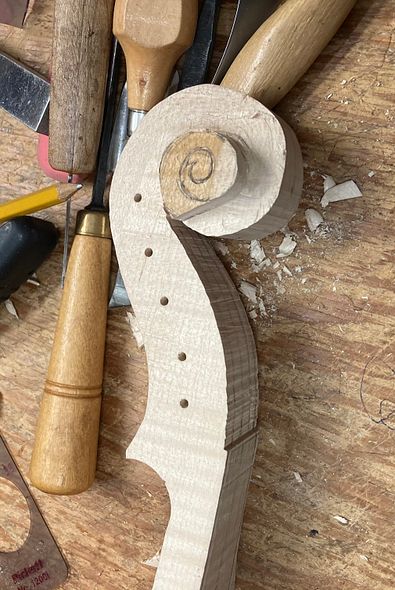
Beginning the Scroll
Once I had completed all the parts, I assembled them and began finishing.
Beginning Varnishing
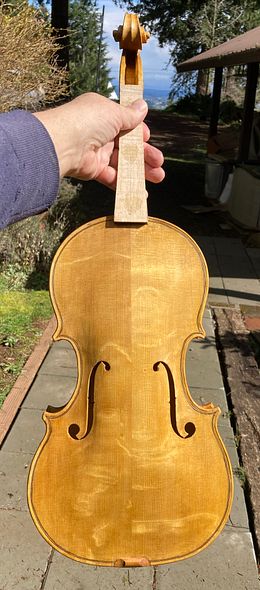
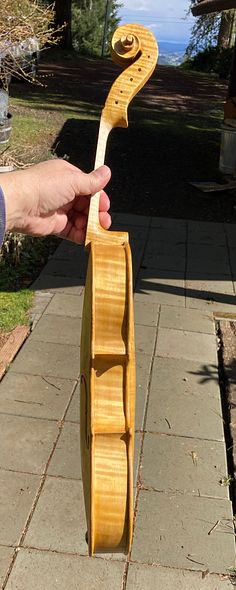
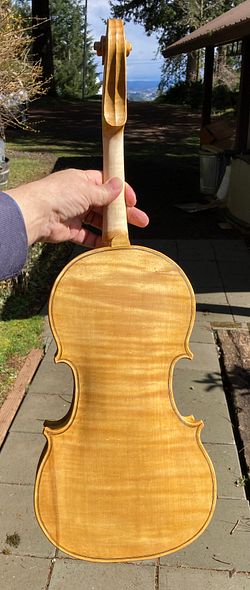
To “Cut to the Chase,” as people often say, here is how viola looks, today. I have applied the base coats of yellow varnish , and I will soon begin applying the darker layers of varnish.
Front side with Yellow Base CoatsSide View with Yellow Base CoatsBack View with Yellow Base Coats
I will post more, as things progress toward completion.
I shipped it to him and it arrived just after his birthday. He has been playing it ever since.
Happy Player
The young man truly has been pleased with it: He loved the tone, loved the balance, etc. But he was reluctant to allow me to publish a video of him playing it. He wanted more time to practice.
He just had a hard time getting used to having five strings. Quite a few classically trained players have told me that this was a problem. They felt that strings just seemed to appear in the wrong places. (I can understand that: there is a string right down the middle of the fingerboard that wasn’t there before! Besides, the angle in string crossings demands more of the player: it is much flatter, requiring more precision.)
Achievable Goals
He sent me several “progress reports,” over the next few months. All of them sounded good, to me, but he was still working on “getting comfortable” with the new instrument, and did not want them made public. Until today, I did not have his blessing to share any of them.
One of his stated goals was to be able to play Bach’s Cello Suite #6 on the viola. It was originally written for a 5-string cello: A very good cellist can play it on a four-string cello. But, the best violist cannot play Suite #6 on a classical 4-string viola in the original key. The classical cello used “thumb-position” fingering to play it. “Thumb-position” is not usable on a viola.
The young man bought the 5-string viola to overcome that specific hurdle, so he is working on that piece in this video :
I especially appreciate this video. It showcases both ends of the range of the Viola, and it shows that the instrument speaks quickly and easily, in fast attacks.
He hasn’t “spoken up” online yet (and he may not) but the music tells me he is happy with the instrument.
What can be done on a 5-string Viola that cannot be done on a classical viola?
J. S. Bach Cello Suite #6
I recently spoke with a pro-level violist from California. He said that you cannot play the Bach Cello Suite #6 in the original key on a four-string viola! (This presented a new idea to me. I am not really a player, so I simply never had thought of that possibilty.) Accordingly, I looked it up online:
I offer the following quote from an article in “The Strad” Magazine. The Magazine quotes Simon Rowland-Jones’ comments in 1999. (The article appeared in July, 2021)
“The suite can only comfortably be played on a five-string instrument, although most cellists do play it on a normal four-string cello using thumb position to facilitate the higher registers. As thumb position is not possible on the viola, violists normally play this suite in the key of G.”
I knew that J. S. Bach actually wrote suite #6 for a five-string cello (possibly a violoncello piccolo.) Experienced cellists play it, but they find it challenging on a four-string classical cello. I just had never thought that “very difficult” for a classical cellist might spell “impossible”for a classical violist!
So, a five-string viola actually provides the only answer for a violist who really wants to play all six Bach cello suites on a viola, in the original keys!
Violin/Viola Teachers love the 5-string Viola for a different reason:
Violin teachers find the 5-string viola offers a big help, too. Especially when teaching in a group setting, the five string instrument allows the teacher to demonstrate the violin part for the violin section. The teacher can immediately switch to the violists’ part, without having to change instruments. A well-balanced five-string instrument provides good sound on both ends of the spectrum.
Band Members love them, too
Players in modern bands ( Jazz, Country, Bluegrass, or anything between) enjoy being able to drop into a growly low harmony to complement whatever melody the lead singer or instrument is following. When the five-string instrument is the lead, the player will really shine, because of the extended range.
Large Violas vs. Small Violas
I do not claim that there is no difference between the sound of a large instrument and a small one. (Sorry: a well-made, well-set-up, large viola simply does provide a bigger voice.) However, a well-made, properly set-up, small 5-string viola can still demonstrate an amazingly good voice. It will speak easily on the C-string, and be very open, deep and clear. It will prove to be just as clear and strong on all five strings. But violists really like the sound of big violas!
Non-Classical, Ergonomic Options
So: what can I do for a player who, by reason of physical limitations, cannot play a large viola? David Rivinus invented a new form, years ago. He named the new instrument “Pellegrina.”
The Pellegrina I tried out offered the playing length of a 15″ viola, but it possessed the internal space of an 18″ viola! (How is that possible? Well, quite honestly, I thought it looked as though Salvador Dali must have designed it!) Mr. Rivinus had dramatically extended the curves of both the upper bass bout and the lower treble bout, so that they “bulged diagonally.”
This feature provides the internal resonance volume of an 18″ viola. But he left the playing length from neck-heel to end-button exactly that of a 15″ viola. The player’s hand moved no further from her shoulder than it would have done with a 15″ instrument.
Commission only, for Ergonomic, non-classical forms
If a player wants such an instrument, today, I can build one. However, I will only build it as a commission. Also, I will be using my own design, not a copy of David Rivinus’s work. (Mr. Rivinus retired a few years ago, and quit building them. His personal instruments are no longer available except when a player sells one. In fact, he still functions as a broker for those selling or buying his older creations.)
But Mr. Rivinus built the Pellegrina using sound engineering principles: His instruments (or instruments like his) offer a very good option for ergonomics. However, some players feel so strongly the need to “Look Normal” that they will never try such an option. (That is sad, because many violists end up with injuries by playing violas which are really just too large for them. )
Five String Violas for sale:
If you are interested in a five-string viola of any kind, please contact me, and we will discuss your needs. If you need something similar to what Mr. Rivinus invented, we can talk, as well, but it would definitely be a commissioned instrument.
Additionally, if a player wants anything far out of the ordinary, it will be offered on a commission basis.
A shop in Charlotte, NC has agreed to take one of my fiddles on consignment.
The shop is called “The Violin Shoppe” and is a pretty important outlet in that area for stringed instruments, so I am thrilled to be represented there.
One of the owners, Glen Alexander, is a great fiddler, and demonstrated the posiblities offered by my little five-string viola, on his facebook page as well as on YouTube.
Almost done with the Wood Work parts on the 16-1/2″ five-string Viola!
Completing Arching of the back plate.
When I last posted, I was nearly done arching the back plate, and nearly done shaping the neck:
Arching nearly complete; Neck nearly complete.
Setting the neck
I forgot to take photos during this process: sorry. I get wrapped up in the work and forget all about taking photos.
Setting a neck follows this course of action:
Prepare the neck heel– angles and dimensions all correct. Heel absolutely flat, all mating surfaces absolutely smooth.
Lay out and cut out the mortise in the neck block on the corpus. I try to give myself some room for adjustment. It is always a mistake to try to cut exactly to the layout lines in the first attempt.
Check all measurements with every single change:
how does the centerline of the neck fit, relative to the centerline of the corpus?
how does the transverse level of the neck match the level of the corpus?
how does the pitch (front-to-back) angle compare to what is correct?
how does the distance between the nut line and the top edge of the front plate compare with the correct distance?
how does the height of the lower edge of the fingerboard above the edge of the front plate match the correct height?
When the final fit is perfect, checking ALL measurements, remove the neck and slather in the hot hide glue, and immediately ram the neck into place one last time, making a fast re-check of all measurements, to make sure nothing moved out of place.
Let it dry!
Neck set complete!
You will notice that I set my neck before closing the corpus. I find it easier and faster, and it allows me to achieve a perfect fit against the back button.
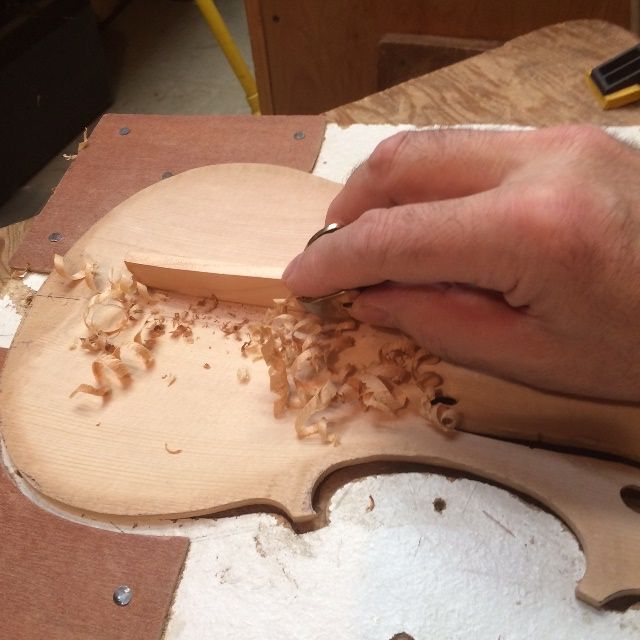
Graduating the Back Plate
The next step was to carve out the interior of the back plate, to achieve ideal thicknesses all over. This is called “Graduating the plate” or, simply “Graduation.”
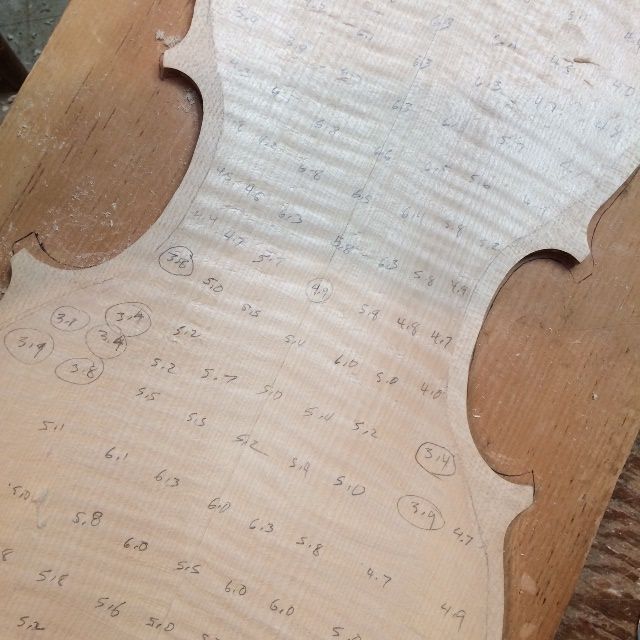
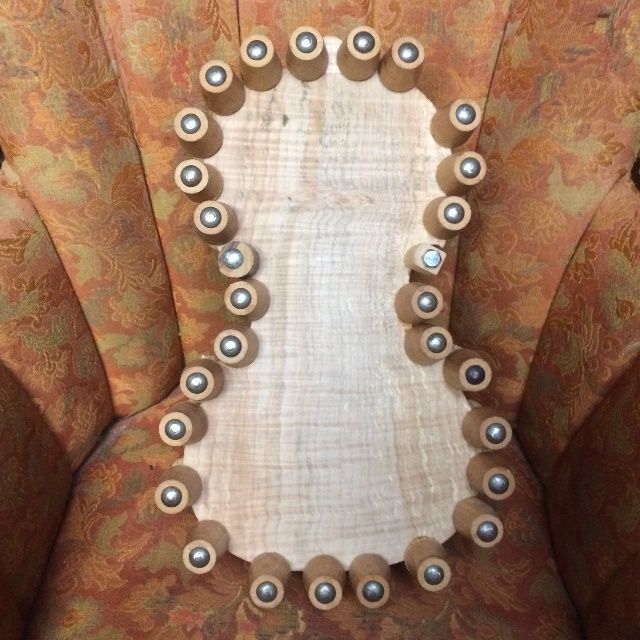
Beginning graduation of the back plate.
Calibration of “dots’ begun: circled dots are already correct. Others need carving out.
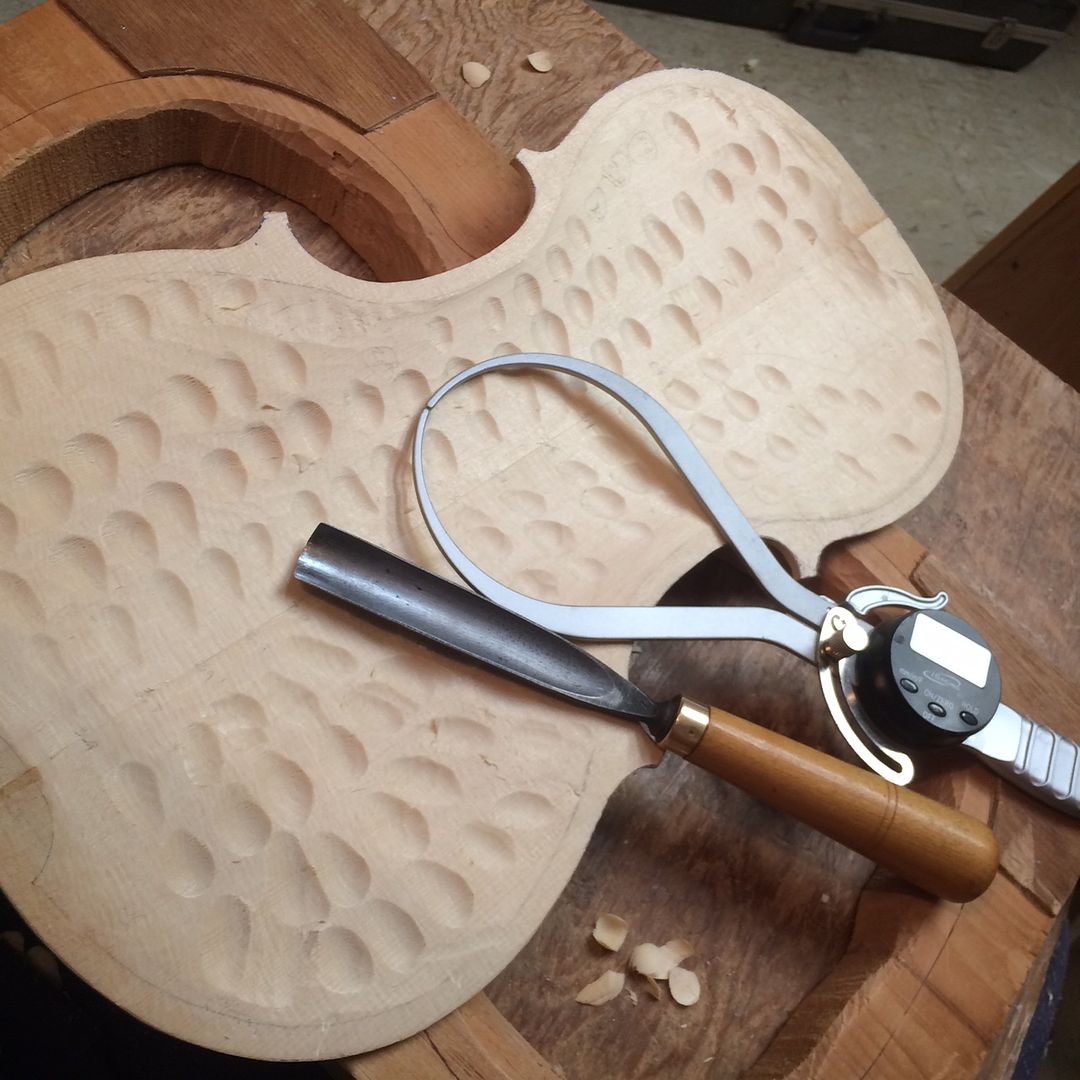
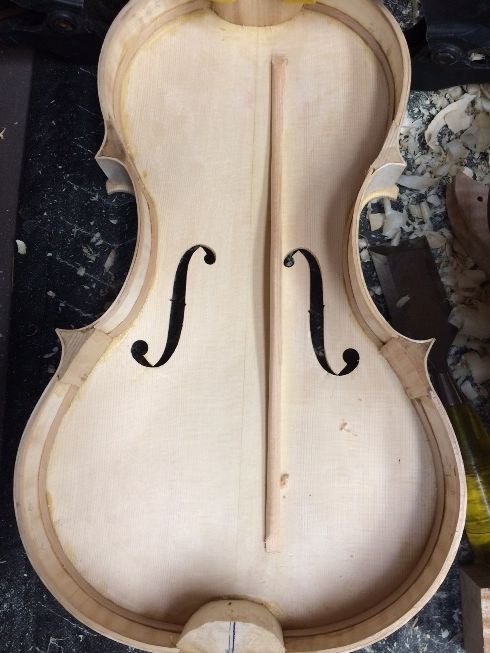
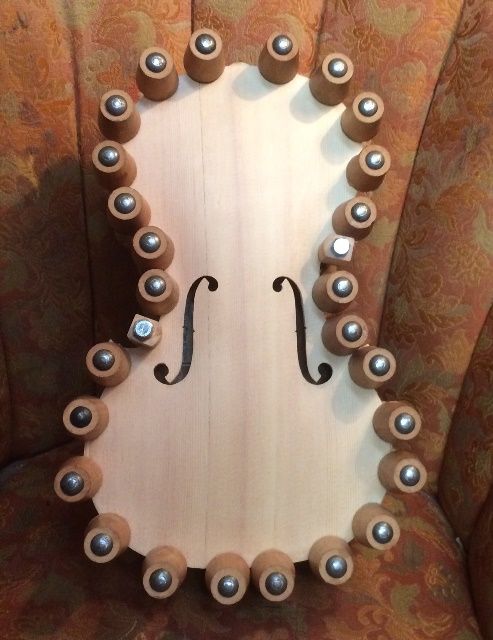
After I established the current thicknesses for all the above locations, I carved each dot to the thickness I actually desired, leaving a series of pits all over. The following photo was actually of the front plate, but it is the same idea:
Dots (front plate) completed and ready to be connected, using a plane.
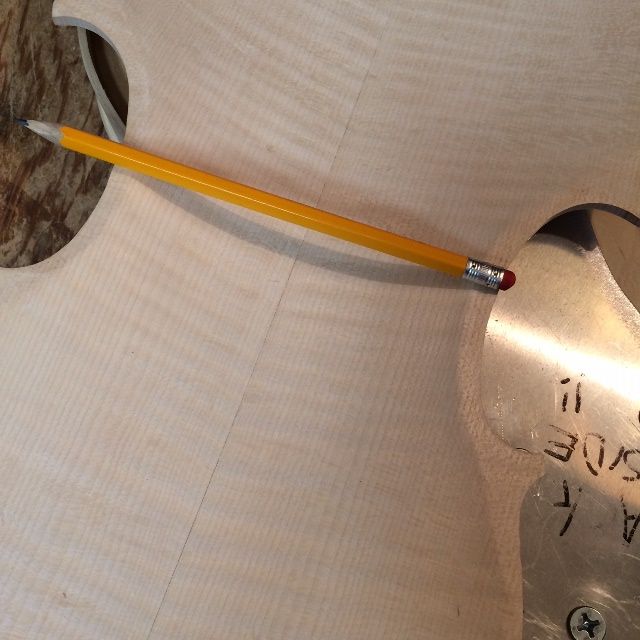
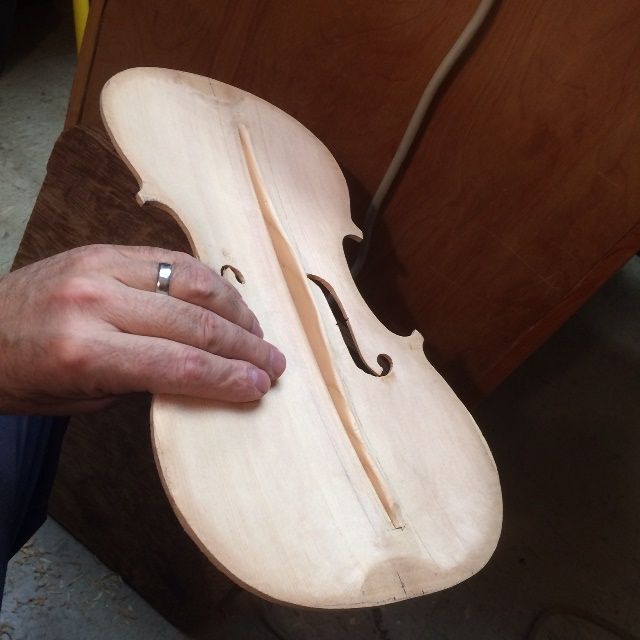
After connecting the dots, the graduation is very nearly complete. I scraped, and checked thicknesses, and scraped some more, until it looked like this:
The shadow line shows the curve of completed graduation.
Preparing to close the Corpus
With the back plate graduation complete, I was ready to attach the plate to the corpus, except that:
the corpus was still attached to the mold, and
the blocks and linings had yet to be shaped.
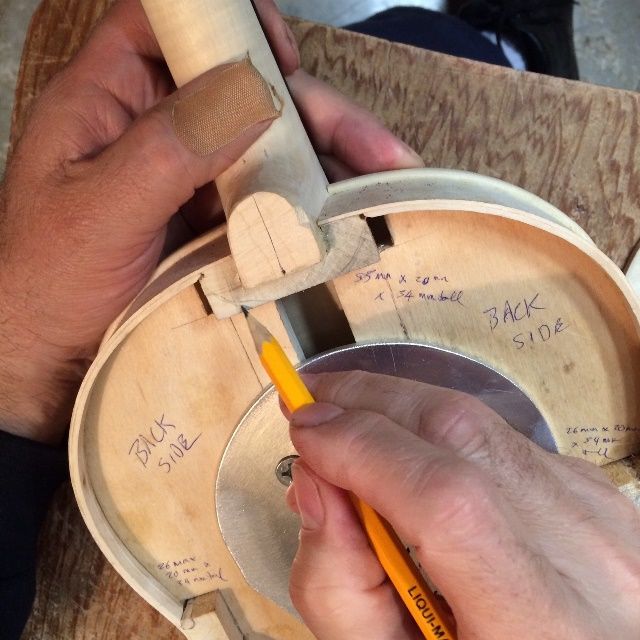
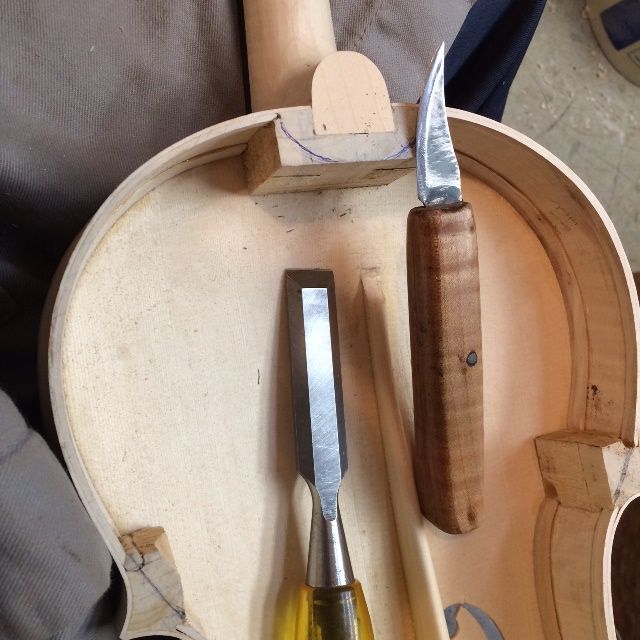
So I sketched in the planned shapes of the six blocks, trimmed the neck-heel flush, removed the mold, and then set about shaping the inside of the blocks and linings.
I used a knife and a chisel and a gouge to shape all of them, finishing with a scraper. The very first step was to sketch in the block shapes.
Sketching in the block shapes.
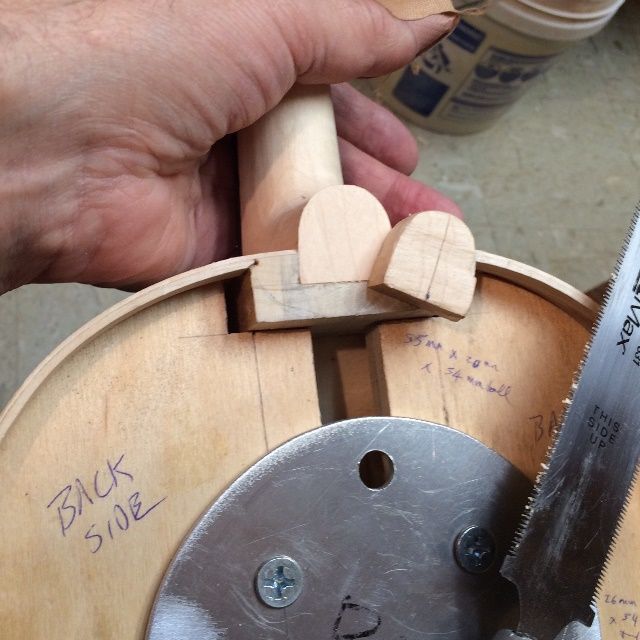
Then I cut the neck-heel off, flush with the neck block. I used a flush-cut saw for this step. It works well, but you have to watch carefully to make sure it is not wandering off the line.
Neck-heel cut off flush with the neck block.
Removing the Mold
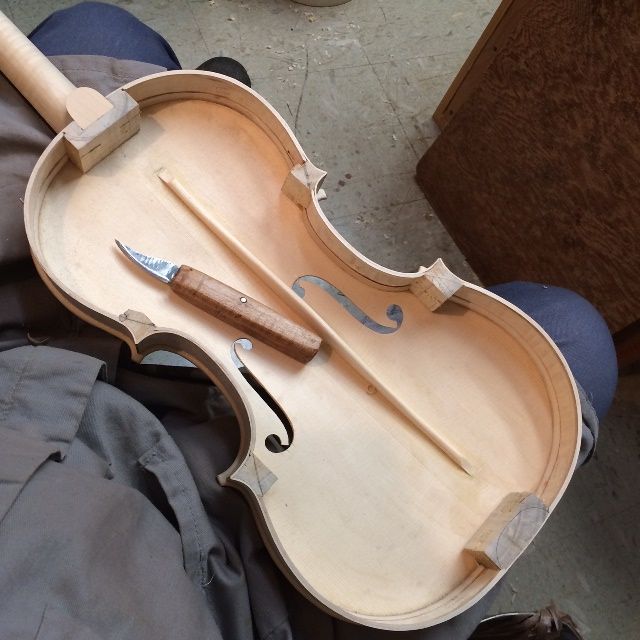
Then I leveled the back of the garland, using a sanding board, and I was pretty much ready to remove the mold. I popped the glue-lines loose from where the blocks were attached to the mold and lifted the mold out. It is a collapsible mold, so I removed the bolts and took the mold out in three pieces. That left me with a completed corpus, and a neck already set, but no mold. At this point the structure is extremely fragile: I have to be verycareful until the back plate is glued on, making the structure rigid and strong again.
Mold is out! Preparing to shape the blocks.
No mold means no support! Be very careful!
The next photo is from an earlier instrument, because I forgot to take a picture of the shaped blocks in this instrument:
The general shape of the finished blocks (earlier instrument.)
Closing the Corpus
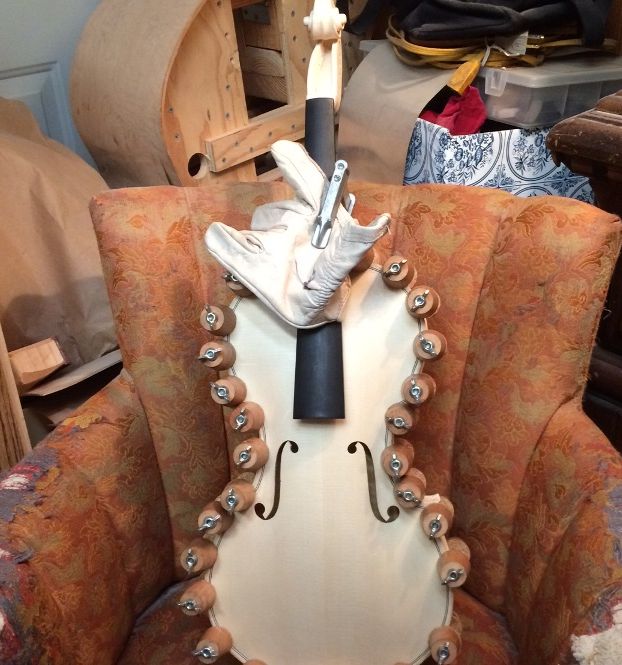
Then I installed the label, and dry-clamped the back plate to the corpus, using spool-clamps, checking carefully to see that my position was correct, and that the overhang was equal all the way around.
I then removed a few clamps at a time, and slipped hot hide glue into the joint, using a thin palette knife, and quickly replaced the clamps. When I had spool-clamps all around the perimeter, I added one last clamp, a padded C-clamp, to ensure that the joint between the neck heel and the back button was fully closed and tight. I used a glove to pad the neck, and clamped it securely.
Closed Corpus, with bass in the background. (Gotta get going on that double bass again!)
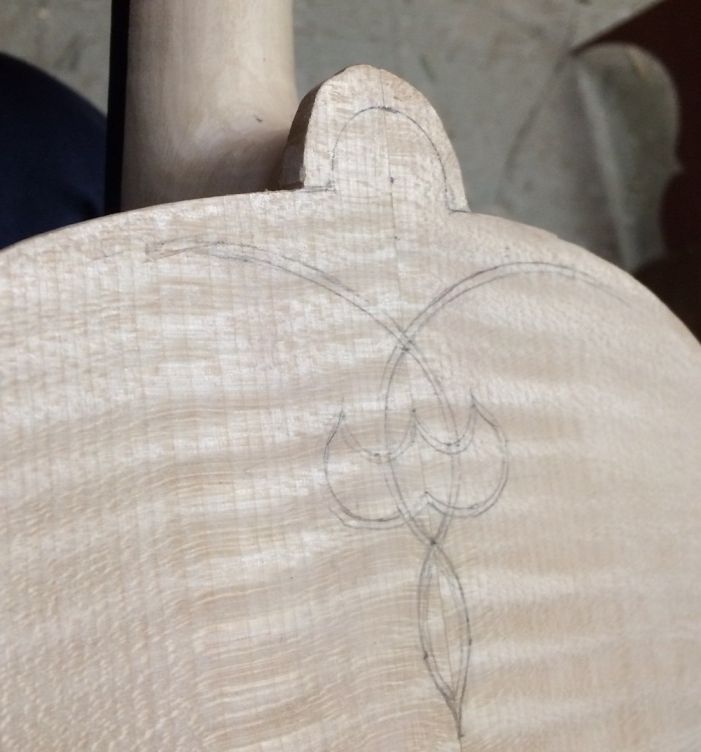
The next thing will be to trim the neck heel and back button together, as they are the key to the strength of the joint, and must hereafter function as one.
Neck-heel and back button awaiting final shaping. Planned purfling-weave sketched in.
But I will leave those steps for a later post…this one is already too long. (sorry…)
I would love to just say, “There! All Done!” but the fact is, I will always be able to see little things I wish I could change, and perhaps could not see until it was pretty much too late. That’s OK…it’s part of being a maker. I just have to know when it is time to say, “That’s as far as I am going!” and call it good.
Varnish
Last time, I shared how one of those decisions was how dark to make the varnish. I came to that decision about two coats past the last time I posted, so I allowed the varnish to harden for about a week, and then gave it a final once-over, and began the set-up procedures. Here is how it looked before I began set-up:
Final varnish front view.
Final Varnish, Back View.
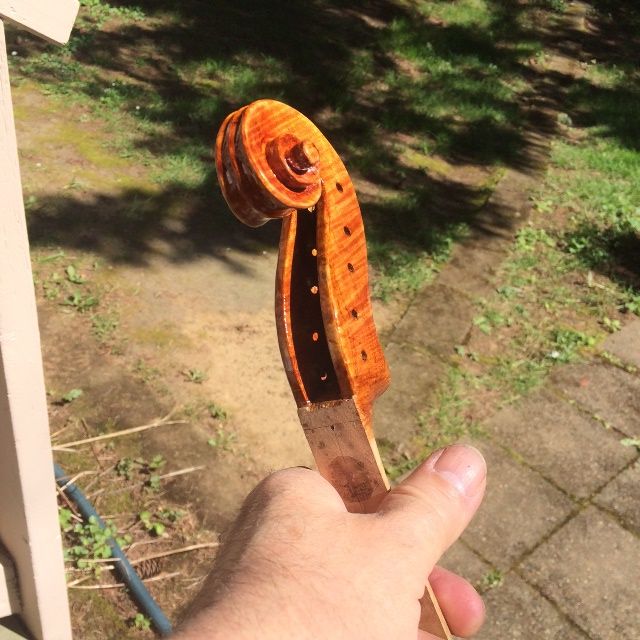
Final varnish, Scroll.
The varnish took several days to harden enough to work on set-up, and even when I thought it was ready, it still easily took fingerprints. 🙁 I guess I should have known. Anyhow, it means there will be some rubbing out to be done after set-up is complete, and the varnish is even harder.
Set-up
I did not take many photos during set-up. Set-up includes:
Re-installing the Fingerboard,
Installing the nut,
Installing the saddle,
Installing pegs,
Fitting the soundpost,
Fitting the bridge,
Installing the end-button,
Installing and adjusting the tailpiece and strings,
Installing the chinrest, and
Playing while adjusting for sound (balance, tone, etc.)
So, I had a fairly frustrating day, wherein it seemed nothing went right on the first try. It took me twice as long as it should have, but I got it done. I only took a few photos:
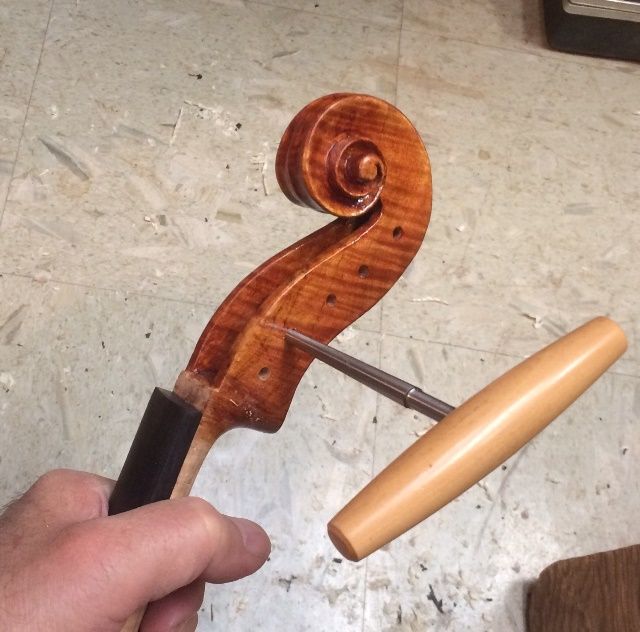
Fingerboard installed: Beginning to ream peg holes.
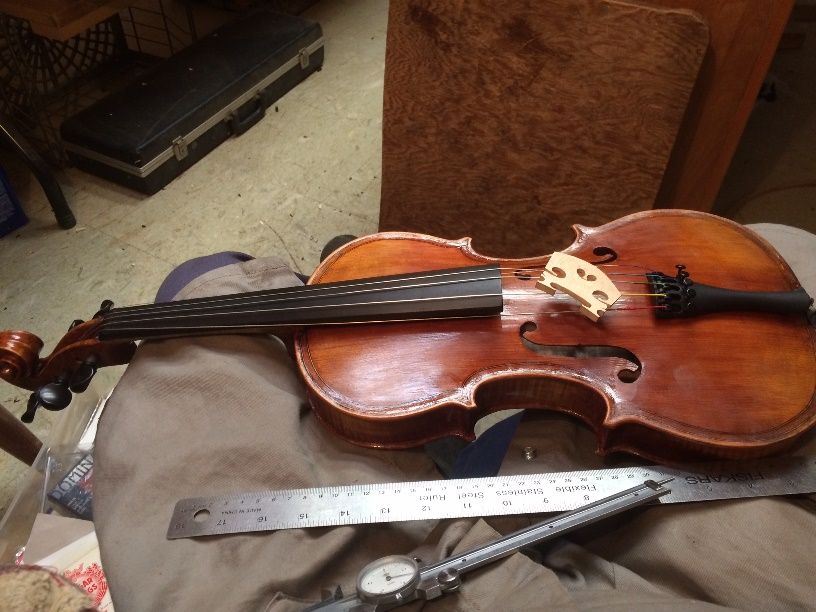
Pegs, nut, saddle, end-button and soundpost installed. Still working on the bridge.
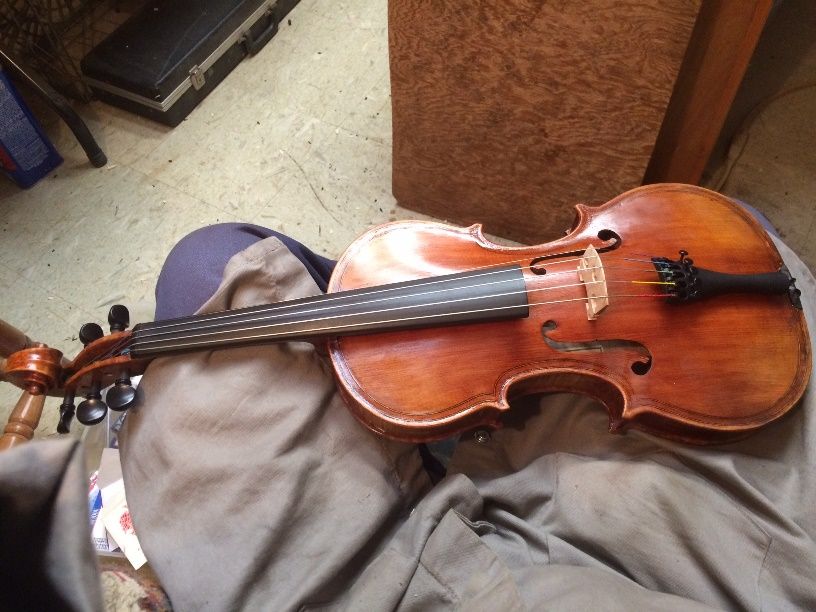
Almost done with set-up: chinrest and final adjustments remaining.
Sound
The 5-string 15″ viola had good sound from the first moment, but, as usual, it required some sound-post adjustment to achieve balance across all five strings. A sharp-eyed viewer also may notice all the mismatched strings; Jargar C, heavy Dominant G, D and A, and a regular Dominant E. I was unable to find the string sets I had bought recently (found them later), so, for the moment I simply used what I had, and adjusted accordingly. And, surprisingly, it sounded quite good.
It has a huge voice compared to my violin-size five-string fiddles, and except for the C, thebalance is very good. I adjusted the soundpost to bring the C-string into line, and it is much better, now. I am anxious to try an actual “set” of strings on it, to see what I can achieve in terms of balance and over-all tone.
Anyway, here is what it looked like immediately after full set-up:
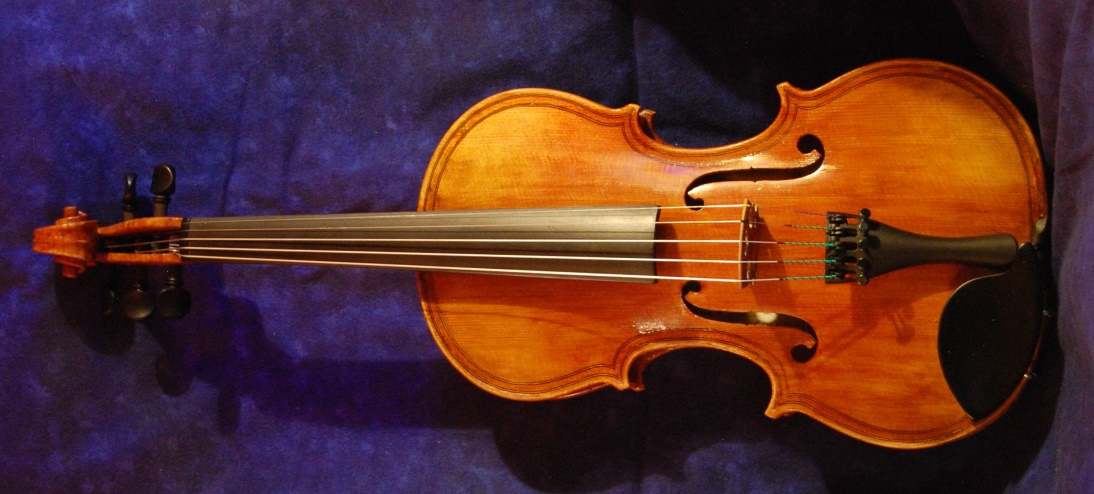
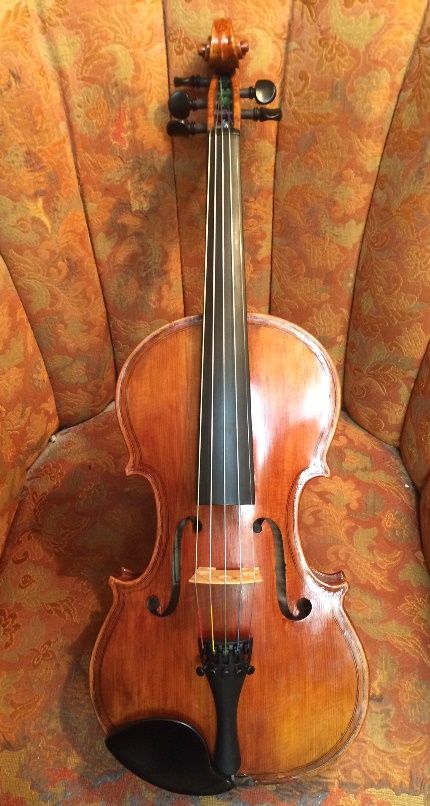
Front view of completed 15″ 5-string viola.
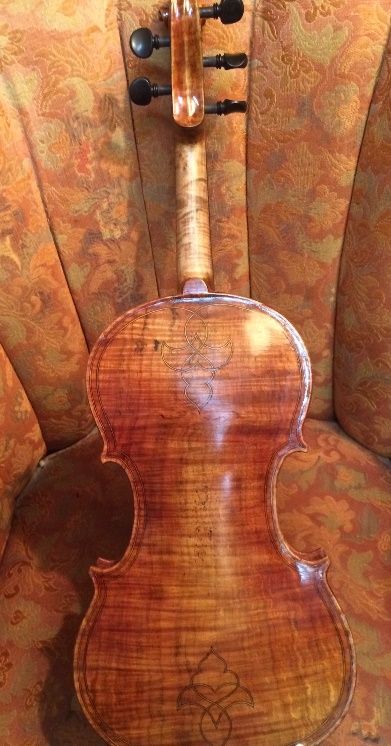
Back view of completed 15″ 5-string Viola.
It still will need a final rub-down, but for now, I am playing it and just letting it finish hardening.
This is the first large 5-string viola I have made. So far, most players have been quite firm about wanting the same scale length as a violin…and an instrument that will fit in their fiddle case. So that is what I have mostly made. But lately, there seems to have been an increased interest in five-string violas. Some were interested specifically in a smaller viola (hence the current, nearly completed 5-string 15″ Viola,) but more recently, there were two players who were really interested in a large 5-string viola. A 16-1/2″ Viola with a high E string.
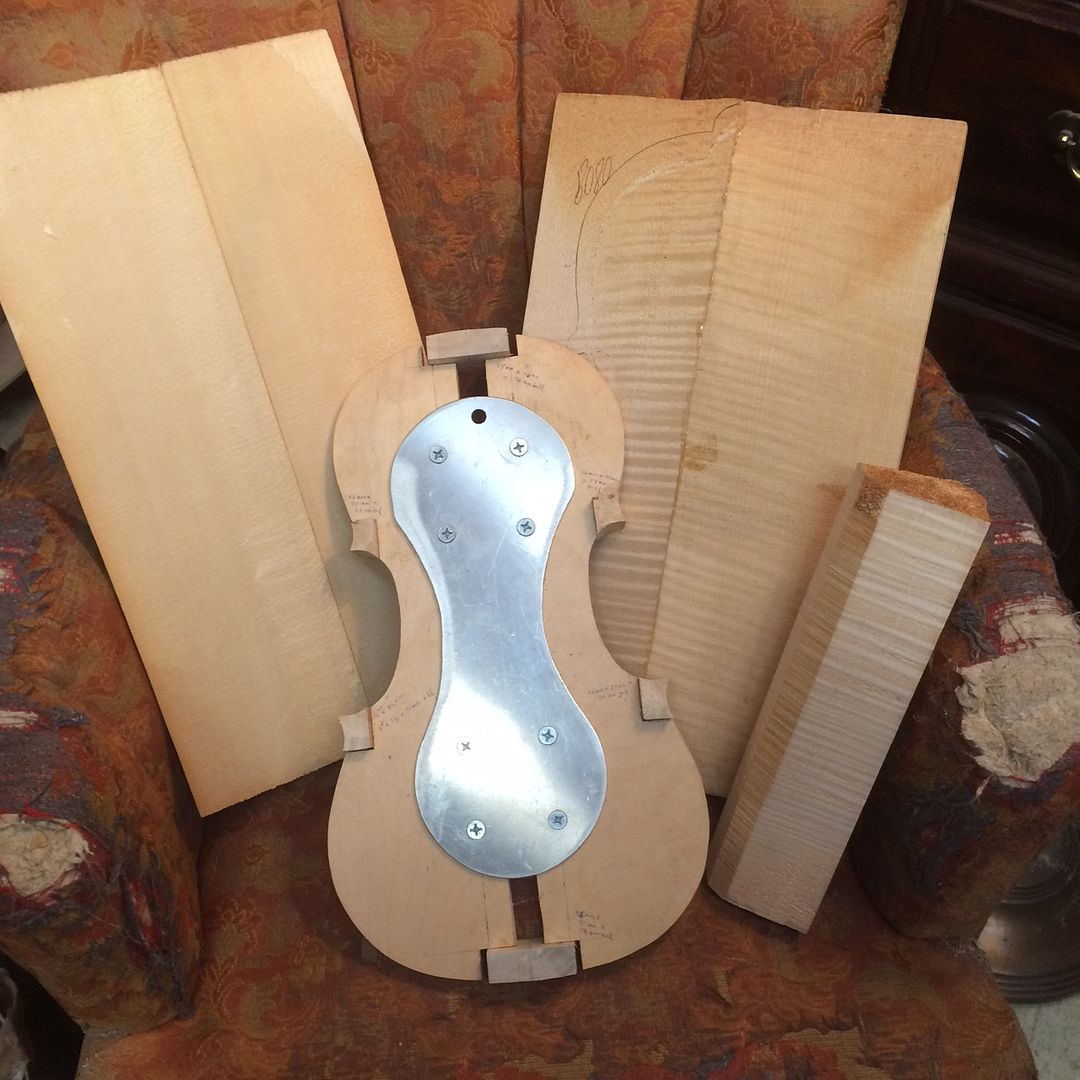
So… here we go! I already had European Maple and Spruce billets set aside from earlier “shopping trips,” and everything else that I needed to build a big viola. All I had to do was to finish the instruments already on the bench! They are now out of the way, except for completing the varnish and final set-up of the 15″ 5-string viola… so I am good to go. Here are most of the materials, with the plates already bookmatched.
Materials for new 5-string Viola.
Making, Bending and Installing Ribs
The blocks were already in the mold, and shaped. It was time to start working on ribs. I thinned the ribs to the proper thickness, using a fixture I made for my oscillating spindle sander (one of my few power-tools.) Then I bent each of them to the proper shape, using a hot bending iron.
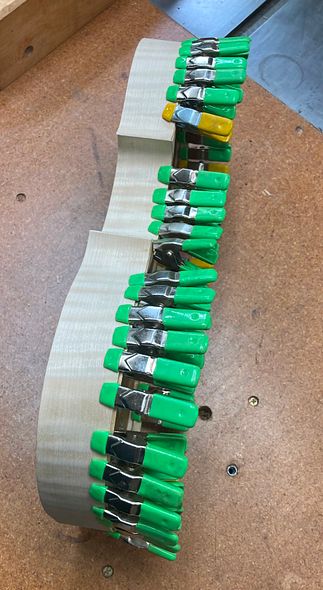
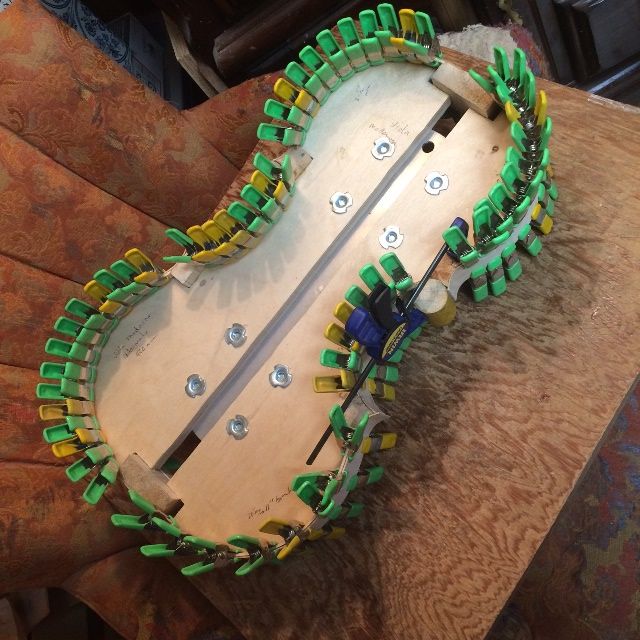
When I had all six ribs shaped, I installed the two center-bout (often called “C-bout”) ribs, and secured them with hot hide glue and clamps. You can see that clamping to a curved surface is not easy. I held the mold in a small vise, then secured each joint using hot hide glue, cylindrical wooden cauls, and f-style clamps.
Center ribs installed on 16-1/2″ five-string Viola.
When the glue holding the center-bout ribs was dry, I trimmed the ends of the ribs, using the spindle sander again, and installed the lower bout ribs. The joint at the center of the instrument, between the lower ribs, has to be pretty close to perfect, as it will always be visible and any discrepancies will be glaringly obvious under the varnish.
Center ribs trimmed to match the curvature of the blocks.
Lower ribs installed.
Finally, I installed the upper ribs. There is no joint between the upper ribs: in fact, they don’t even have to touch. The neck mortise will remove the middle section regardless of how good my joinery is, so I leave a gap there to allow for easy installation of the ribs. (Meaning, I only have to concern myself with how the ribs fit the corner blocks and that they cleanly follow the mold up to the neck block.)
Upper ribs installed.
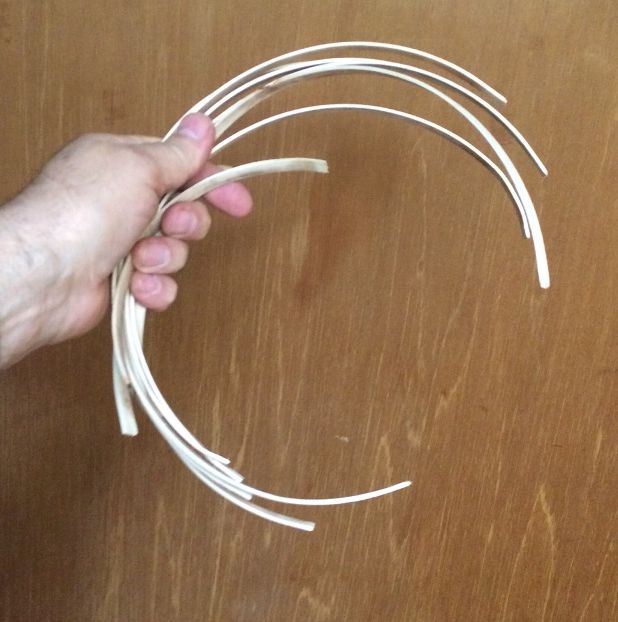
Making, Bending and Installing Linings
While I was bending ribs, and still had the iron hot, I went ahead and cut and bent a supply of linings. The linings, like the blocks, are made of willow, because I like the way it works. The linings serve to triple the gluing surface of the edges of the ribs, where they contact the plates, as well as strengthening the rib garland.
Linings bent and ready to install.
I made a small mortise at the juncture between each rib and each block (24 of them,) and then installed the linings dry, to make certain they fit correctly. Then, one-by-one, I removed each lining, applied hot hide glue to both the rib and the lining, and quickly reinstalled the lining and secured it with a series of small spring-clamps.
Linings with hot hide glue and spring clamps.
Tracing the Shape of the Plates
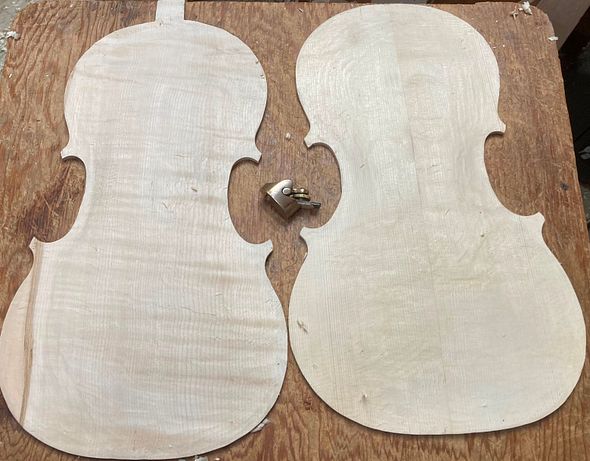
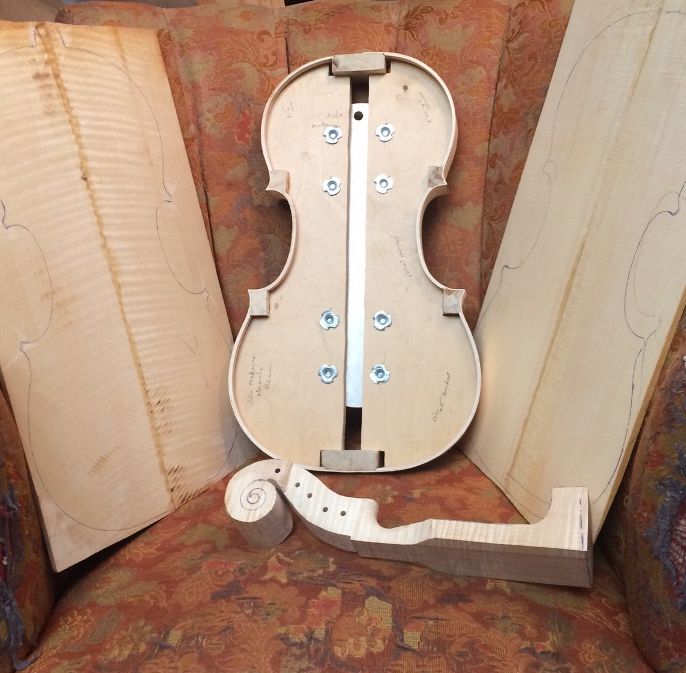
When the glue holding the linings was dry, I removed the clamps and used the spindle sander to trim the ends of the rib corners. I also leveled the front and back of the garland, so that I would be able to trace the shape of the plates. The European Maple back plate is on the left, and the European Spruce front plate is on the right. I used a small washer as a spacer, to establish the edge overhang, and a ball-point pen to trace the shapes. You can see that I have begun work on the neck, as well, which is also made of European Maple.
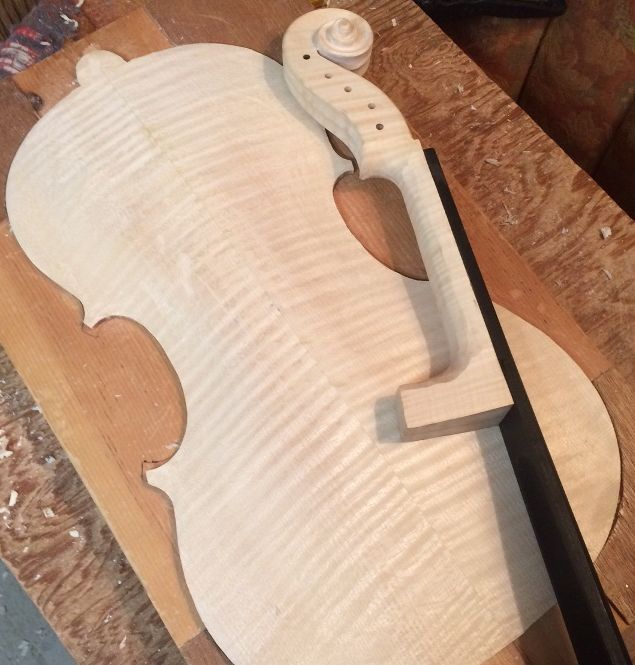
Completed garland, traced plate-shapes, and partially carved neck.
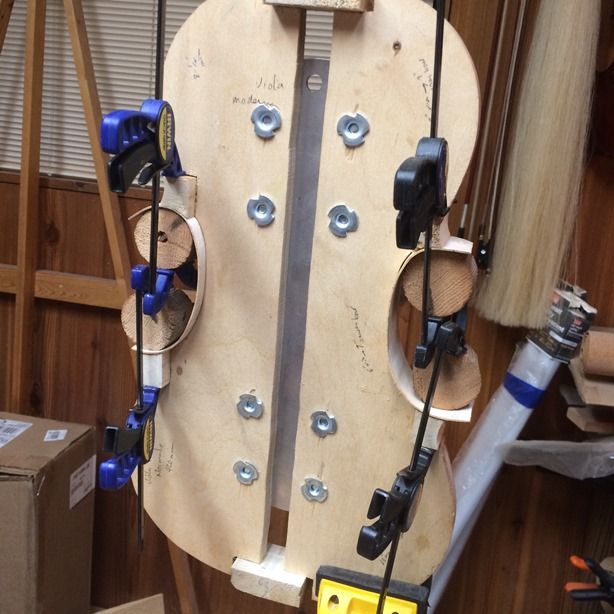
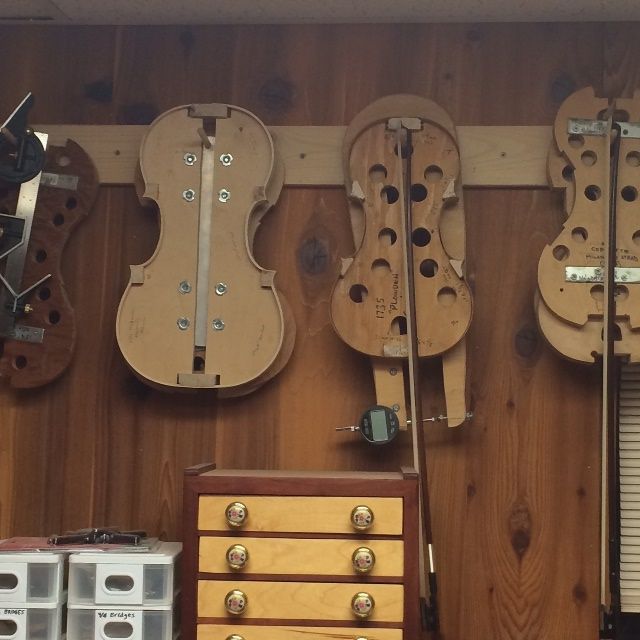
The garland is temporarily out of the focus of the work, now, so I hung it up, out of harm’s way, until I am ready to begin installing plates.
Rib garland completed and set aside for safe-keeping.
The next step is to actually cut out the plates and begin shaping them into the voice of a Viola. I will let that wait until a later post.
When I last posted, I had completed the carving of both plates and the garland, but had not begun assembling the corpus.
Bass-Bar
The next step was to install the bass bar. The bass bar is the only fixed, interior brace in violins, violas or cellos. Flatback basses do have some other bracing, but they are a different “branch of the family,” so to speak. All members of the violin family have a bass bar– a spruce brace, which runs “north-south” at a slight angle, nearly parallel to the centerline of the front plate of the instrument, and just inboard of the bass-side f-hole, so that it supports the bass-side foot of the bridge. In a five-string instrument, this becomes an even more critical part as the instrument has a broader range and has to have good support on the bass side, as well as the ability to sing in the higher registers.
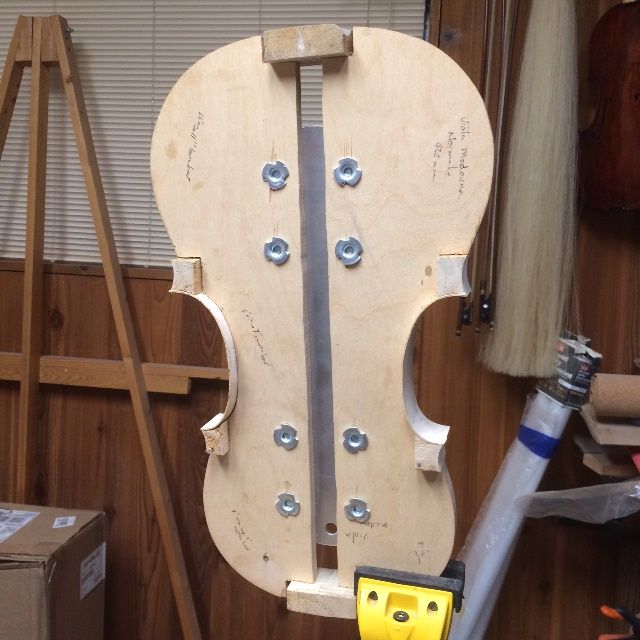
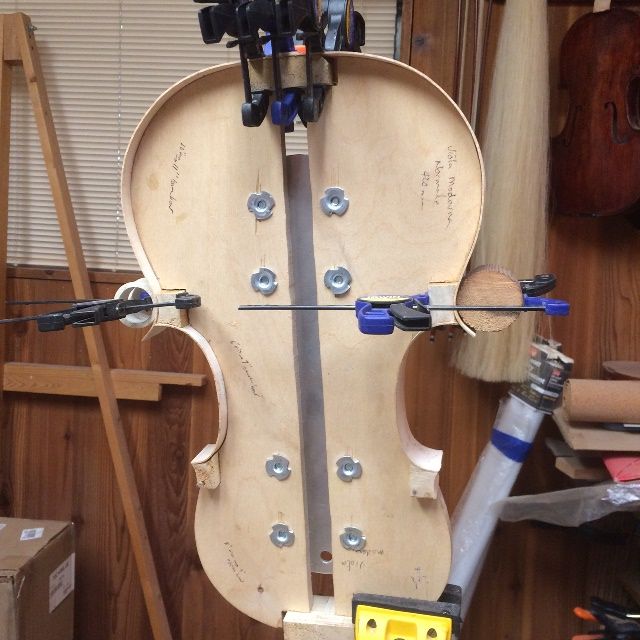
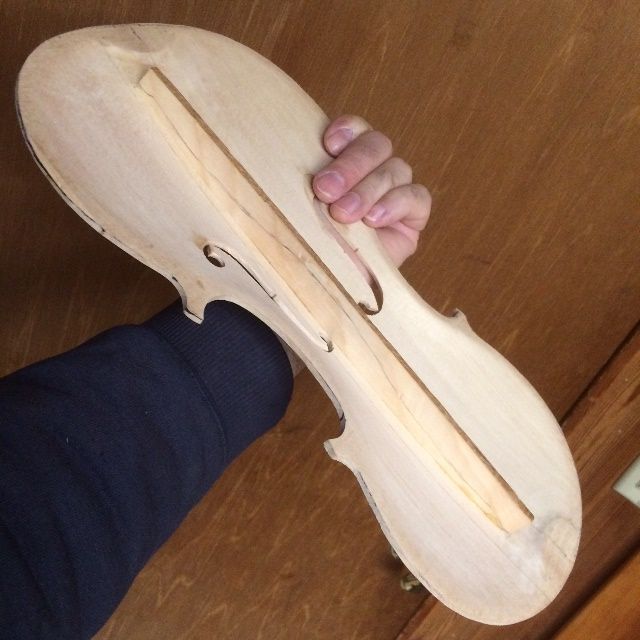
I first carve the bass bar bottom to exactly fit the inside curve of the front plate, along the correct location, and at the correct angle, then glue and clamp it in place, using hot hide glue and special clamps, padded with cork, so as not to damage the soft spruce of the front plate.
Fitted, glued and clamped bass-bar. Still needs to be shaped.
Proposed general profile of the bass-bar.
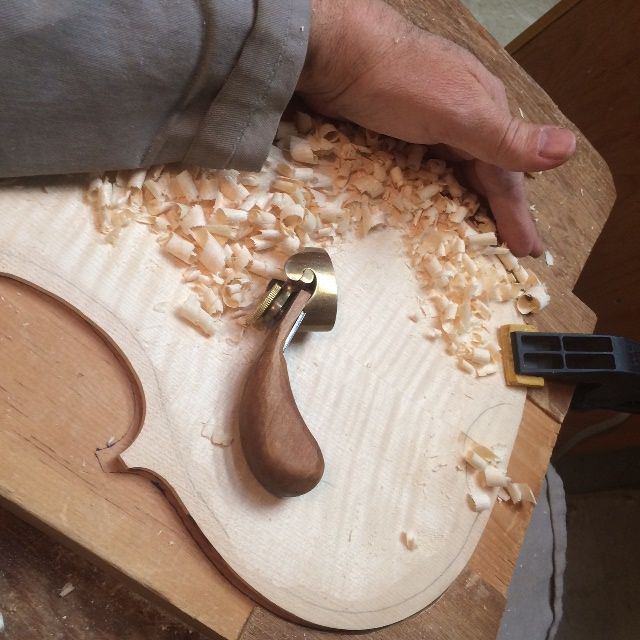
Shaping the bass-bar, using a finger-plane.
Completed shape of finished bass-bar.
Five-string viola corpus assembly:
Now the plates are ready to be installed. Before doing so, I used a small finger plane and half-round files to shape the edge all the way around on the inner face of each plate, hoping to avoid having to shape it after installation. (I am aware that sometimes adjustments have to be made, so I may have to do some tight-clearance work later on, in spite of this precaution. That’s OK.)
The next step was to install the back plate. This is an older-model mold, or “form,” (my first, in fact, as I mentioned in an earlier post) so it has some peculiarities, compared to my newer ones: it is a two-part mold, made to collapse, thus easing removal of the mold after installing the first plate. But in later iterations, I moved toward installing the front plate first, and installing the neck before removing the mold.
In this model, originally, I had planned to install the back plate, then remove the mold, and finally install the front plate, after which I could install the neck whenever I was ready to do so. Nowadays I personally find it easier, however, to install the neck before the back plate is in place, because I don’t have to concern myself with the back side of the heel aligning with the back plate button. (Annnd, it would have been a simple matter of planning, to still do that with this mold, if I had been thinking ahead: just label the front side of the mold as being the side without the screws (which have to be accessible) and you can install the front plate first, then remove the mold after installing the neck; no problem.) However…I wasn’t thinking ahead, and I used the mold exactly as I had originally designed it, so I have no choice, now: I am forced to install the back plate first, remove the mold and then (after shaping the blocks and linings and cleaning the interior of the corpus) install the front plate. So that is what I did. (By the way, in case you are thinking that the shape of the front and back plates are mirror-image of one another, the fact is, they virtually never are exactly mirrored, and are nearly never bilaterally symmetrical even if they were. So the front plate will not fit the back of the mold, and vice-versa.) Ah, well…hindsight, etc.
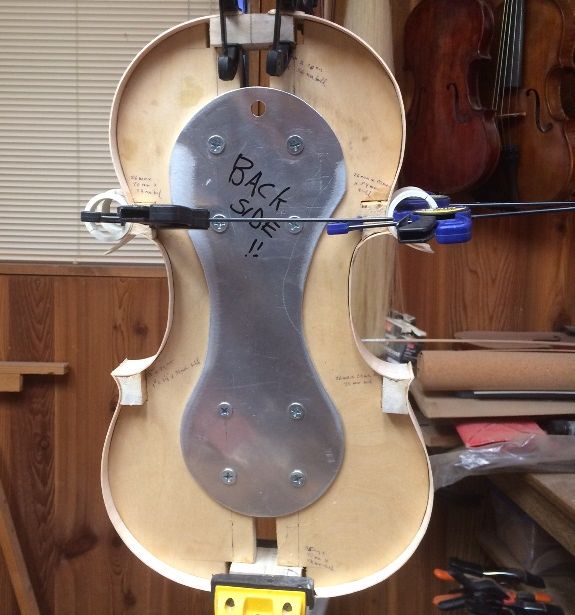
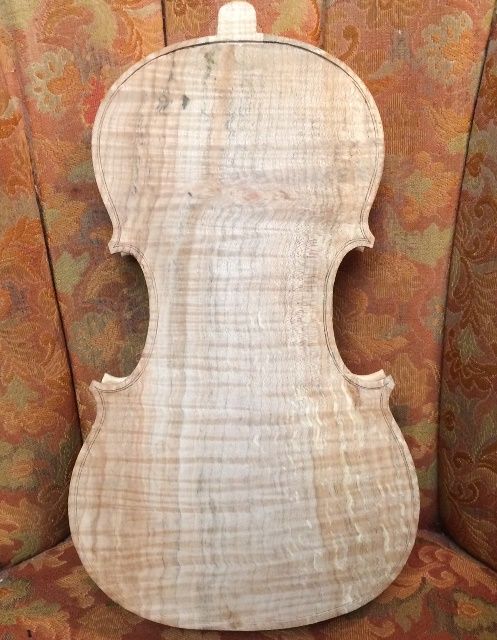
Here is the back plate, glued in place: the mold is still inside, holding everything rigid. Notice the spalting and curl in the maple back. This is a striking look, and some people love it…others do not.
Back plate glued and clamped in place on the garland.
After the back plate glue was dry, I removed the mold, shaped the interior blocks and linings, and cleaned up the interior of the corpus, so that it was ready for the front plate to be installed. I also installed the signed and numbered label, marking this as one of my handmade instruments.
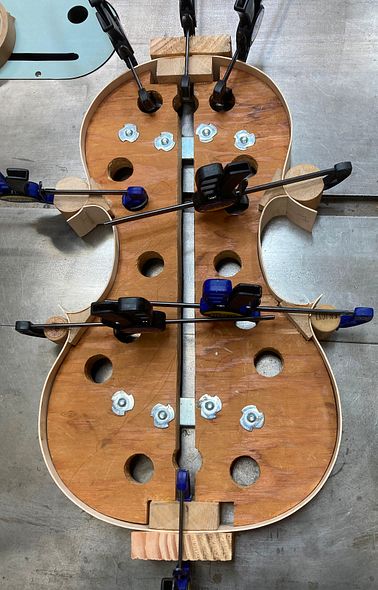
Then I clamped the front plate in place, dry, just as I had done with the back plate, removed a few clamps at a time, and used a thin palette-knife to insert hot hide glue between the plate and the blocks and linings. As soon as I had the glue in place, I quickly replaced whatever clamps I had removed, before the glue could gel.
Once the plate was glued and clamped all the way around, I went back around with a blade, and picked out any gelled, cooled hide-glue that had squeezed out of the joint, so as not to have to deal with it later, in the form of hard, jagged chunks of dry hide glue. Then I tightened the clamps a little, and brushed hot water all around the joint, so as to reconstitute any glue that had gelled too soon, and allow the joint to close even more tightly.
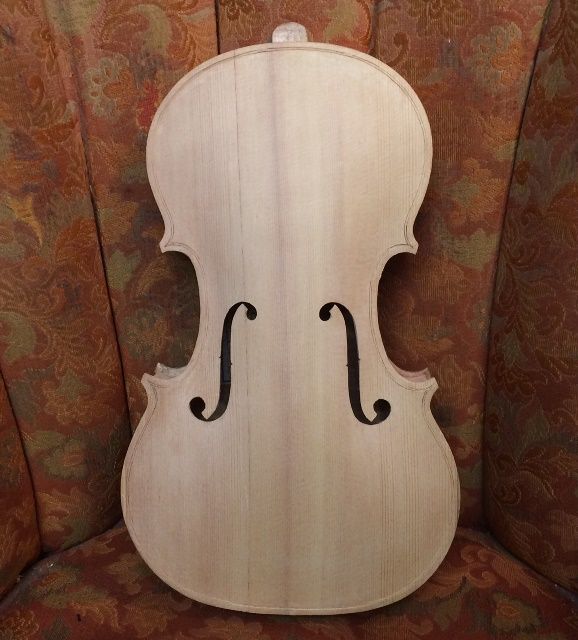
Here is the corpus, all glued together. The next step will be to adjust the overhangs as needed, and lay out the corners so as to begin purfling.
Front plate showing: Corpus assembled, glued and clamped.
Beginning Purfling the Five-string viola:
I used to do my purfling before closing the corpus, but I frequently discovered that the rib garland had moved a little, during the removal of the mold…or in some other way, things had changed, and then my plates no longer fit the garland, and I could not change the plates, because I had already installed the purfling…which locks in the shape of the plates, irrevocably (sigh…). So, I began waiting until after the corpus is closed and whatever needed overhang adjustments have been made, and then begin purfling.
I use a two-blade purfling marker to sketch in the location of the twin, parallel cuts needed to make the purfling slot, but I have to sketch the corners in by hand, with a pencil, because the purfling marker will not correctly lay out the corners.
I went ahead and began both the front and the back plates, but got too tired to complete them last night. (Today was spent getting last-minute things done, as we have heard they are mandating that all Oregonians stay at home, due to the coronavirus scare. Went and bought flour and other groceries, filled the car with gas, and got the snow-tires removed, as that deadline is soon upon us as well.)
One thing about the maple and spruce plates: the spruce is very soft, compared to the maple, but it is tricky to carve, because of that. The winter grains (reeds, they are called) are so much harder than the summer reeds, that the blade has a definite tendency to swerve and follow the grain instead of the line you are trying to follow. The maple is much tougher to cut, because it is hard all over, but it is much easier to follow your lines without digressing.
So, here is what the little viola looks like, today:
Back purfling-slot begun: the dark strip at the top is the only area where I already picked out the slot.
Front purfling-slot begun: none of the slot has been picked out.
In both cases, the plan is to cut the two incisions, pick out the wood between them, and then dry-fit the purfling strips, before removing them one-by-one and gluing them in place with hot hide glue.
That will be the next post, unless I take a break and carve the scroll. Either way, it is starting to look like a fiddle!
I began this instrument as an experiment, in 2010, but did not complete it. In fact, the only reason I know when I began it is that I wrote the date on the mold when I made it. It was intended to be a 14″ Viola with a very wide lower bout.
The wood for the neck, sides and the one-piece back is plain-sawn, Big-leaf maple with a two-piece Sitka spruce top plate. The workmanship is not as good as I try to produce today, so I might have simply discarded it, but, (I reasoned with myself) “it is just an experiment, to see what happens if you add a lot of width in the lower bouts.” If it turns out to work well, I will still have the mold and can simply make better, more professional examples of the same model.
What about a five-string Experiment?
So, back in September of 2019, it occurred to me that really I needed more 5-string fiddles on my website (especially violas), and that, if it worked, this was one I could complete more quickly…so I jumped back on it!
It still needs a good rubdown, a soundpost adjustment, and some play-in time, but today it is playing, and it sounds and looks OK, for what it is.
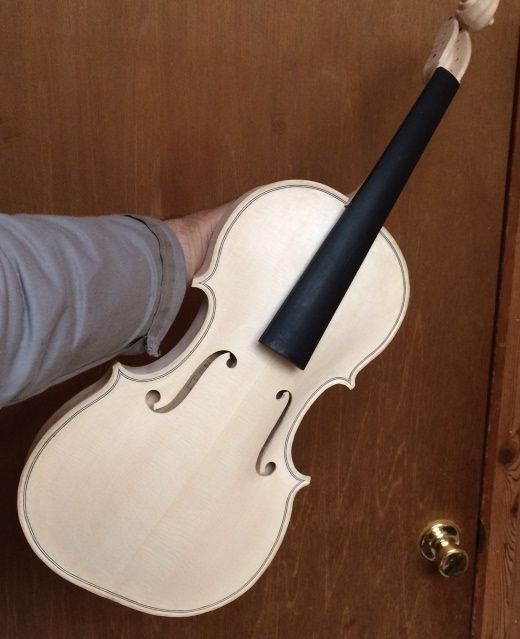
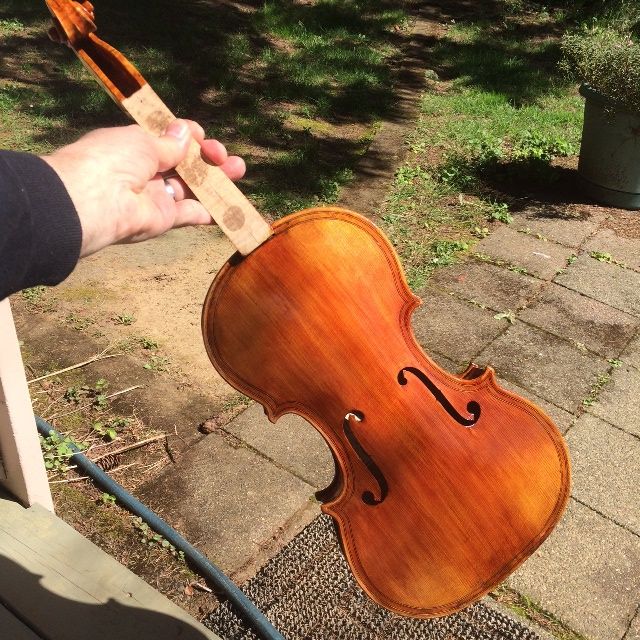
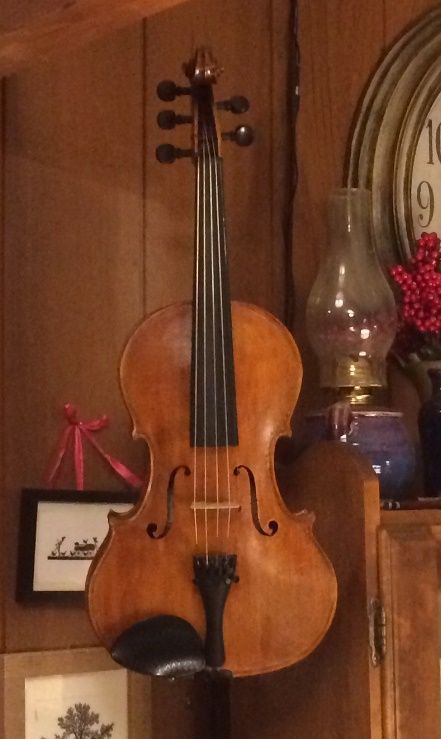
Front view of 14″ Five String Viola with wide lower bouts.
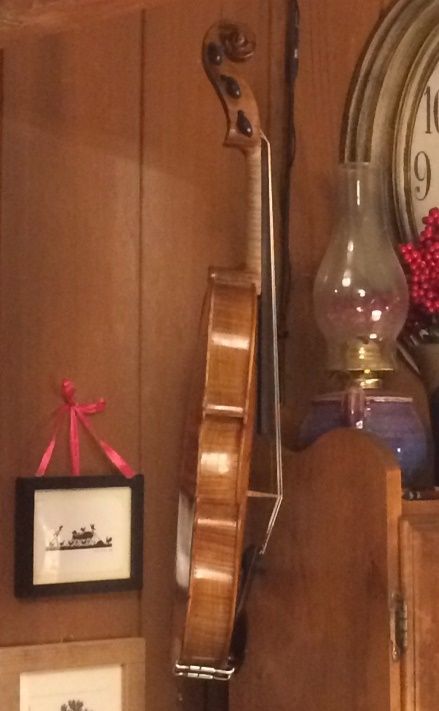
Not a great photo, but here is the side view.
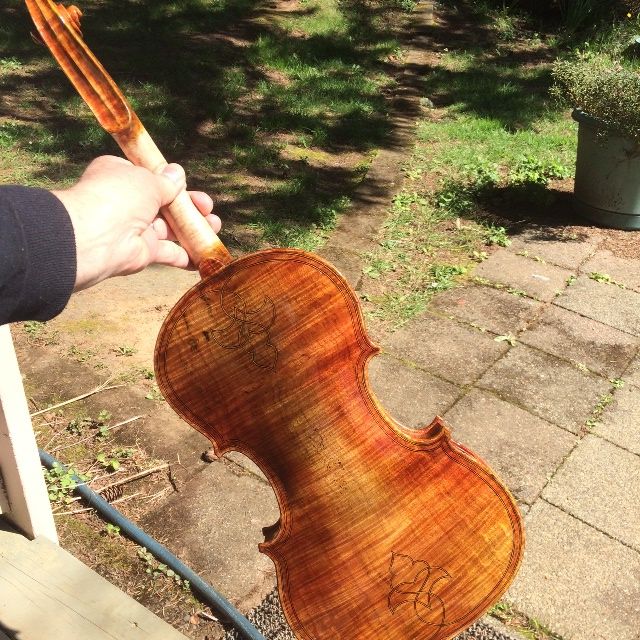
Back view of 14″ five-string viola with wide lower bouts.
The voice is still a little too soft for what I want, but that could be the fact that the varnish is still pretty soft, too; and also, the soundpost is pretty tight (which I know will need to change, but I also recognize that there is a tendency for the arching to relax a little and for the soundpost to be looser, after some time with strings on. Longitudinal compression of the top plate tends to try to shorten the top, resulting in a change in how the soundpost fits.)
All that to say, I am reticent to just jump in and trim the post, when it may actually need the extra length, in a few weeks, and with the varnish hardening off, and the playing-in beginning to take hold, I want to take my time about making changes.
The sound is (mostly) balanced across all five strings, but the C-string could use a little more focus. Probably adjusting the soundpost and giving the varnish more time to harden will take care of all those issues.
Finally, because the repetitive tensioning and relaxing of the tuning is hard on strings, I have deliberately used an older set of strings for the set-up and trial period, so as not to sacrifice a brand-new set in what I know will shorten the life of the strings.
So! There it hangs in the dining room, where it will be warm, and we will see what the next week or so brings.