Gotta have a stand for the bass…can’t let it just lie around the house.
Heavy base-plate adds stability for the five-string double bass.
Nearly 4″ thick particle-board base-plate lowers the center of mass.
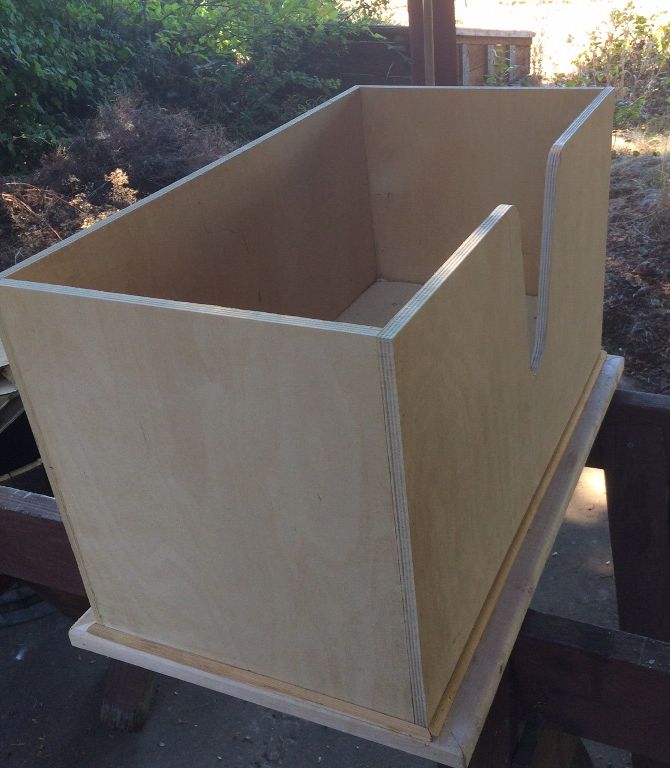
Exterior of 1/2″ birch plywood for strength and beauty. Ready for varnish
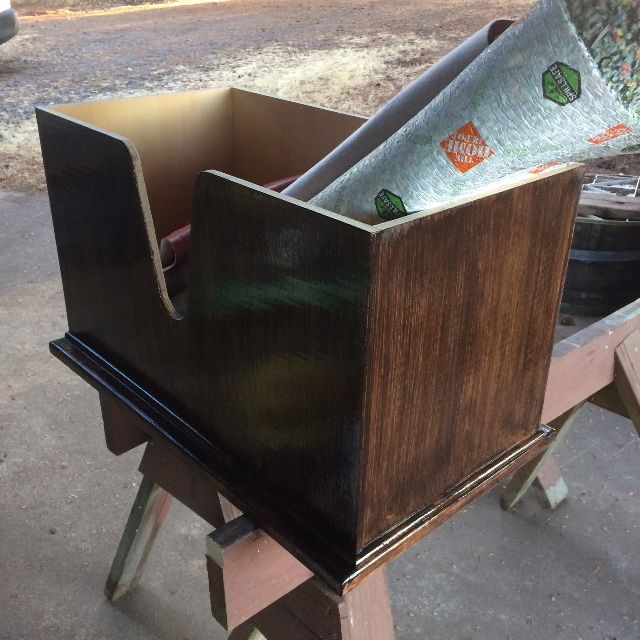
Varnish complete: ready for upholstery.
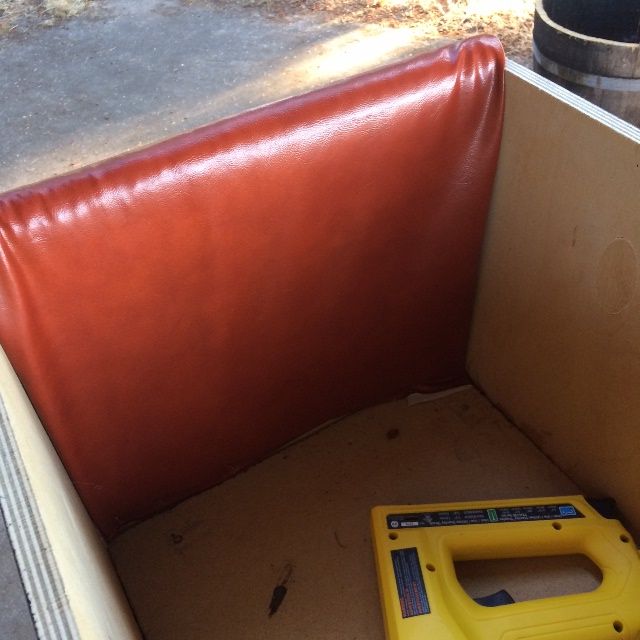
Carpet padding with vinyl upholstery.
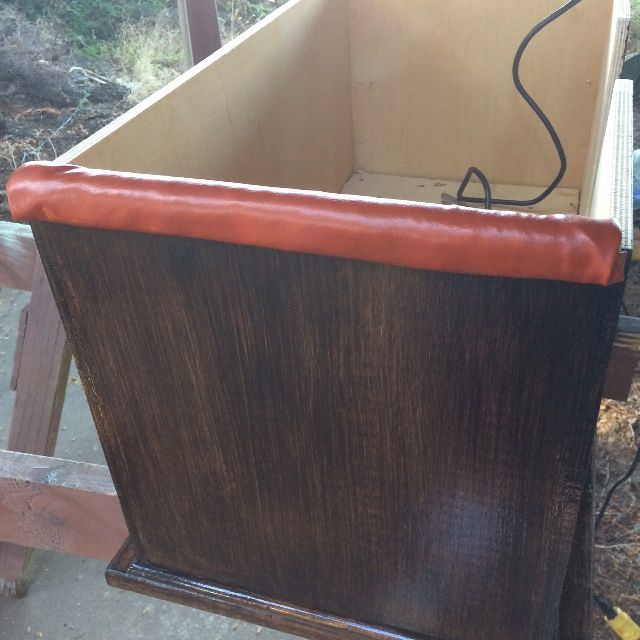
Upholstery begun…outside view.
Inside view.
Upholstery completed.
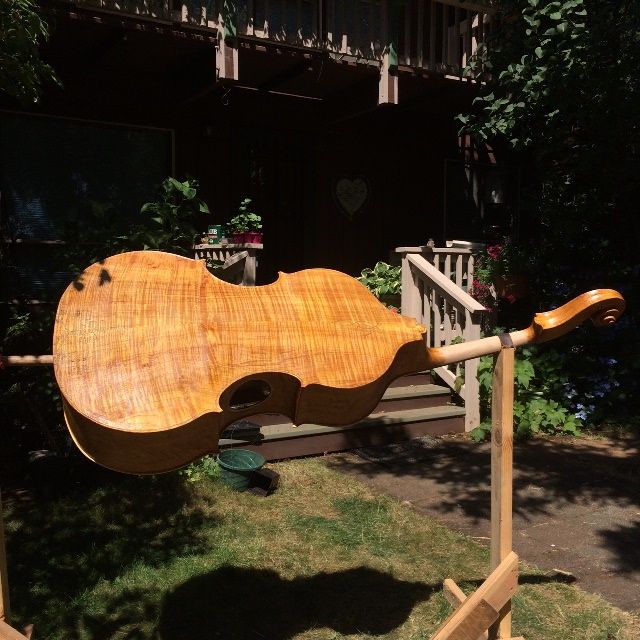
Bass stand with the bass, secure against tipping.
Looking good! Safe, too!
Travel Case Coming!
The next project has got to be a travel case for this bass. A “Travel-bass” with a removable neck is less than optimal without a case in which to travel. And such cases don’t seem to be readily available for reasonable prices.
So, it is back to the drawing-board for me. 🙂
Probably looking at a foam-core fiberglass case. Shouldn’t be too much harder than building a boat. 🙂
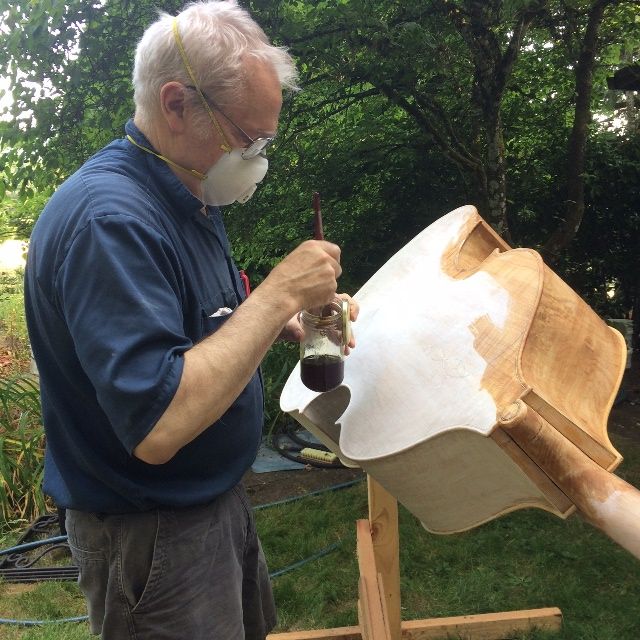
I begin with yellow varnish for a base coat at least…sometimes two or three coats to get it even all over, as some areas soak it up rapidly, and look “dry”. though they have the same amount of varnish.
After the base coat is dry, I rub it down with fine sandpaper, just to remove any bits that stick up–whether dust, debris, wood fibers that raised up earlier…whatever is sticking up needs to be flattened, or there will be a “cone” of varnish growing around it with each coat.
if I am going to do any “wear” or “antiquing,” I need to begin thinking of it now. It will affect how much color I apply to what areas, as well as whether I intend to add “dirt” in wear areas.
If I have induced the type of wear that involves “scratched areas” or “dents”, I apply them now, and rub dark pigment into those discontinuities, to imitate dirt in old scratches on old instruments. Then I rub off any excess pigment, so that the dark color only remains in the low areas of the “distress.” This would also be when I apply “dirt” in wear areas, where grain is raised and where a player’s clothes or hands would typically wear off the original varnish.
Next I begin applying darker colored varnish in the areas where least wear would occur (Or, of course, if no “antiquing” is planned, I apply the darker varnishes over the entire instrument except the “handle” area of the neck, which is left bare until the very end. I sand between coats, using 400-grit paper.
As the color builds, I have to watch, and make a decision as to when to stop: I do not want the grain to be obscured, but I do want enough varnish thickness to provide a moisture barrier against sweat, etc.
When I finally decide (usually after six or more coats) that the color is acceptable, I give it two more coats of clear varnish, to deepen the sheen and to protect the colored varnish from damage.
Finally, with the varnish complete, I allow it to dry thoroughly, then I can begin final fitting and set-up.
So, since we are effectively at step “zero”, and the last time you saw the instrument it had only the rosin sealer coat applied,
Back with sealer complete.
The first thing was to wash down the sealer coat with alcohol to remove any excess rosin from the surface. I wanted the rosin in the wood, not “on” it. Then I applied a full coat of yellow varnish. The result is always a little disconcerting, as it is veryyellow after that first coat. But the yellow mellows and calms down under the subsequent coats of colored varnish, and becomes the “inner glow” that shows through the darker varnish.
At any rate, here are several pictures of the yellow varnish:
The yellow base coat: front view.
Side view yellow base coat.
Back view of the yellow base coat.
End view of yellow base coat.
And, that is pretty much what the base coat looks like. Step one is complete!
I chose to add a second coat of yellow to the sides, back and neck, but began adding color to the front, in order to balance the front color with the rest of the instrument.
Here is the first color coat for the front plate. It reduces the glaring yellow quite a bit.
Second yellow coat for sides and back plate. They are beginning to balance, I think!
New Fingerboard
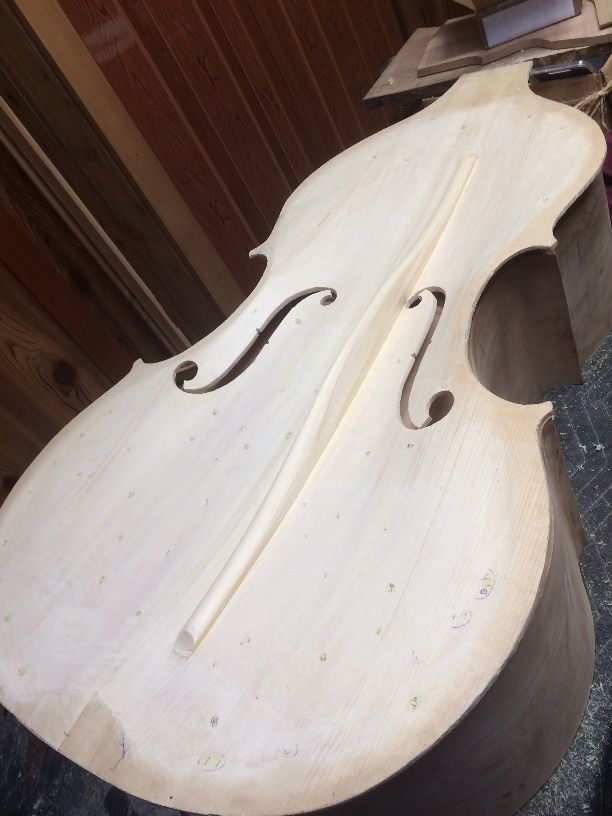
About this time, a friend in Australia, who is a great bass maker, contacted me to point out very kindly that I had made my fingerboard too flat for a five-string bass. (Well, rats!) So I had to make a new fingerboard with the correct radius for playing a five-string double bass with a bow.
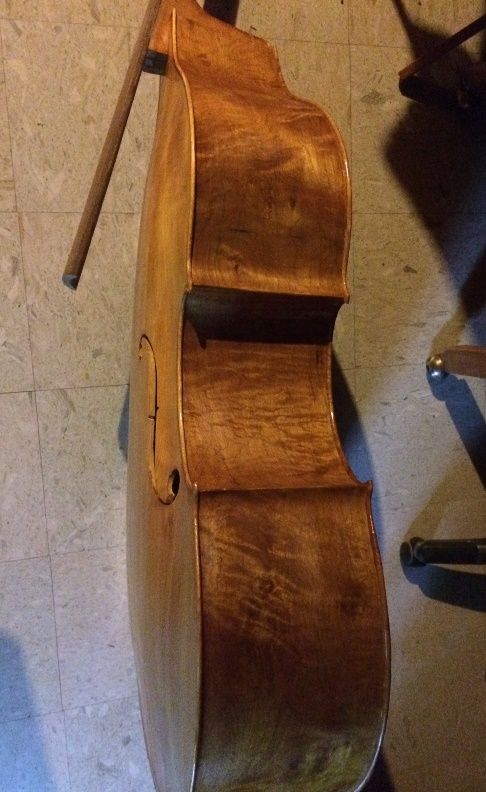
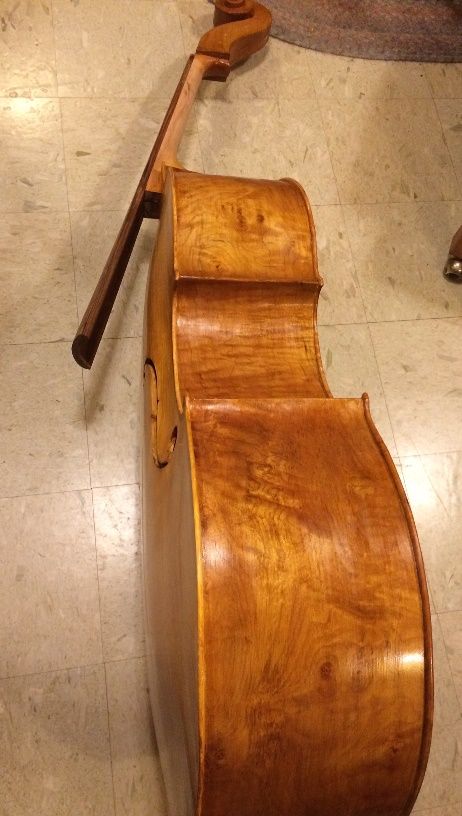
Here is the side view with the old fingerboard:
Side view of the bass with the excessively flat fingerboard.
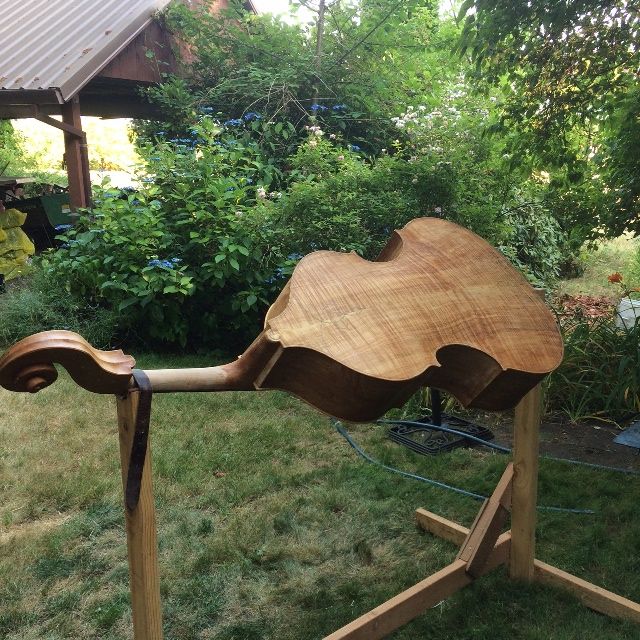
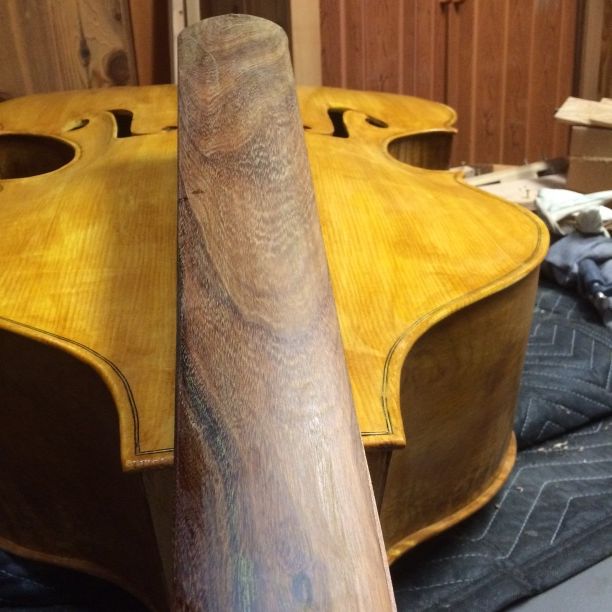
And here it is with the new one!
Side view of the new fingerboard.
End view of the new fingerboard.
Without that tighter radius, it would have been next to impossible to avoid playing two strings at once. I am very grateful that my friend alerted me to my error before I had completed the bass. Not being a player opens me up to some “sins of ignorance” that a player would notice immediately. He had also pointed out that I had made the upper end of the Fingerboard unnecessarily wide, so the new one is narrower…but that meant re-carving the neck to match the new board.
New fingerboard before re-carving the neck. (You can see the edge of the neck.)
The neck feels better to my hand, now that it is narrower and a little thinner.
Endpin Assembly
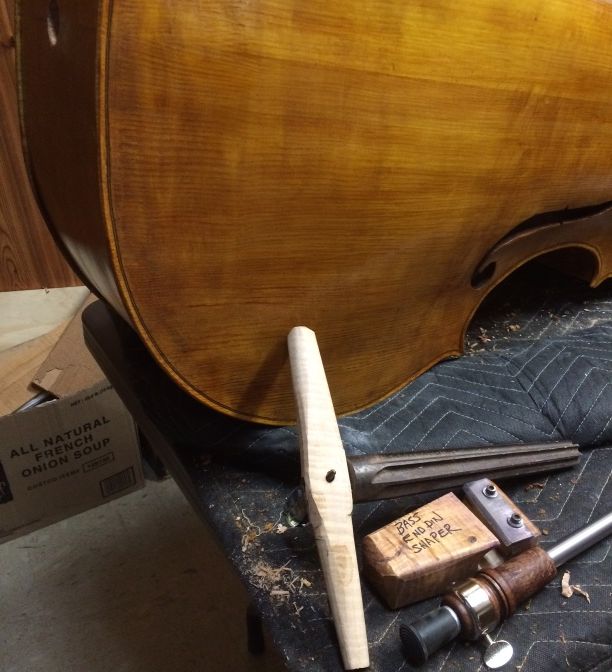
I decided to go ahead and fit the endpin assembly as well, before pressing on with final color coats. I had a double bass reamer made for me by a friend, about 2006, and I made a shaper for myself about that same time. In both cases, the occasion was the building of my first double bass.
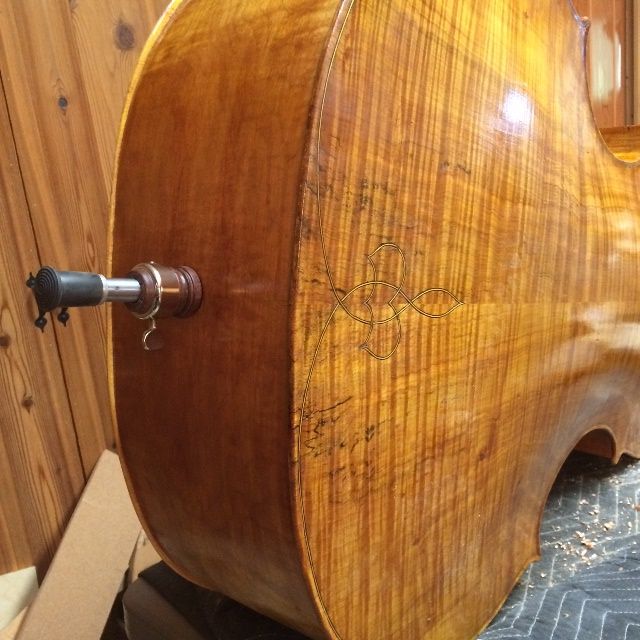
I had hoped to make an Ipé endpin plug, to match the rest of the fittings, but since I wasn’t sure either that I was able to do so, or that I would have time, I went ahead and purchased an endpin assembly with a plug made of Indian Rosewood, and it turned out that the color was so similar that I gave up the idea of hand-turning one of Ipé wood.
Double Bass with endpin, reamer and shaper.
Double Bass with endpin assembly installed.
Final Color Coats
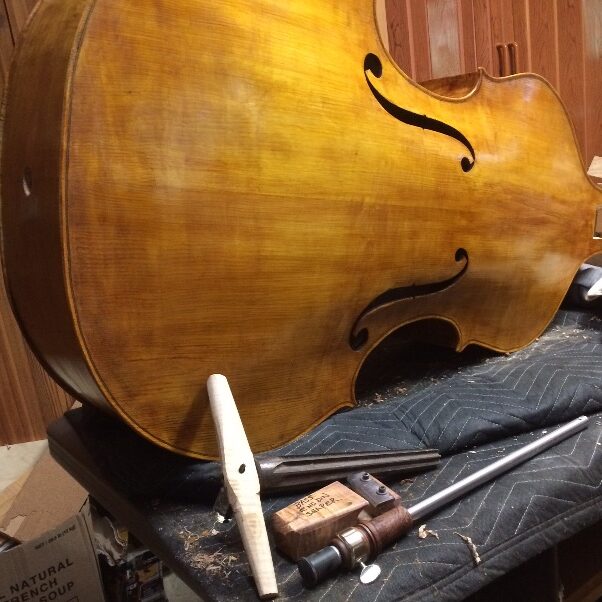
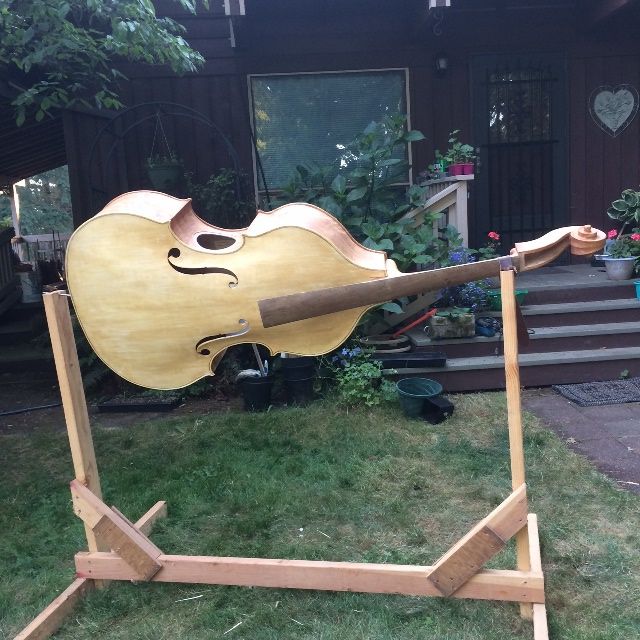
Then I sanded down the whole bass, and re-touched the whole bass, adding color in areas that I felt were too light, and filling in places where the previous coats had not been thick enough. when that was dry, I gave a second color-coat to the entire bass. This will be the final color coat, though I intend to add at least one clear coat, and probably two. The clear coats deepen the sheen of the varnish and make it look more transparent. while actually adding very little to the thickness of the varnish film. They also protect the color coats against premature wear.
Final color coat.
I really like the deep amber color that is developing in the bass. The clear coats will accentuate it, but not make it much darker.
Wet down the wood,to raise the grain and accentuate “problem” areas
I wetted the whole bass down with coffee, mainly to raise the grain a bit, but partly to add a little color to the white wood of the Sitka spruce belly. The Oregon Big Leaf Maple is already pretty colorful.
Back plate, wetted with coffee.
Then I turned the lights off in the workshop and went over the whole bass, inch by inch, with a small flashlight, held at a low angle, to make shadows wherever there was a discontinuity in the surface. As I located them, I scraped or sanded away the problems, before moving on. It took quite a while, but I was pretty happy with the outcome.
Mineral Ground
The next step is to coat the wood with a mineral ground: a suspension of extremely fine particles of gypsum in water is what I use. I brush it on, one section at a time, rub it in vigorously, to get the tiny particles into the pores of the wood; then rub off any excess, with a rag. It always looks as though I took all of it back off, until it dries.
Mineral ground in progress; sides nearly dry; back only begun.
Mineral ground continuing: Back is 2/3 complete, and beginning to dry.,
Mineral ground complete on back and sides of bass. Drying rapidly.
After the ground is fully dry, I sand all over with fine abrasive, to remove any dry patches of excess mineral. There will be very small discontinuities that have been filled by the mineral ground: this is desirable, and I am not trying to remove those places.
When the ground dries, the bass will be stark white, but when I apply the sealer, to lock the mineral particles in place, the mineral ground becomes completely transparent, permanently. It will never be visible again.
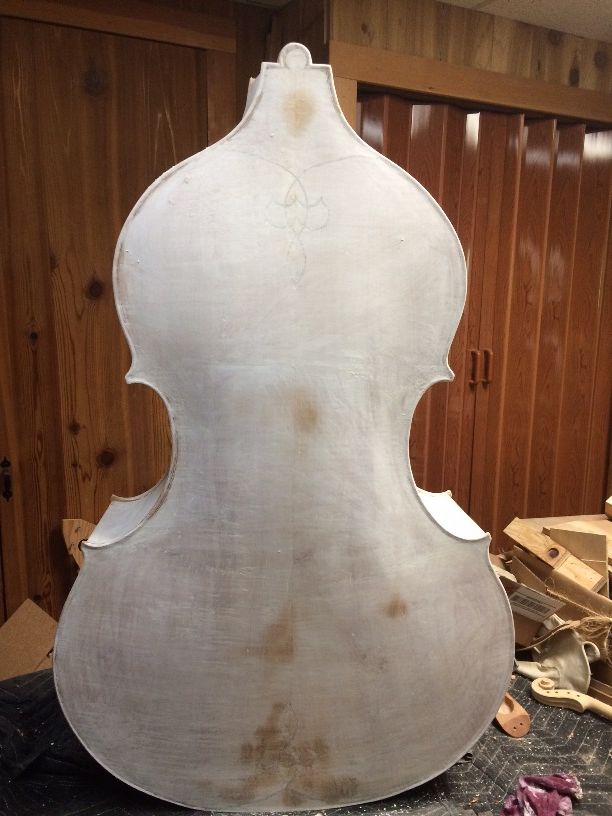
So, here is the bass, with the gypsum fully dry, mounted in my varnishing fixture, and ready for the sealer:
Ready for sealer.
Sealer
I am currently using rosin dissolved in turpentine and alcohol as a sealer. The liquid (alcohol first, then turpentine) evaporates, leaving the rosin in the pores of the wood. When dry, this helps prevent the varnish from soaking into the wood, so as to minimize the sound-dampening effect of excessive varnish penetration.
This is the part of finishing I like best: it seems almost magical to see the stark white of the mineral ground disappear instantly and permanently as the sealer permeates the gypsum and renders it transparent, so that the beauty of the wood is revealed.
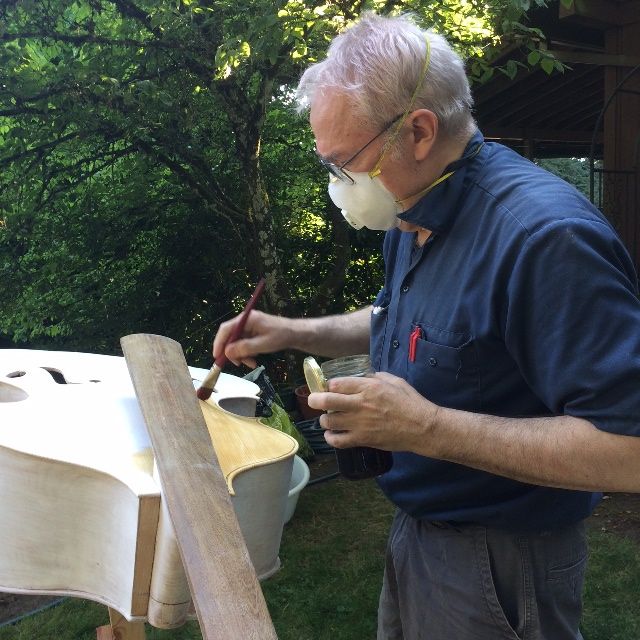
I begin by sealing the front plate.
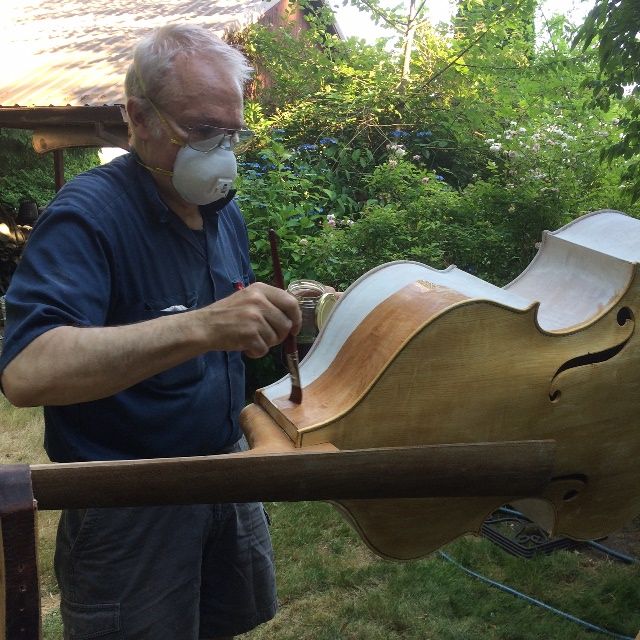
Then I rotate the bass in the fixture and seal the ribs.
Then I work on the back plate, and continue…
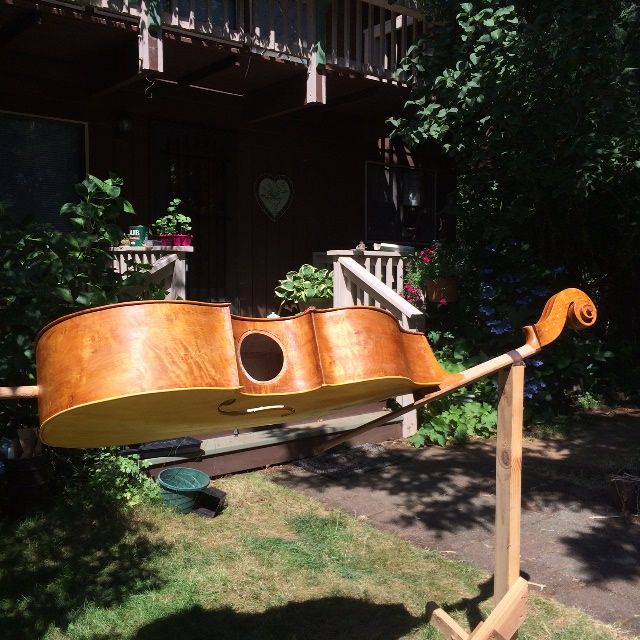
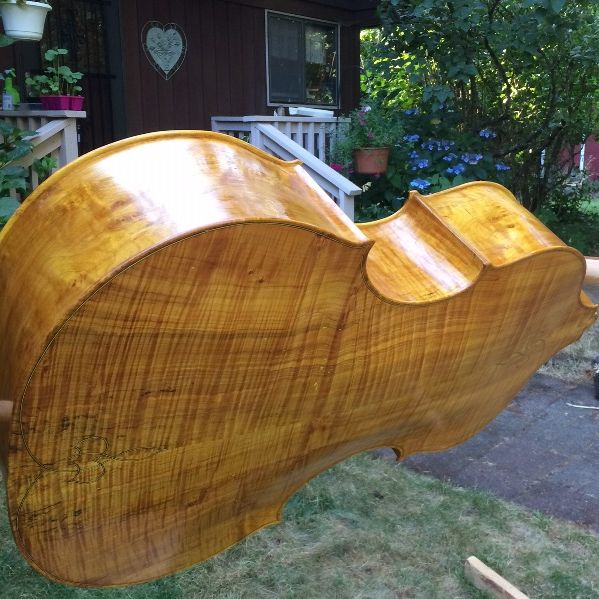
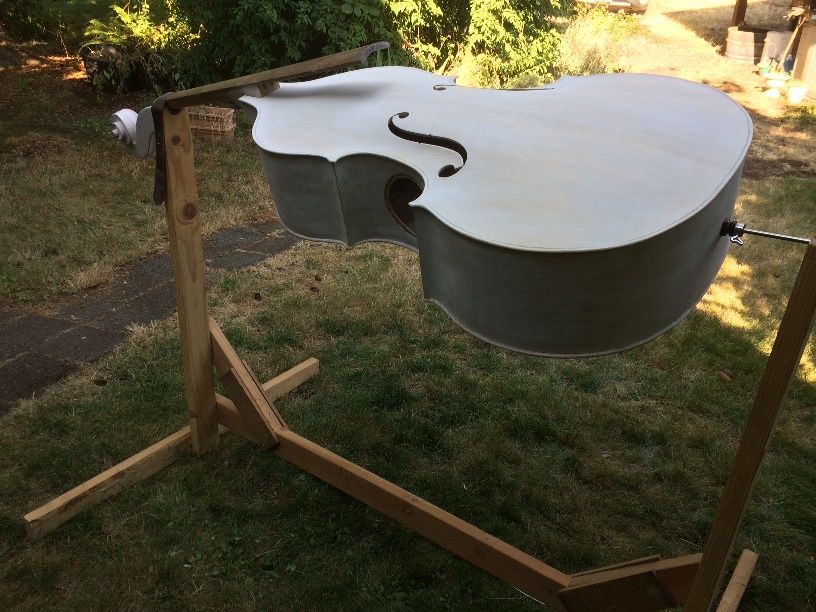
Until the whole thing is done! Here is the front view.
And here is the back!
After the sealer is dry, or just before it is completely dry, I rub down the surface of the wood with alcohol, to pick up any rosin that may have remained on the surface. When the sealer is fully dry, I go over the whole surface, lightly, with fine sandpaper, to pick off any bits of wood fiber that may have raised during the ground and sealer process.
Varnish plan
I always begin with a yellow varnish: I like the way it shines through the darker pigmented varnish when all the finishing is complete. In this particular case the maple was dark enough that even the yellow varnish will end up looking pretty dark. So, though I will still begin with the yellow, I will have to add a good deal of darker varnish on the front, to balance the color with that of the back. This is just a type of “Judgment call” that the maker must always consider when finishing an instrument. As I add coats of varnish, I will pay attention to which areas need darker varnish, and which could use yellow or clear varnish.
The last time I posted, I had temporarily installed the neck, and (I thought) I had glued the neck heel root in place, as it was to be a permanent part of the corpus, glued to both the neck mortise and the back button.
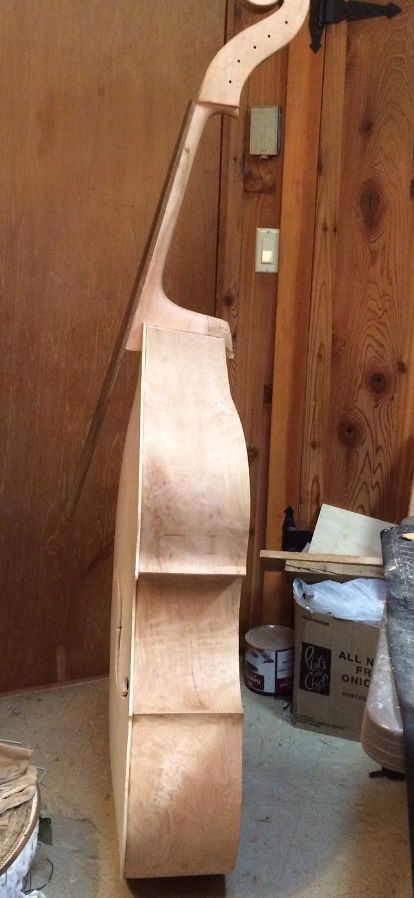
So the bass looked like this:
Bass with temporary neck set.
Side view, showing neck heel break-away joint.
The heel root looked like this:
Heel root positioned and glued to mortise, using hide glue, with paper break-away joint.
I was so confident that everything was right, that I even sawed off the excess heel root, visible in the above photo, and planed it flush with the back of the neck block, in preparation for installing the back plate. But! When I broke the paper “break-away joint” (see the above photo) the heel root gently let go of the mortise and was completely loose. (Rats!)
It turns out that hide glue doesn’t stick to carbon fiber plate! Ok… so I had to start over, and this time glue it home with epoxy. I put a plastic bag around the neck heel to protect it, coated the heel root with epoxy on the bottom and two sides, and slid it all back into place, this time bolting the neck in solidly, and clamping the heel root tightly against it. It all worked this time.
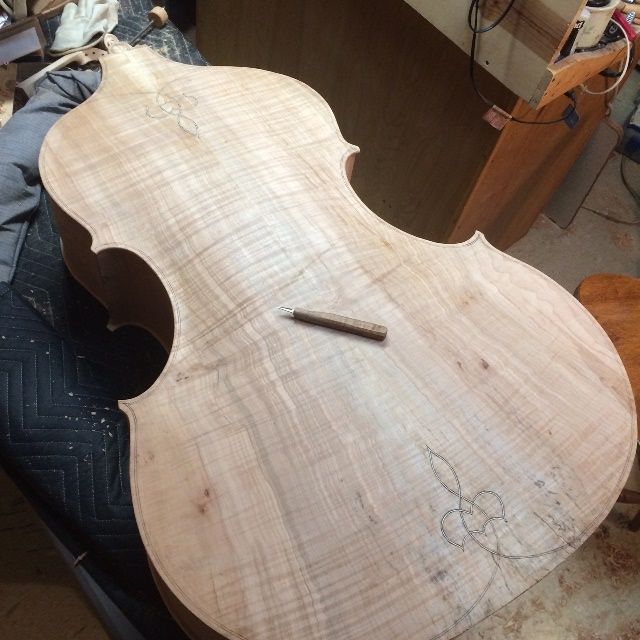
Beginning the purfling of the back plate
While the epoxy was curing, I decided it would be a good idea to at least install the “purfling weave” portion of the back plate purfling, before installing the plate. I figured it would be easier while the plate was still loose. The reason I wait until the back plate is installed to do the rest of the purfling, is that the corpus often changes shape a little when the mold is removed, so I can’t guarantee that the overhang will still be the same. If I have already installed the purfling, then I am stuck: but if I have not, then I can maneuver the overhang to being as close as possible to what I wanted, and install the plate, then plane away excess all around until the overhang looks right again, and finally put in the purfling so that it looks as though everything just worked out right, to begin with.
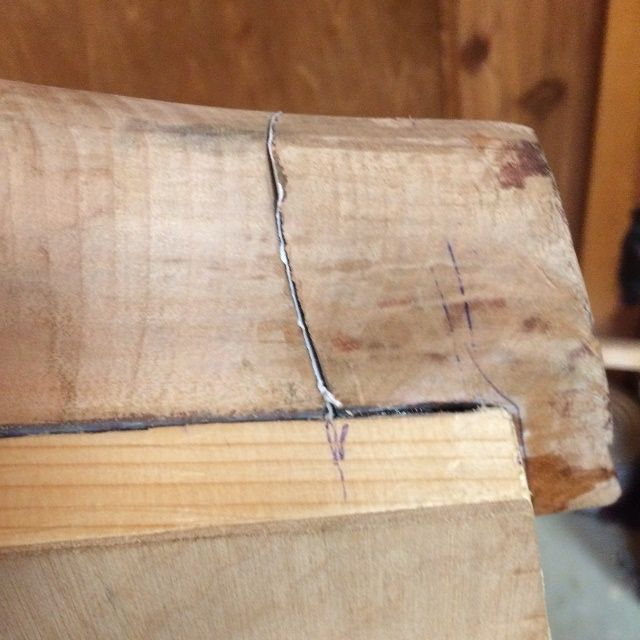
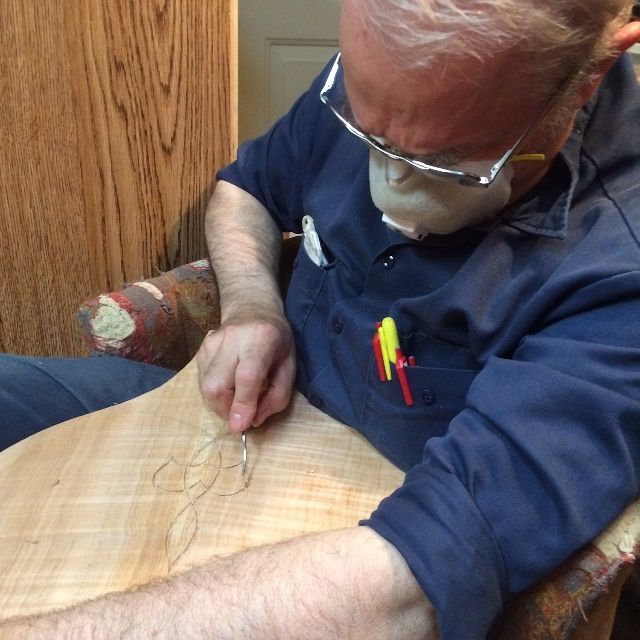
Cutting the slots for the lower purfling weave on the back plate.
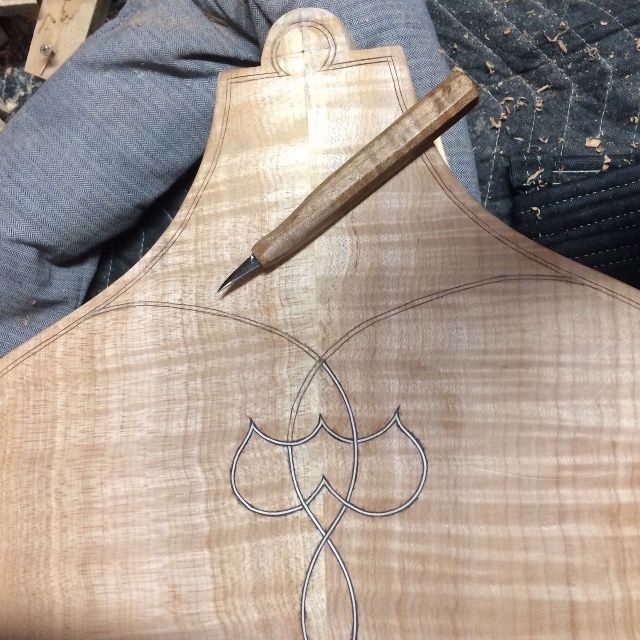
This is a weave that I came up with for my very first five-string fiddle and which I have tried to incorporate on all my subsequent five-string instruments. It is just a modified “fleur-de-lis”…nothing really special, but I like it. I use the same design, upside down, in the upper end.
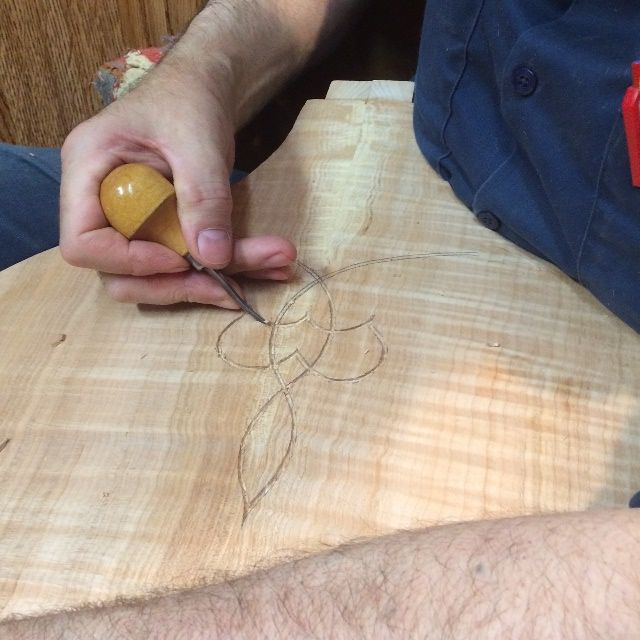
Picking the waste wood from the upper purfling weave.
Upper weave slot nearly complete.
After cleaning the slots out, I used heat and water to bend the purfling strips to fit the curves of the weaves, and glued them in using hot hide glue.
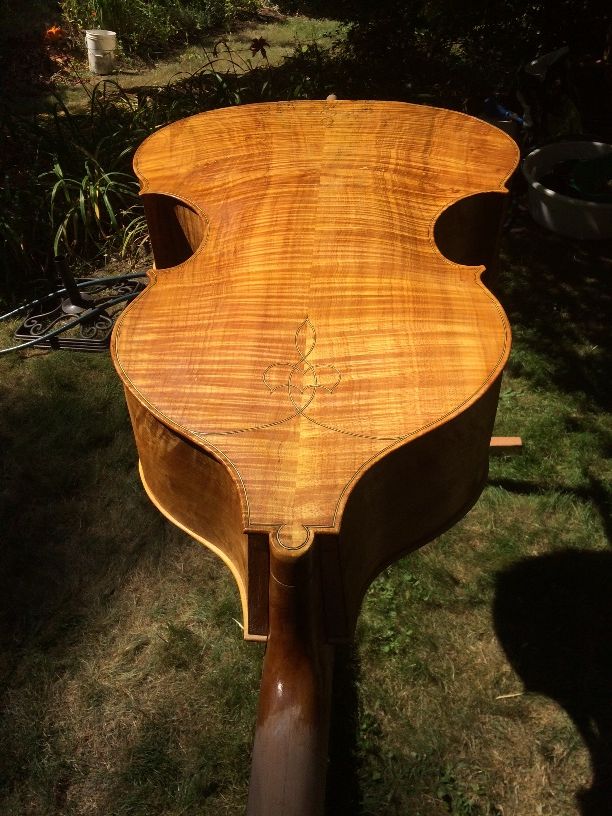
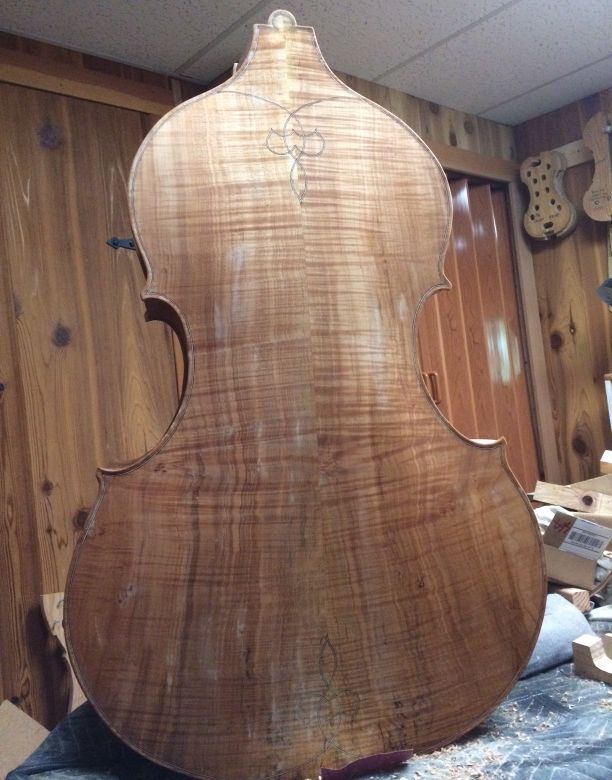
Both purfling weaves completed on the Oregon Big Leaf Maple back plate.
I planed the weaves flush with the plate after they were dry, using a gouge, a small finger-plane, and a scraper. You can see the beginning of the rest of the purfling slots, how they will connect to the weaves.
Purfling weave planed flush.
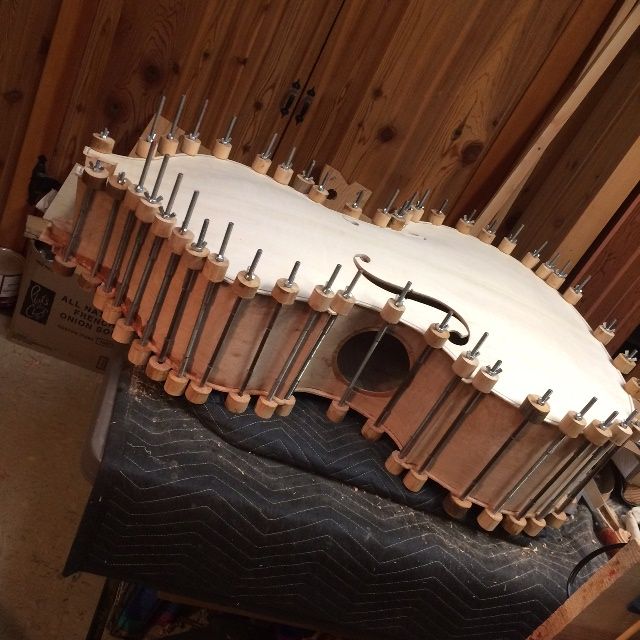
Closing the corpus
I finished scraping the interior and then laid the corpus onto the back plate, positioning it carefully, adding spool clamps, and constantly checking the overhang all the way around. When everything was as close as I could get it, I removed a few clamps at the bottom block, used a thin palette knife to ladle in the hot hide-glue, and replaced the clamps, tightening them securely. I added more clamps over the glued area, then repeated the process for the next section on either side of the bottom block, and worked up around the sides that way: removing clamps, inserting glue, replacing the clamps and adding more…until it looked like this:
Closed Corpus.
I still had not put the magnets into the cover plate, because, when I added the reinforcements to the cover plate, it changed the curvature, and it no longer fits cleanly into the access port flange. (Rats, again!) So I kept wetting and clamping the cover plate in different configurations until I got it to a close fit, then I added the magnets.
Here are the magnets in the cover plate.
Annnd… it turns out they are too weak. (Sigh…) I will have to order some bigger magnets after all.
At any rate, I was now ready to correct the overhang all around, and begin the final purfling.
Overhang corrected, beginning final purfling.
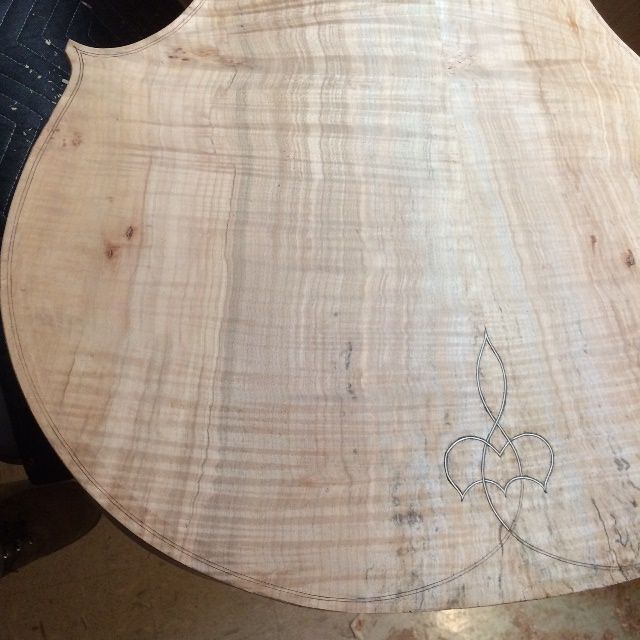
Tracing in the slots for the final purfling.
The bottom end of the back plate has the same design.
Carving the Channel
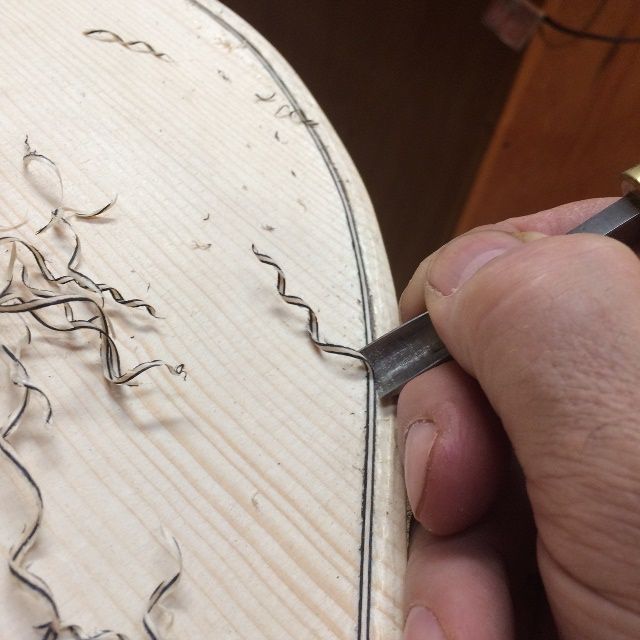
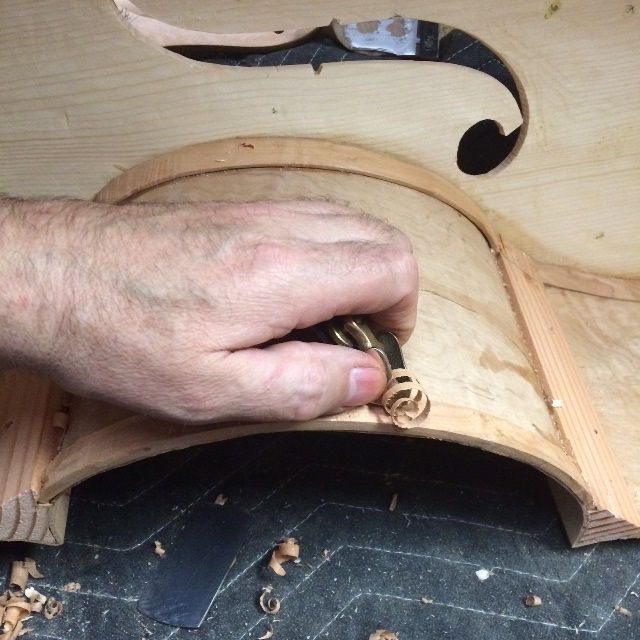
After the purfling was completed, I still needed to trim back the purfling and carve the plate channel. This involved marking the edge crest all the way around, about 2 millimeters inside the outer perimeter, and carving the channel to barely touch that line. I used a sharp gouge, in the manner of a drawknife, to carve the channel, then used a riffler file to smooth the outer curve, where it meets the crest line.
Using a gouge as a drawknife, to carve the channel.
(I actually made a very short video of how this works, but I was unable to successfully link it to this post. Sorry.)
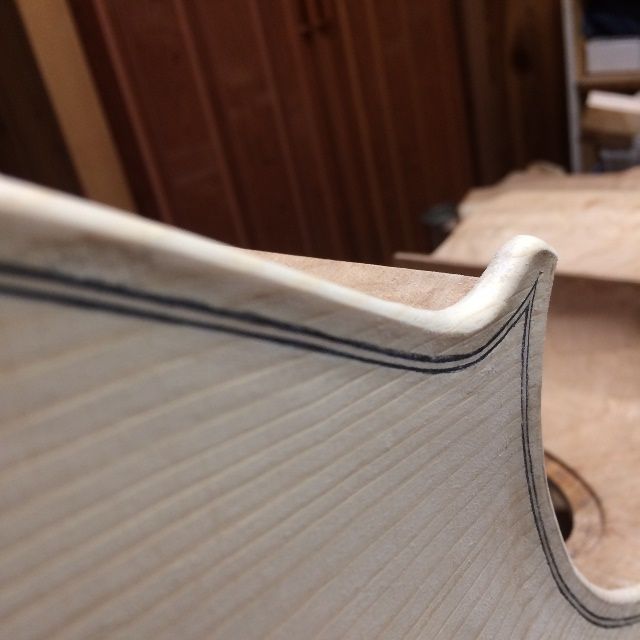
After the channel was complete, it was time to begin final edgework:
Beginning final edgework on back plate.
And the same for the front plate.
The goal is to make sure that the edge contour is correct all the way around, and that the plate channel fairs smoothly into the surface of the plate, without ridges or lumps. Getting the light at a low angle across the plate makes shadows which will show me where the lumps and ridges are so I can scrape them away.
Using shadows to complete edgework.
It suddenly occurred to me that my bass-varnishing fixture requires that the end-pin hole be drilled, so I drilled the endpin hole but did not ream it to the taper it will eventually have. On smaller instruments I usually varnish before drilling the endpin hole, so that there is no likelihood of causing sags or runs where the varnish brush touches the hole. But on the bass, I have to have that hole as a place to attach the support for varnishing. (I can’t hold the bass in one hand, and the brush in the other, as I can with a violin!)
End pin hole drilled.
And, that is pretty much where it sits, for the moment! The bass is ready for final varnish-prep, which will involve wetting down the whole surface to raise the grain, so I can sand it smooth again, then repeating until the grain no longer responds to moisture. Then I will rub in a compound to add color to the wood itself (not a stain, which might “reverse” the grain colors) and a mineral ground to close the pores in the wood. Finally a sealer locks in the mineral ground, and I will be ready for varnish.
So there is the bass corpus, ready for final varnish prep!
Five string double bass corpus ready for varnish prep.
One of the problems with creating a double bass whose neck is removable for traveling is that there has to be a way to connect and disconnect the neck. Thus you have a choice– will the fasteners be visible from the outside, or hidden inside?
I have seen several examples of both, and I really prefer the hidden fasteners approach. BUT! That also mandates that there be a way to access the interior to tighten or loosen the fasteners. I have chosen a 3/8″ diameter bolt (tensile strength exceeding 5,000 pounds) and a large flat washer embedded in Epoxy on the inside of the neck block. The bolt extends through the washer and the neck-block and engages the threaded insert in the maple wood of the neck heel (see below.) So…the next step is to consider a side-access port through one of the C-bout ribs,
Threaded Insert in the heel of the removable neck.
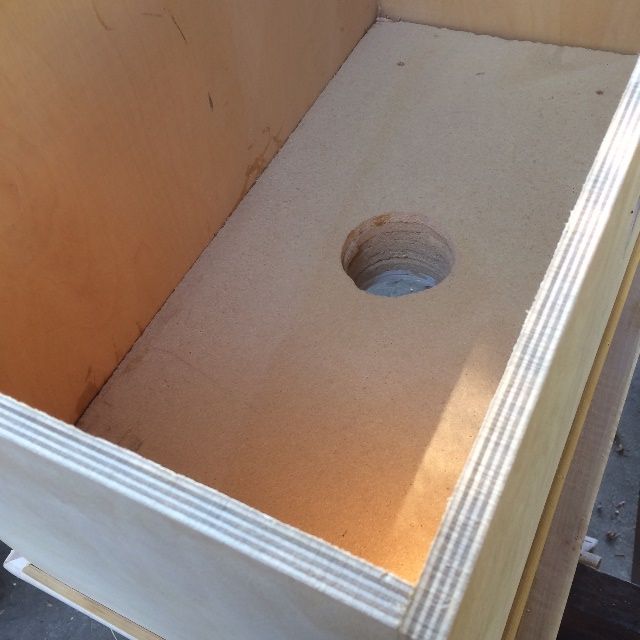
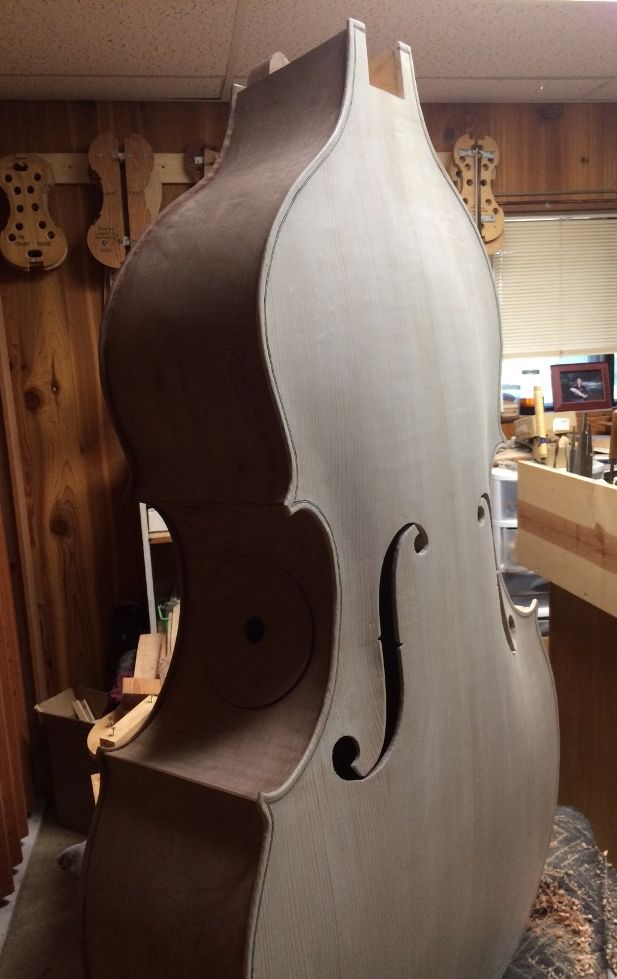
Access port
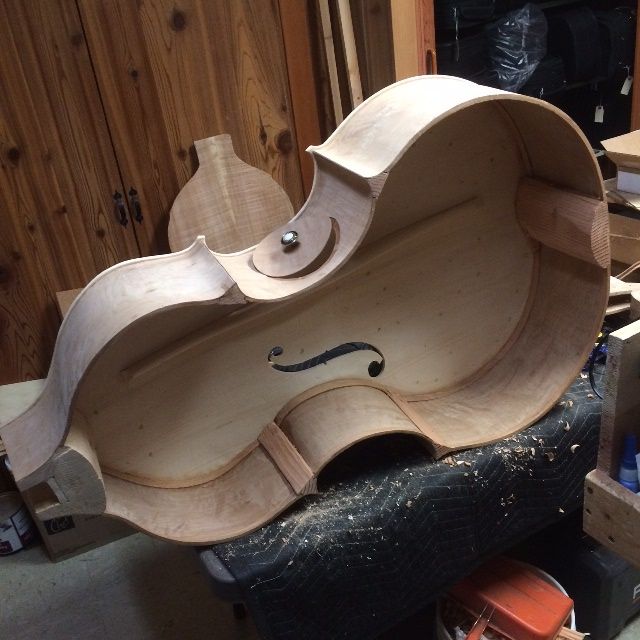
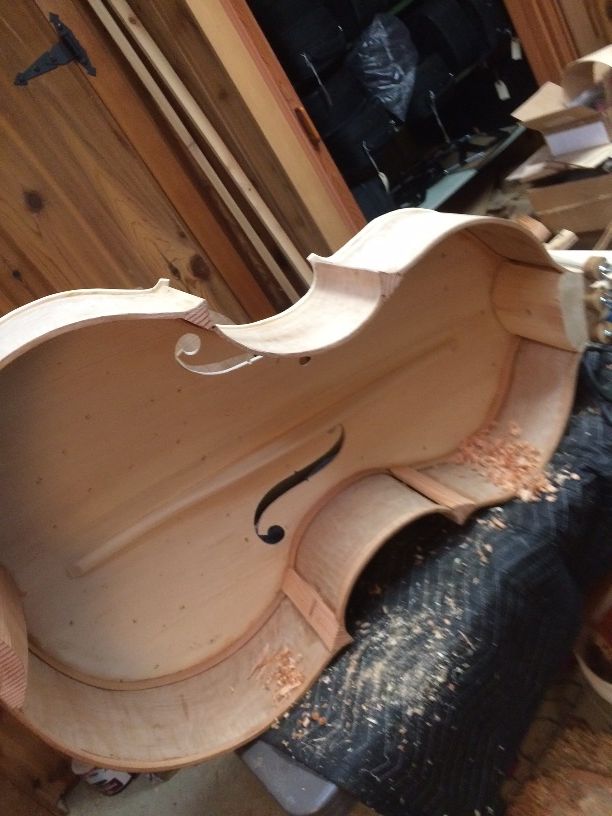
I chose to make the access port through the bass-side c-bout rib: the player will reach up through the port with his or her right arm to access the single bolt in the neck-block. As an added bonus, the soundpost is also easily accessible, as it will surely need to be re-positioned after having the bass apart for travel. (In fact, it is so nearly guaranteed to be loose, that I intend to provide a pocket in the instrument case for the soundpost, as well as the bridge, the tailpiece, and the neck assembly, etc. That way there is no question: as you reassemble the neck, you will also re-set the soundpost, after the strings are on, but before it is up to tension.) Finally, as another luthier pointed out, if there is ever repair-work to be carried out inside the bass, this access port makes it a much simpler task, thus saving money and time.
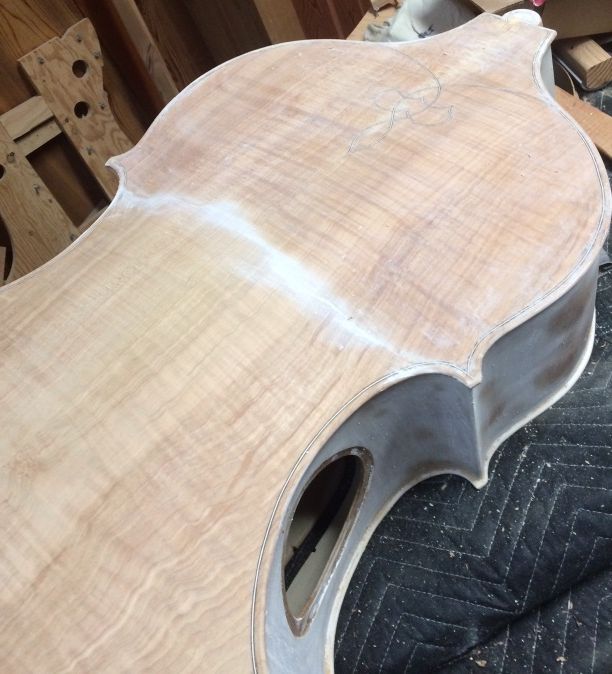
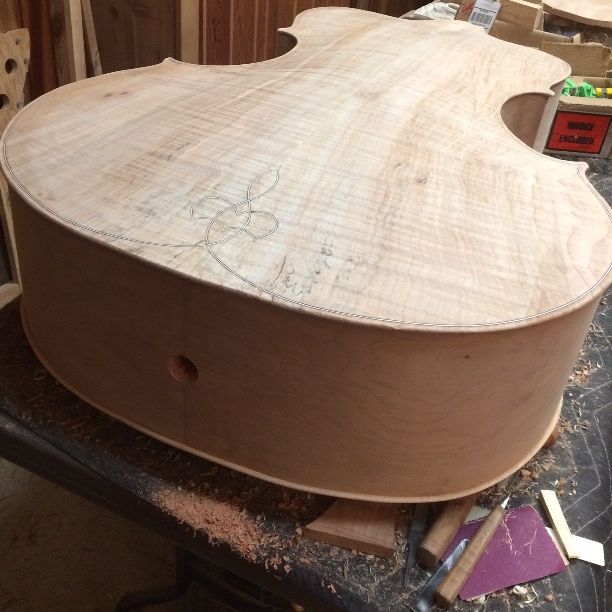
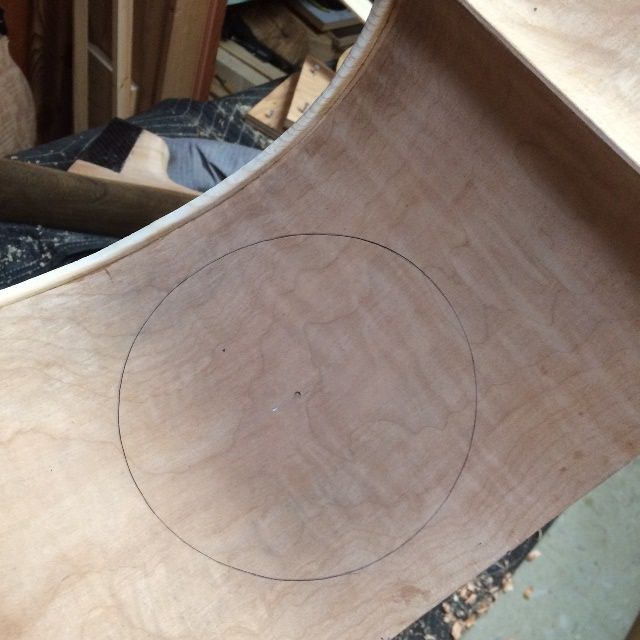
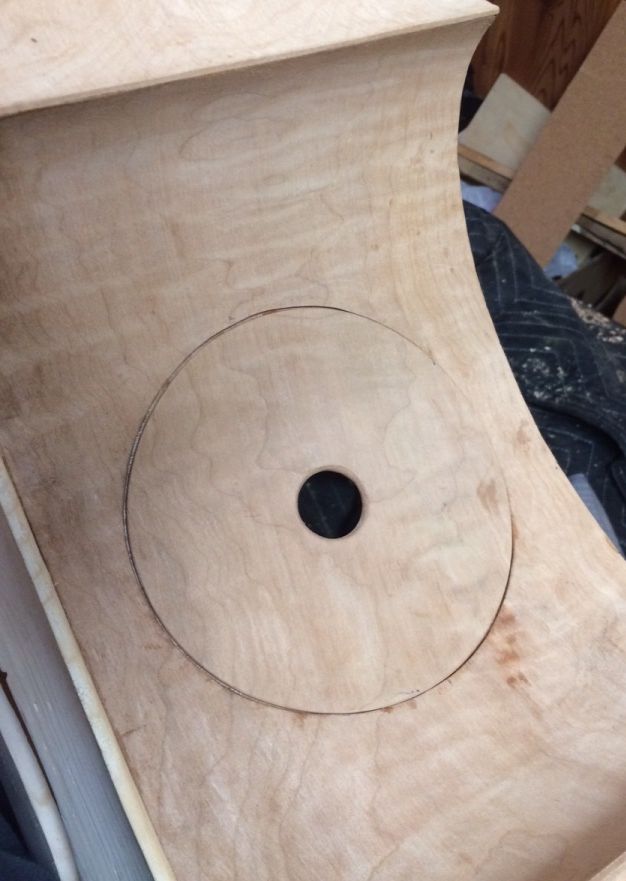
So: how to carry out the access port plan? I positioned the proposed hole on the bass-side c-bout rib, roughly centered, and laid out a 5-3/4″ circle. I cut out the circle using an X-acto knife, then smoothed the cut edges with a file and sandpaper. I wanted to use that piece for the closure, as well, so I couldn’t afford any damage to either the rib or the cover plate.
Side access hole laid out.
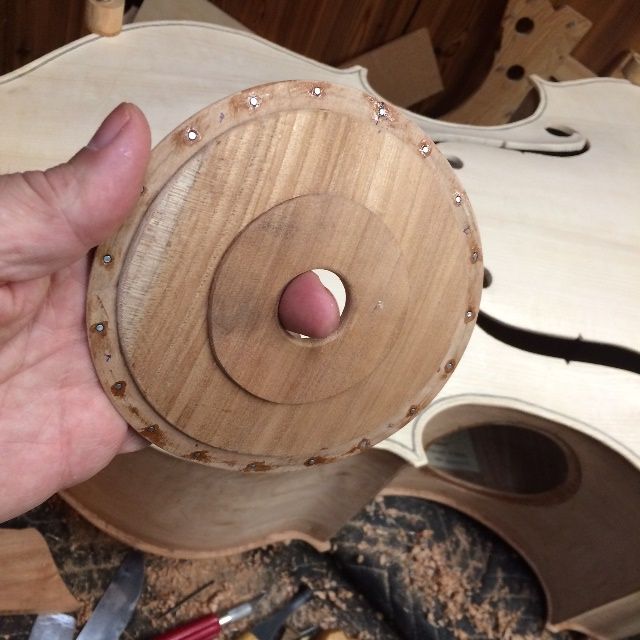
Initially, I had thought I would employ a drawer-pull-type handle as a means to open and close the access port, but I didn’t care for the looks, so, after further reflection, I chose to make a simple “finger-hole,” instead. I reinforced the single-thickness of rib-stock with two more, especially near the center, so that the rib would be stronger, and so that the edge of the rib where the finger contacts it will be 6mm thick instead of 2 mm, thus much more comfortable.
Proposed access cover plate with pull-knob.
Side-access cover plate with finger hole.
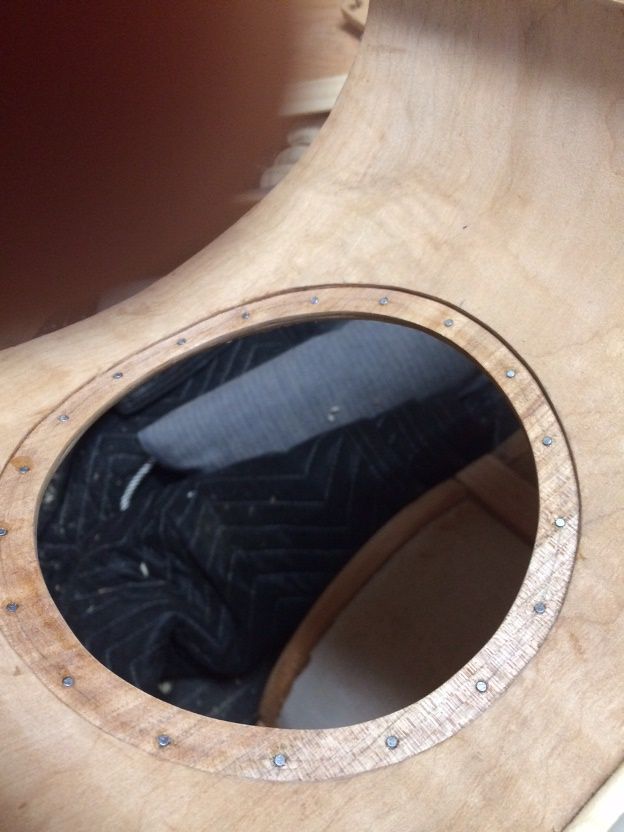
I reinforced the actual c-bout rib by adding a second thickness of ribstock to the entireinside of the existing rib, and I cut a slightly smaller hole in it so that the closure plate had a shelf to rest against. Also, this is the surface into which the neodymium magnets will be inset, to hold the closure plate in place.
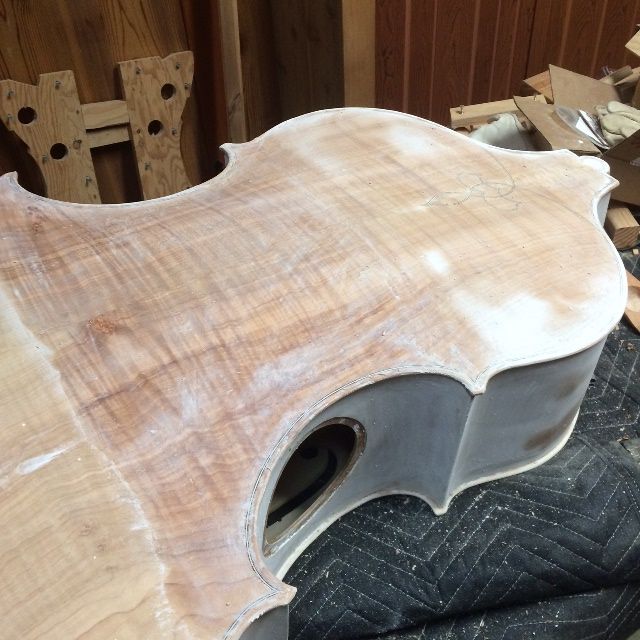
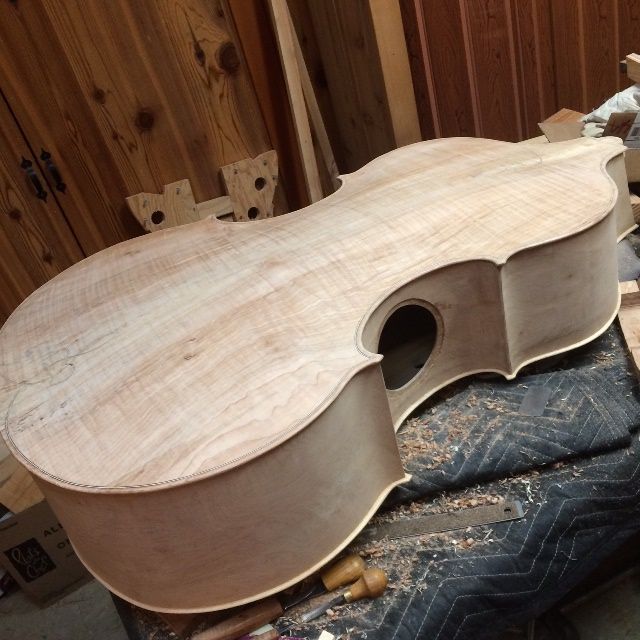
Side access hole with reinforcement plate inside and neodymium magnets.
(I realize that the above photo looks a little as if there were a plexiglass cover on the hole, but those are not reflections: you are looking through the hole at some pads behind the bass body. I was using the pads to protect the front plate, earlier.)
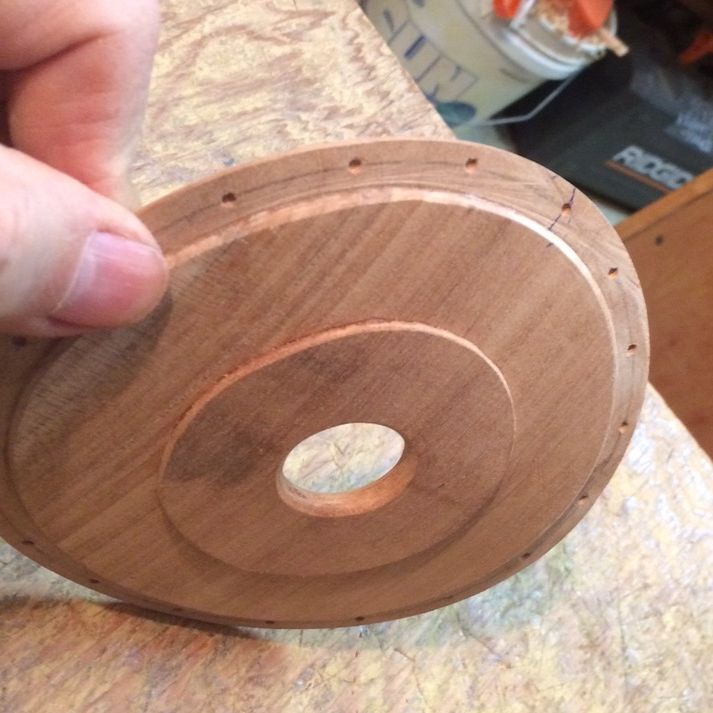
I added the reinforcement to the cover plate and sanded the interior of the finger-hole to be very smooth.
Reinforced cover for side access port, with holes for neodymium magnets.
Cleaning up the interior
While the glue was drying on all the above assemblies, I took the time to complete the shaping of the blocks and linings, so as to be ready to close the corpus, once all the interior work is done.
Planing the ribs to shape.
I used a knife a gouge and a small plane to shape the linings and blocks. Then I used a scraper to ensure that it all was acceptably smooth.
Shaping the blocks.
Neck Set
I had checked and re-checked the fit of the neck-heel into the mortise in the neck-block, until all the measurements were correct, and then I had drilled a pilot hole through the neck-block into the neck heel. That established the position and range of both holes, so that when I drill for the insert and r-drill for the bolt, the holes will still be in line with one another. I bedded the large plate washer in epoxy on the inside of the Sitka spruce neck-block, so that the bolt would not be able to gradually wear a hole deeper into the soft spruce.
With the neck temporarily in place, I could check to see how much of the excess neck-heel “root” would have to be sawn off and planed flat. You can see, also, that I had glued the heel-block “root” onto the neck-heel proper, using a sheet of paper between them as a “breakaway” layer, so that when everything was correct, I could easily pop the neck free from the root.
Temporary neck-set.Close-up photo of the paper breakaway joint.
As it turned out, hot hide glue does not bond well to carbon-fiber plate. So, after I discovered that the neck-root was actually not glued home, I was forced to choose epoxy as a final bond for the portion of the neck that is intended to remain permanently in the neck mortise. I don’t like doing this, as epoxy is not reversible, but there was no viable option. After making that choice, though, I took a sharpie pen, and wrote, inside the mortise, a notice to any later repairers, that those three joints (bottom and both sides) at the neck root are epoxy. (Sorry)
But I can put the neck on and take it off and put it on again, and it fits correctly, and all the measurements have remained correct.
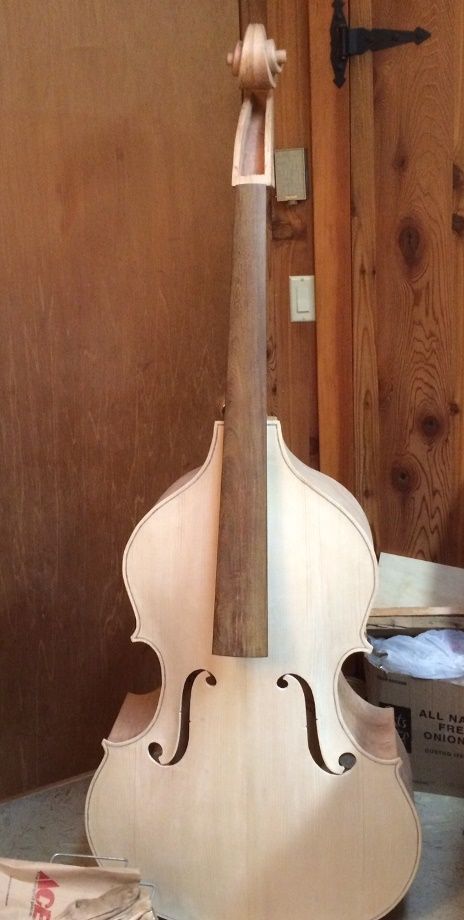
And it is looking pretty good:
Neck set complete.
Next time we will talk about the final work before closing.
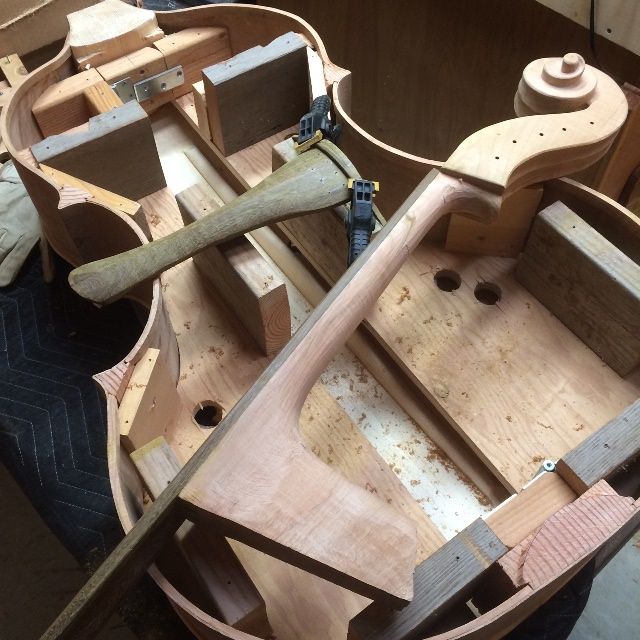
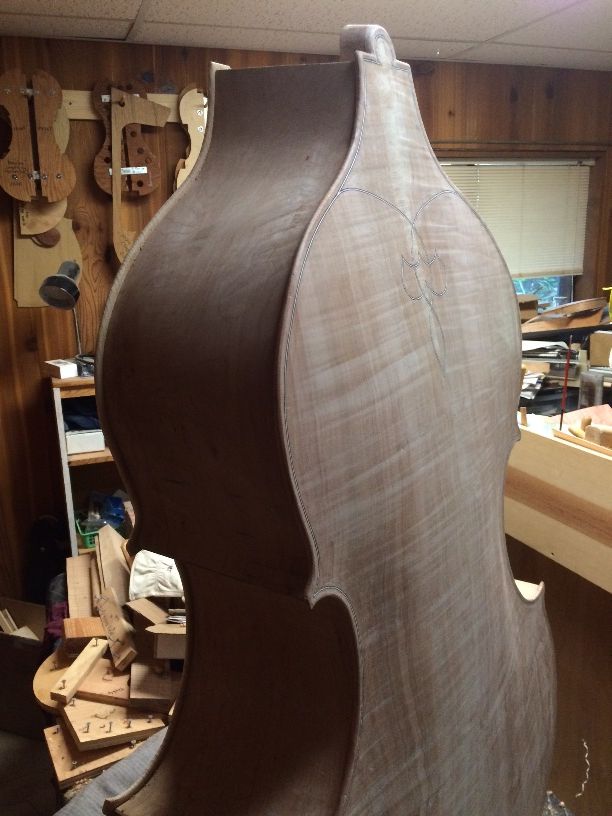
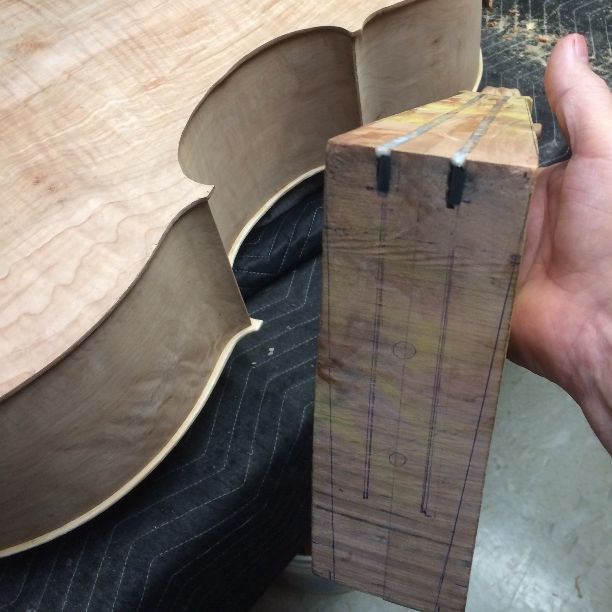
When I last posted, I showed the garland with the Sitka Spruce front plate installed, and the completed Oregon Big Leaf maple back plate sitting on it (because I wanted to see it that way) with the neck block (also Oregon Big Leaf Maple) beside it. You can see in that photo that I had already installed carbon fiber reinforcement rods, bedded in epoxy, to stiffen the neck. But I didn’t say how they got there.
See the reinforcements in the neck?
The problem with maple is that it is fairly flexible. Usually, that is not a concern, because the instrument necks also have a fingerboard added on (usually of ebony) which is very stiff, so that the flexibility of the maple is not much of an issue. But, when the fingerboards become thin, after years of being used, re-surfaced, and used again, the frequent “re-dressing” of the fingerboards thins them to the point they are no longer stiff enough to bear the stress of the string tension, and the neck begins to bow forward, under string tension.
Carbon fiber is very light and extremely stiff, so it makes an ideal material for reinforcement. Carbon fiber rods are available in a variety of shapes and sizes. I chose 1/8″ x 1/2″, and they arrived in two-foot lengths from the “Dragonplate” company.
I do not have a router table, nor even a table saw, so I used my hand-held circular cut-off saw (commonly called a “skill-saw” as “Skilsaw” was an early brand of this sort of tool.) I set the blade on the saw to 5/8″ deep, and, having already drawn the lines where the cuts should go, I clamped the neck block in the vise, with a block beside it to guide the saw, and simply sawed slots into which to fit the carbon rods. The slots did not fit well, as the blade was not wide enough, so I attempted to use a hand-held router to widen the slots, but I did not have the correct bit for the router, and they were very expensive at the local hardware store, so I carved out the remaining wood, using my knife and a small chisel.
Once the slots were satisfactory, I mixed my epoxy, filled the slots, and pressed home the carbon rods. The epoxy I chose to use was advertised as “15-minute” epoxy, but all it meant was that I would have 15 minutes of working time, in which to get the rods in place, the epoxy smoothed over the tops of them, where it had squeezed out, and be done tinkering with it. It turned out to achieve full cure in about 24-hours… by the next day, in other words. No problem: I had plenty of other work to do while I waited.
Neck block with carbon fiber rods bedded in epoxy, waiting to be trimmed.
So, I scraped all the excess epoxy off of the neck joint face, where it would be glued to the fingerboard, and waited until the epoxy had fully cured, before sawing off the excess carbon fiber rods, using a hacksaw.
Neck block with carbon fiber reinforcement rods trimmed to length.
The result is a five-string double bass neck that will never become bowed or warped.
Ipé Fingerboard and Tailpiece
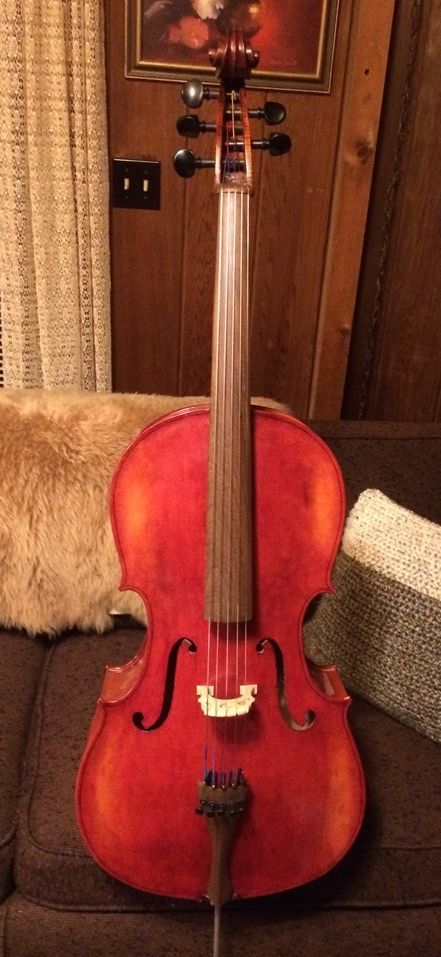
I chose to use Ipé instead of ebony for my fingerboard and other fittings, as it is more readily available, it is not a threatened species, and I like the finished color (dark brown.)
Ipé is an extremely hard, dense, South American hardwood, similar to Ebony, in terms of hardness and durability. It is difficult to work, as are all the extremely hard, dense, tropical woods, but I like the finished product. Here is a fingerboard on a five-string cello I made some time ago:
Ipe fingerboard on five-string violoncello piccolo.
So, I decided on the shape and size of the fingerboard and tailpiece, and then cut them out on my bandsaw. Then I used gouges and planes to shape them appropriately.
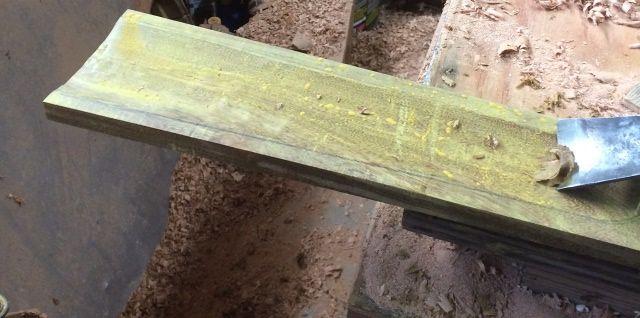
Fingerboard underside being carved of Ipe wood.
The dust from sawing, planing, scraping or sanding Ipé wood is a bright yellow color, and it fills the pores of the wood, giving the wood a greenish-yellow look while it is being worked. But that color disappears entirely when the wood is finished, and the Ipé becomes a dark brown color.
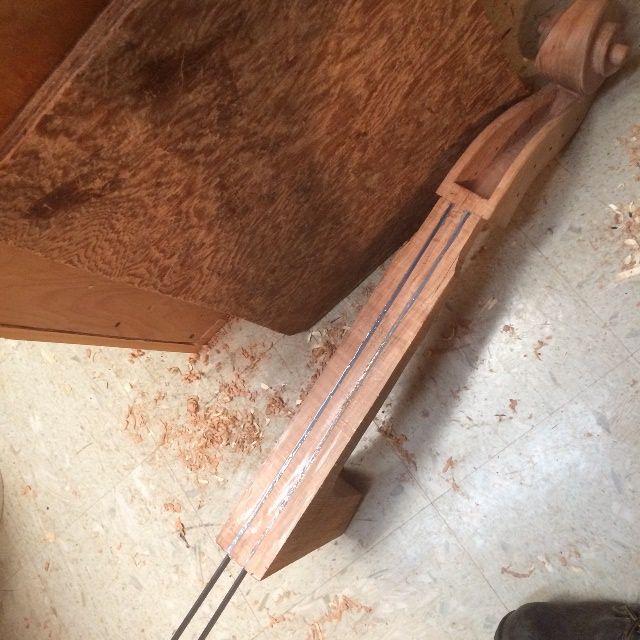
I glued the fingerboard to the neck block when it was nearly complete, and then completed the shaping of the fingerboard with the neck as a unit. The tailpiece, too, is only partially completed.
Fingerboard and tailpiece waiting to be completed. Fingerboard is glued and clamped to the neck.
My wife was a little perplexed about the odd color of the Ipé wood, so, after completing the preliminary dressing of the fingerboard, I used a paper towel, and rubbed the fingerboard down with turpentine, to show the color as it will look when finished. I also rubbed a small portion of the tailpiece, to show the stark contrast between the color of the Ipé when freshly worked, and when finished. (The turpentine is not the finish, obviously, but the color will be very similar, as a light coat of linseed oil rubbed into the wood probably will constitute the finish.)
Fingerboard and tailpiece with turpentine to show the true wood color.
I went ahead and began the shaping of the neck at the same time, so it is beginning to look the way it will be when completed. When the neck shape is correct, I can begin the neck-set procedure. This is the first time I have attempted a removable neck, so I am a little apprehensive about it. All I can do is press on, and see how it works.
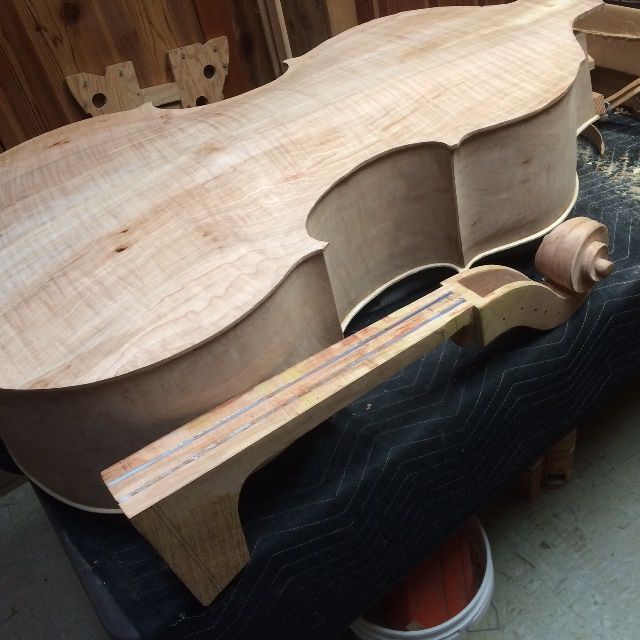
Here is how it all looks right now:
Neck and tailpiece for five-string double bass. Notice the “fret” bent and clamped to the tailpiece.
When completed, the tailpiece will accommodate five strings, and have a “fret” inlaid across the upper end, to provide a hard “stop” for all the strings at the same point. The “Fret” is made of Ipé wood, too, bent to shape with heat and pressure, then clamped to the tailpiece to cool in that shape. Next, I will cut the slot in the tailpiece to allow the fret to be inlaid into the tailpiece, and drill the holes for the string-slots and the tailgut wire.
When I last posted, the back plate was in progress, but even the arching was not completed, let alone the interior carving. Now it is all complete, the front plate has been installed, and the fingerboard, the neck and the tailpiece are underway! Things are moving along!
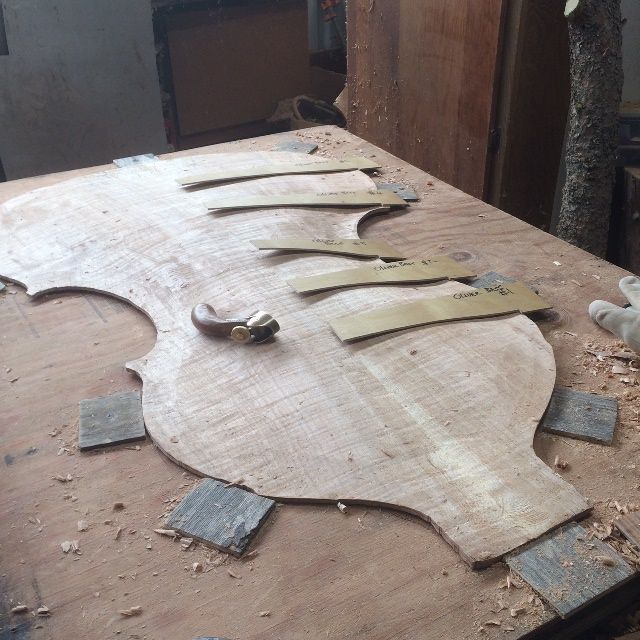
I did make a set of arching templates before moving on with the arching:
Set of cross-arching templates for the five-string double bass.
Those templates helped me to see the shape more clearly, and to know what changes to make, to improve.
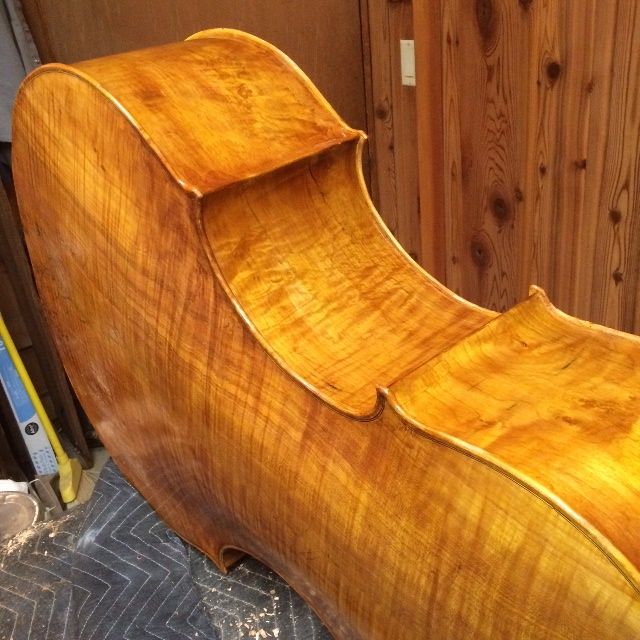
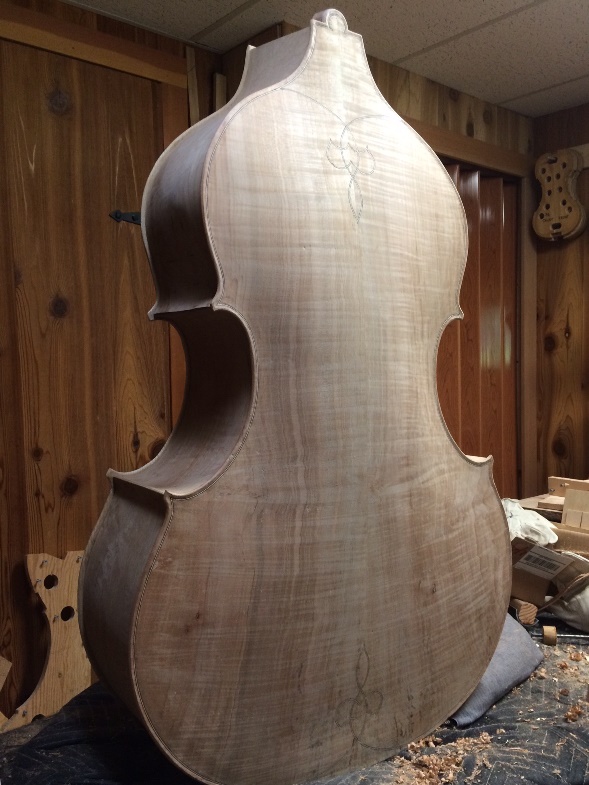
So, here is the completed back arching, after scraping, so that you can see the flame in the Oregon Big Leaf Maple back:
Arching complete on back plate. Pretty wood, isn’t it?
Inside Carving
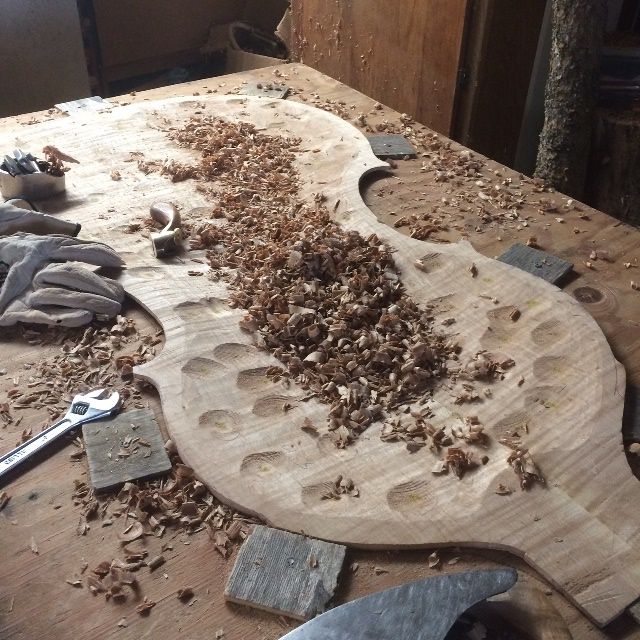
Carving the interior is always a daunting task…that is a lot of wood to move! But, one scoop at a time, it does get done!
Beginning the inside carving of the back plate.
Once I had the whole plate beginning to take shape, I carved “dots” all over the plate, checking thickness as I carved, until I had a pattern of correctly graduated “dots all over the plate. Each dot had a measurement written in the center, matching the graduation “map” I had chosen to emulate.
Then it was time to “connect the dots.”
Graduation “dots” for back plate.
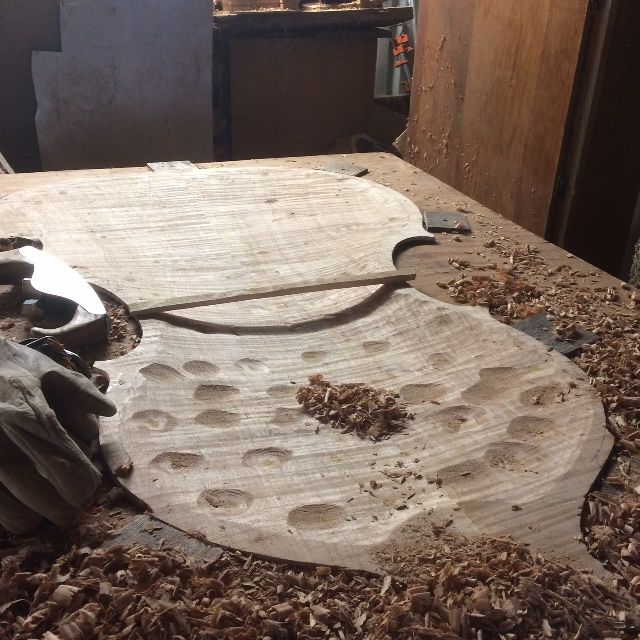
Connecting the dots.
Graduation of the back plate is nearly complete.
It is always amazing to me how light the plates become after all that waste wood is removed. In this picture, you can see how thin the plate is, with the graduation complete.
Graduation of the back plate is complete.
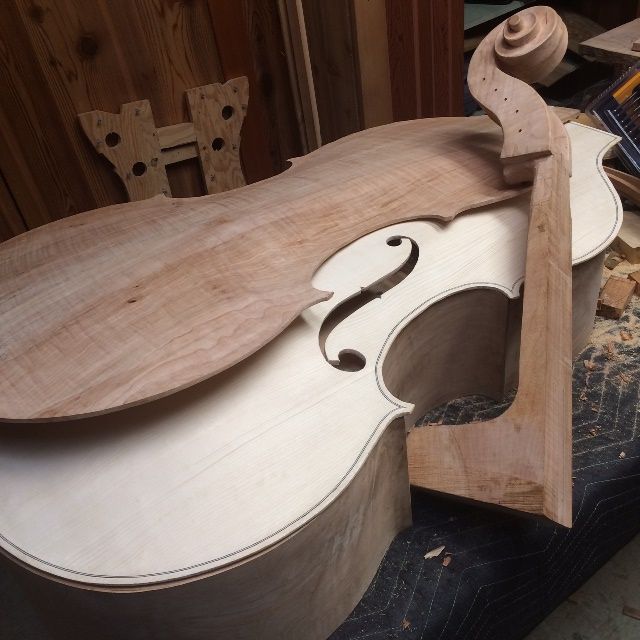
I took the plate inside, and stacked all the parts together so that I could see the progress:
All the main parts complete, and stacked on the garland.
What is next?
I needed to complete the neck, which means I needed to design, cut out, and shape the fingerboard and glue it to the neck block so that I could finish shaping them as a unit. Meanwhile, I could install the front plate, and get ready for the neck-set, once the neck was ready.
Front Plate installation
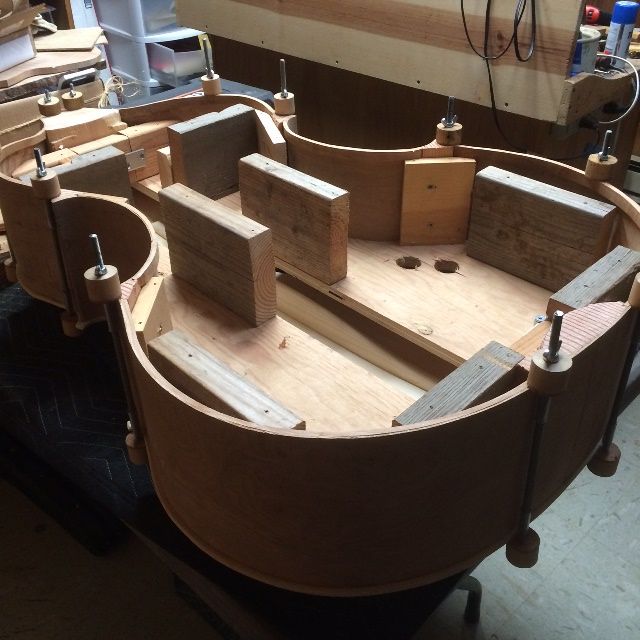
I completed a preliminary shaping of the blocks and shaped the linings, front and back. Then I carefully positioned the garland on the front plate, and temporarily clamped them together, using several spool clamps.
Garland and Front plate assembled and clamped.
Then I removed the clamps from one area at a time, used a thin palette knife to slip hot hide glue into the joint, and re-clamped immediately, adding more clamps as needed. Then I moved to the next area and repeated that pattern. Soon I had the entire front plate glued, and secured to the garland with clamps.
Front plate and garland assembled, glued and clamped.
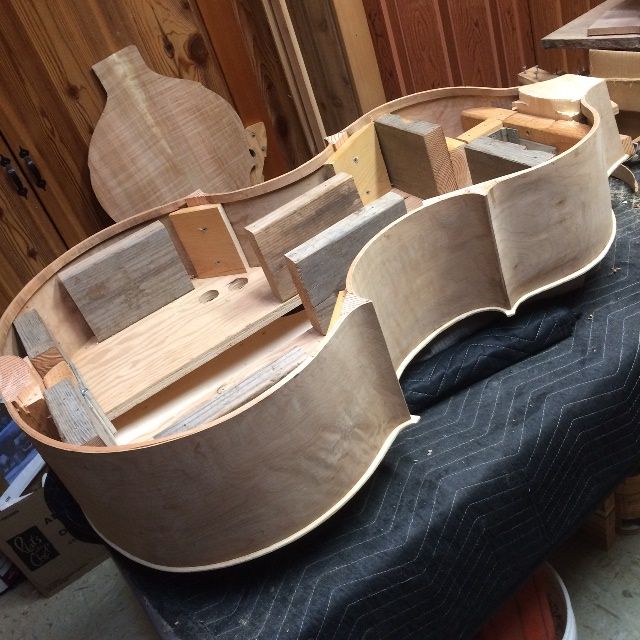
And, when I removed the clamps in the morning, the project was beginning to look like a bass!
Front plate and garland, with the clamps off.
I liked the looks so much, I stacked the parts together again, to see how it would look, all together. The back plate is just sitting there, again, not bent to fit the garland or anything. I will add purfling after installing the plate, I think, so I can be sure the overhang is correct, and that the purfling follows the finished edge.
Back plate sitting on garland assembly with front plate, and neck assembly.
There is still a long way to go, but I will put more in the next post.
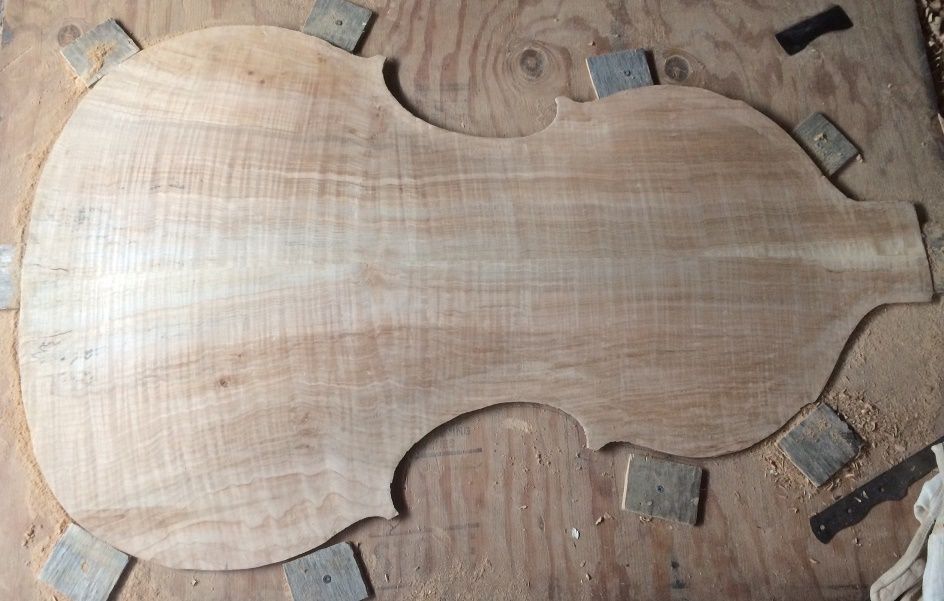
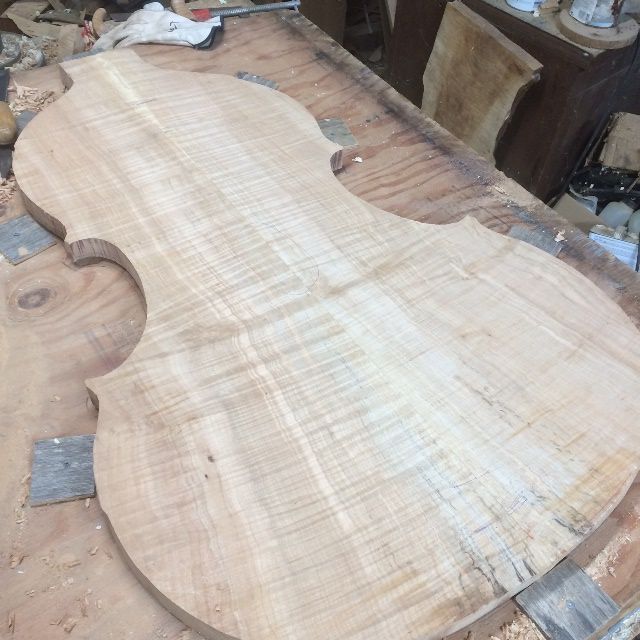
When I last posted, I had flattened the back plate, using a plane, but the shape was still oversized.
Flattened back plate for 5-string double bass.
So I traced out the plate shape using a small section of plastic pipe as a guide, and a ball-point pen inside the pipe to make the mark. Then I cut out the plate using my very old Craftsman “Auto-Scroller” saber saw.
My beloved wife, Ann, bought me this saw when we had been married for less than two years, and it has served me well for the last 38 years, but this may be the final plate it will cut out. It overheated rather badly during the cut. 🙁
Back Plate traced and cut to shape.
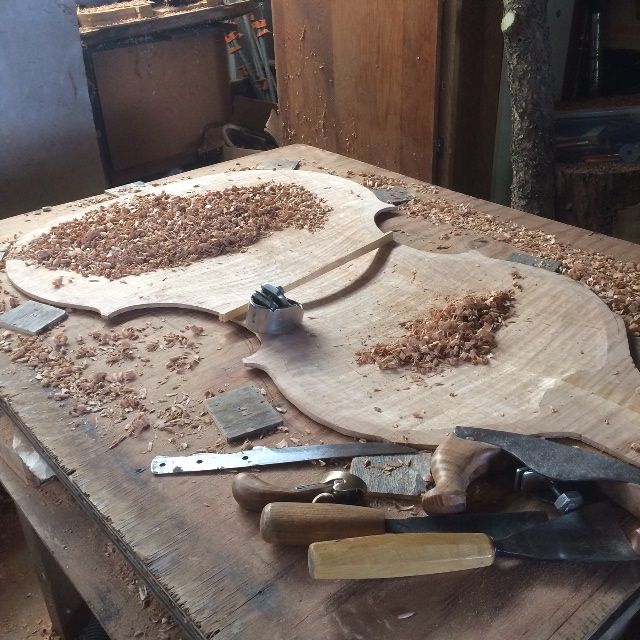
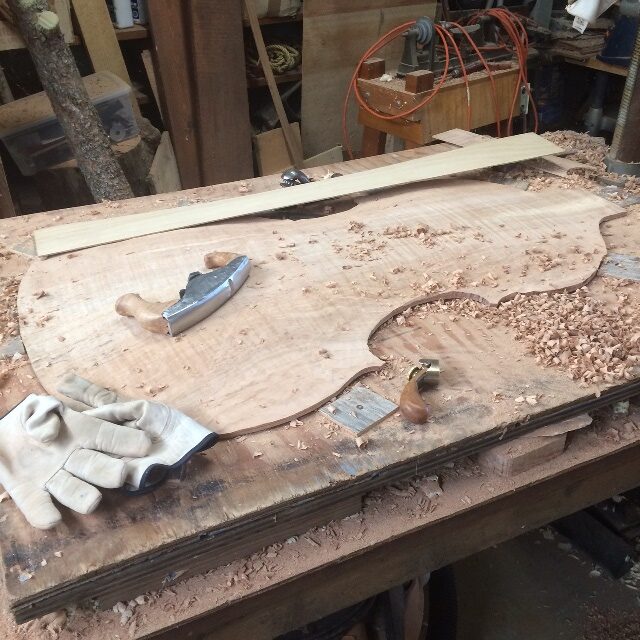
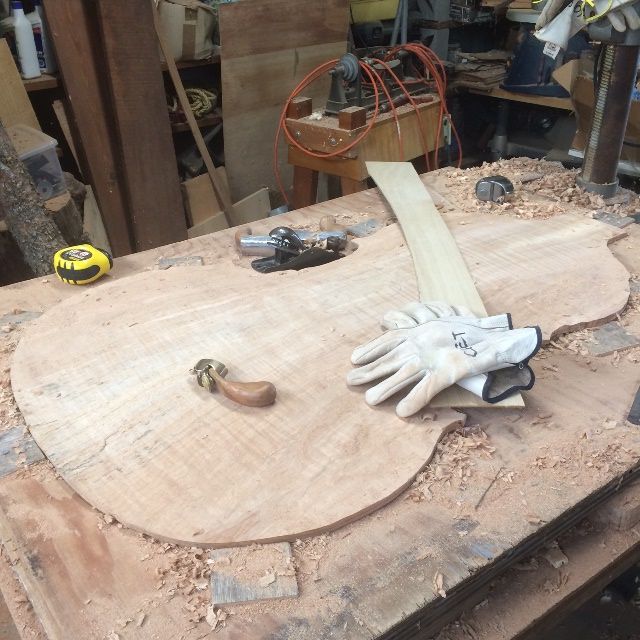
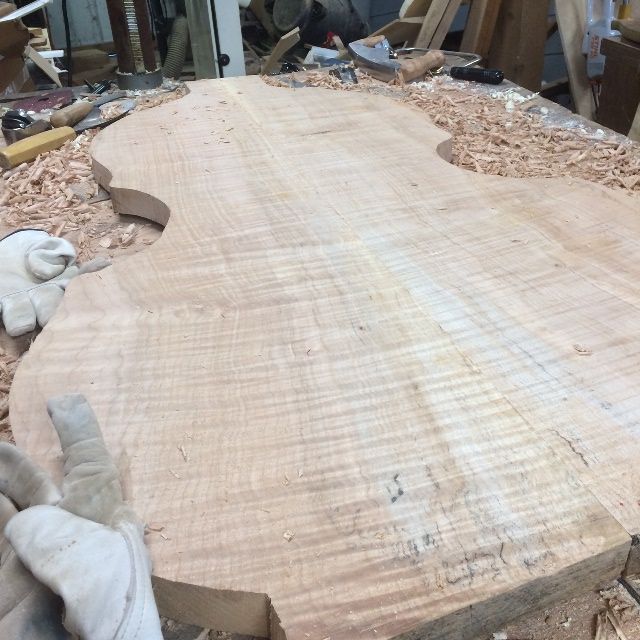
Once the plate was cut out, I used my curved-sole scrub-plane to remove waste wood, and rapidly bring the plate to near the proper thickness around the edge. As the thickness gets close to the target dimension, I switch over to the Ibex Finger-plane with the toothed blade and the wooden handle, to complete the thicknessing of the plate edge. The Oregon Big Leaf Maple is much more difficult to carve than the Spruce was, both because it is harder, and because the grain is highly flamed, meaning that it changes directions every centimeter or so, resisting all efforts to smoothly plane off the wood. The toothed plane helps, but when I start getting close to the right thickness, I will have to switch over to a scraper before the tear-outs from planing are too deep to be removed.
Arching of the back plate is underway.
You can see the longitudinal arching template in the above photo: it is just a thin piece of plywood with an 11′-3″ radius circle section cut out of it so as to leave the correct arching height in the center. I used that to help me establish the longitudinal arching. The Ibex plane is on the plate, and the scrub-plane is almost out of sight behind a small block-plane in the background. The small block-plane is helpful for smoothing the ridges left by the scrub-plane.
I am working to the rough sketch I made before beginning, with the plan for the back arching: (I did change the plan a little. I realized that I could extend the arching a little further “north,” as I have tapered the entire garland a little, so that the bend in the upper bouts will not be so severe, and the arching may be able to follow it a little way before flattening out to avoid the compound curve. It’s worth a try, anyway, and will not hurt anything.)
Rough sketch of arching-plan for the back plate.
Arching of the back-plate still in progress. Scrub-plane is more visible in this picture.
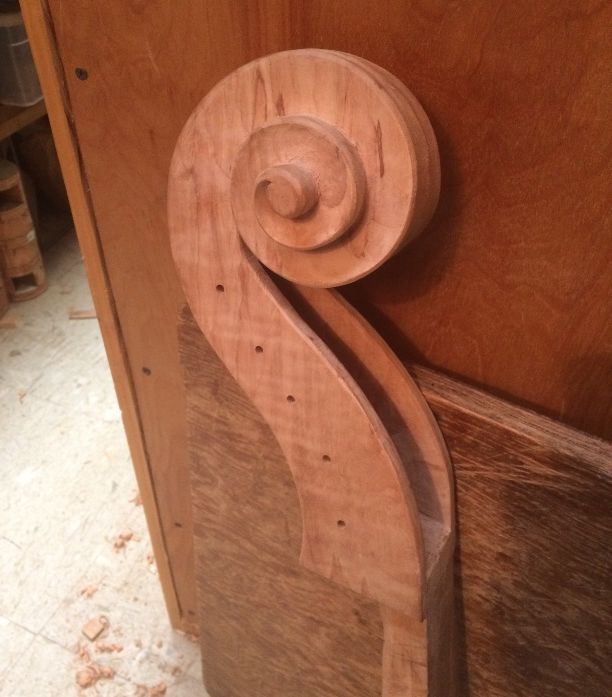
My hands and shoulders were getting too tired, so I went inside and used small finger-planes, files, and scrapers to refine the scroll. I am waiting on an order of carbon-fiber reinforcement materials to complete the neck, but other than that, I am pleased with how it is turning out.
Scroll is nearing completion.
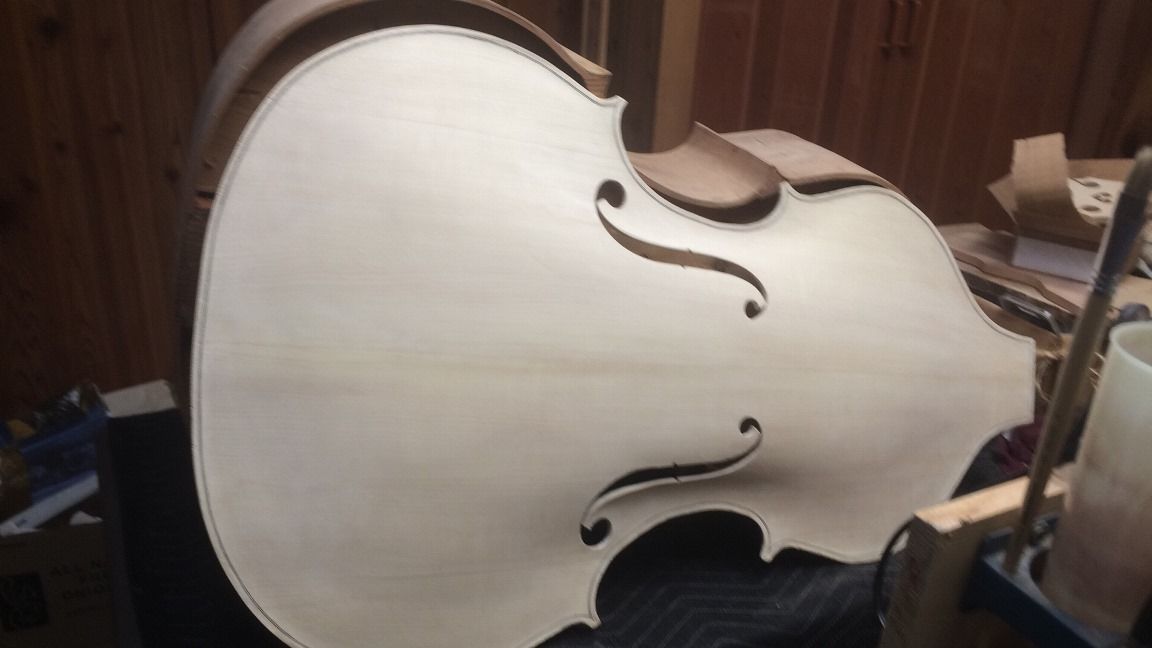
I also completed the scraping of the Sitka Spruce belly, and it is pretty much ready to be glued to the garland.
Front plate and Garland, ready to be joined.
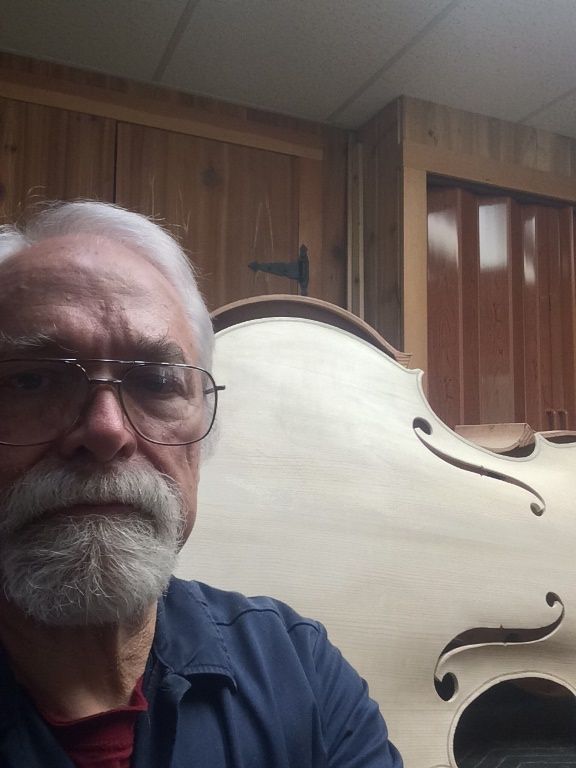
I pretty much wore myself out on this stretch: I’m looking like a tired old man, here. And I thought I was smiling…
The luthier with five-string double bass in progress.
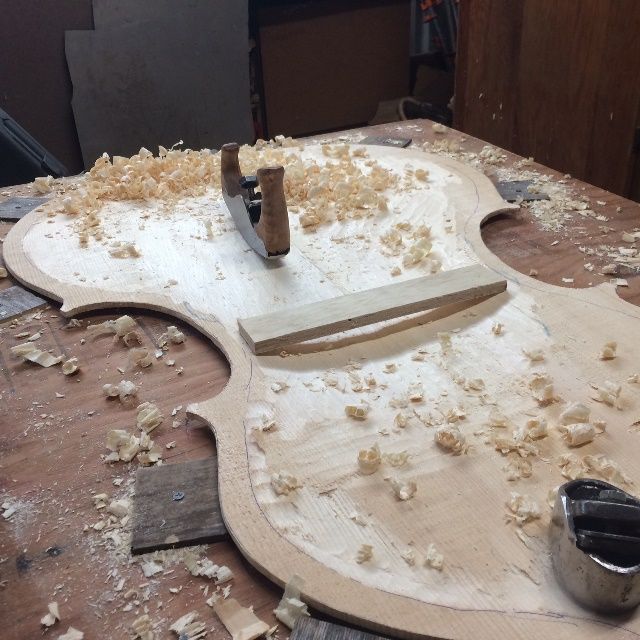
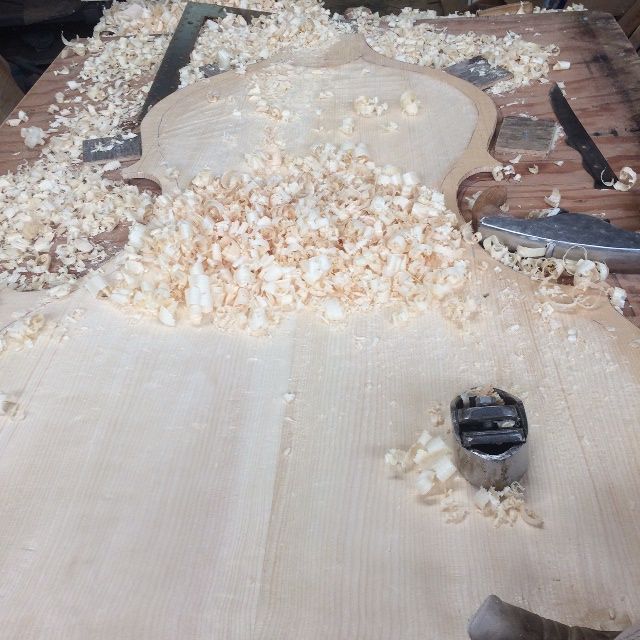
As I said in the post regarding tools, I built the little curved-sole scrub-plane with the specific intent of using it to carve out the inside of the Sitka Spruce front plate for this Five-string Double Bass.
Rough-carving the interior, using the scrub plane.
Carving Dots
As the depth approached the correct value, I began switching over to the palm plane, there in the foreground. But as it turned out, I actually had a long way to go before I was anywhere near too thin.
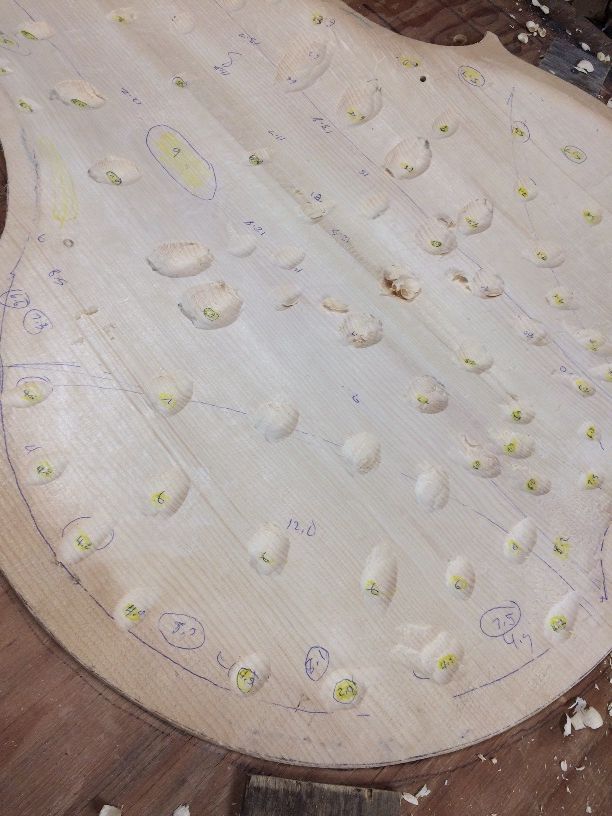
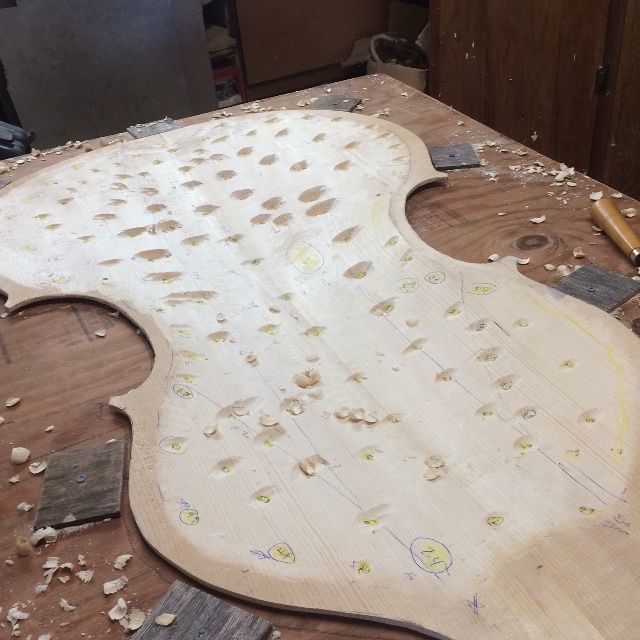
I used the bass caliper to register thicknesses all over the plate, and then began carving “dots” at each location, to the desired thickness.
Carving “dots” of correct thicknesses all over the plate.
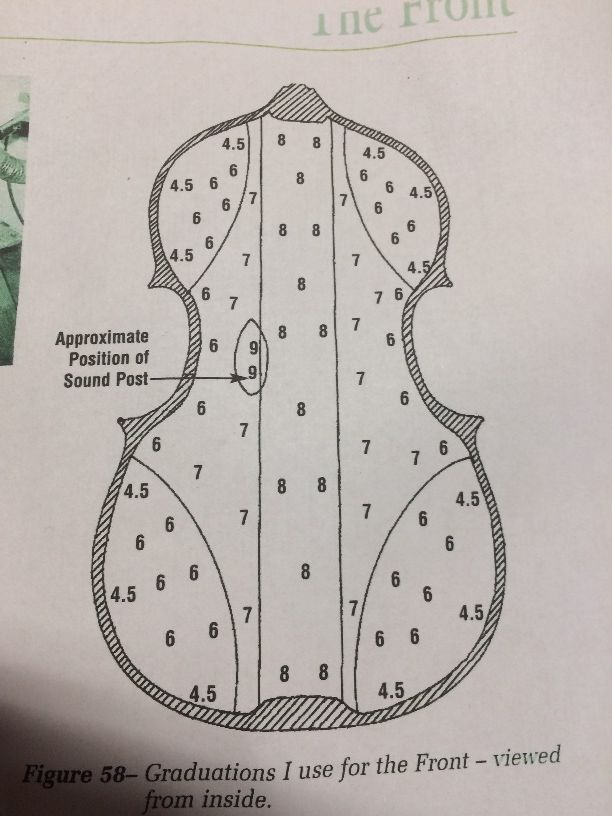
As I found (or created) spots that were at the correct thickness, I wrote in the thickness, and highlighted them in yellow, to warn myself against going any deeper. Eventually, I had mapped out the entire plate at least approximately according to this diagram from Peter Chandler’s book “So you want to build a Double Bass”:
Graduation map from Peter Chandler.
He had derived these measurements from a fine old master bass by Domenico Busan, which conveniently happened to be disassembled for repairs and restoration. He said that he had subsequently used these values on all his basses, and it always worked well. (Sounds good to me!)
I kept carving until I had “dots” all over the plate.
Thicknessing Dots completed.
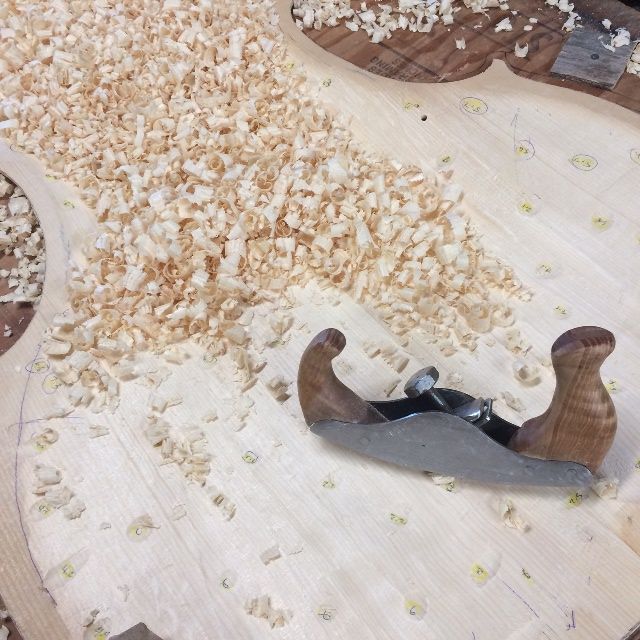
Connecting the Dots
Then I began “Connecting the Dots”:
Connecting the dots.
As I planed away the excess wood, the “dots” got smaller and smaller, and, in some areas disappeared. By that point I had switched over to the palm plane which is less aggressive and makes a smoother surface.
Planing with the Palm Plane.
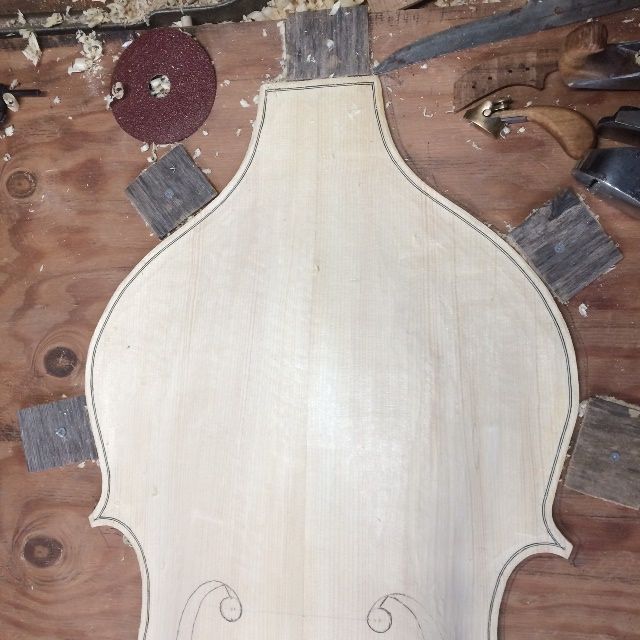
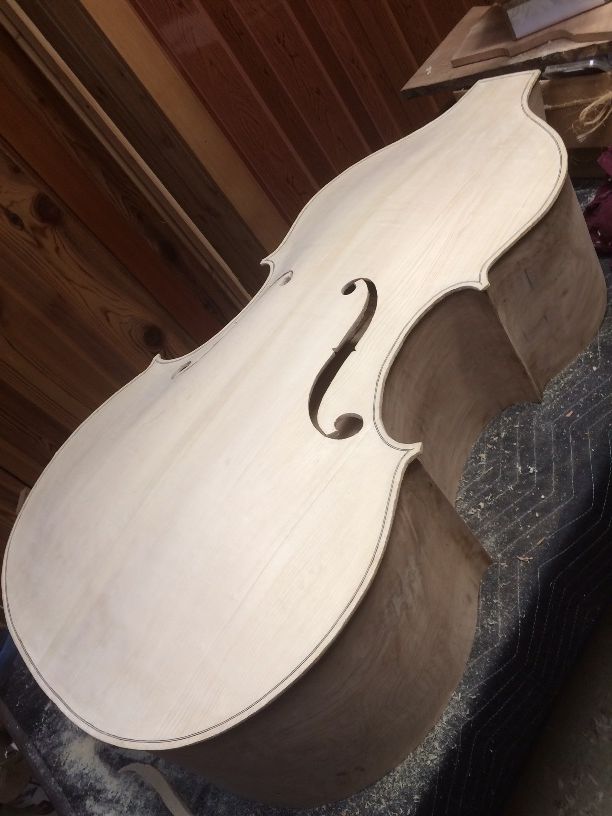
But eventually, it was pretty much all done, and time to cut out the f-holes. However, I decided to install the purfling first, and then cut out the f-holes.
Purfling installed:
I did not take pictures while this step was in progress: I just got going and pressed on until the job was finished, then took a few pictures. Sorry. I don’t always think about pictures.
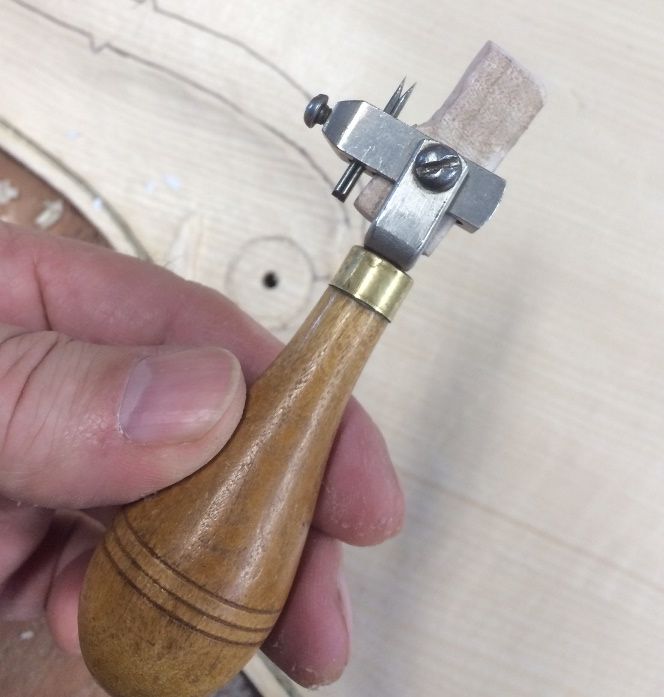
I used this old purfling marker to trace my lines, then a thin-bladed knife to slice along the lines to make a slot…then picked out the waste wood and inlaid the purfling.
Old purfling tool: missing part replaced with maple.
Upper bouts with purfling installed.
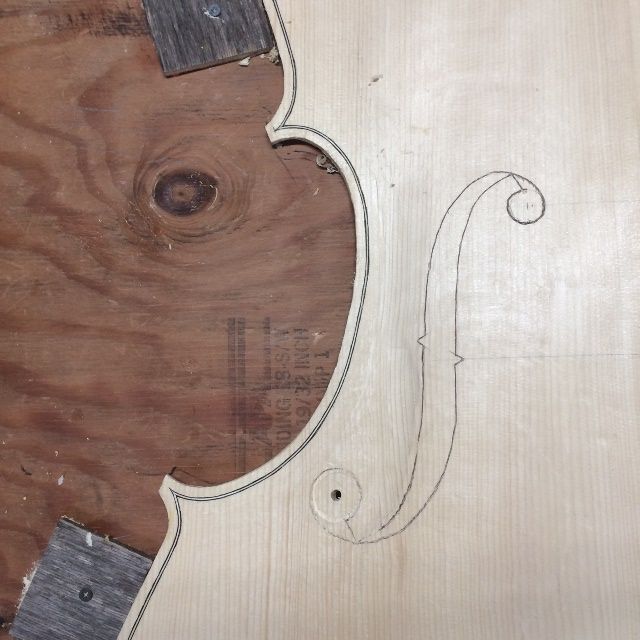
Bass F-hole incised and center-bout with purfling.
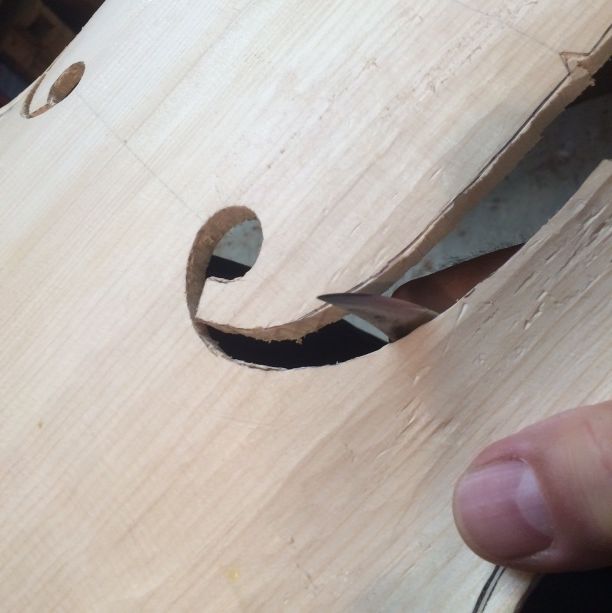
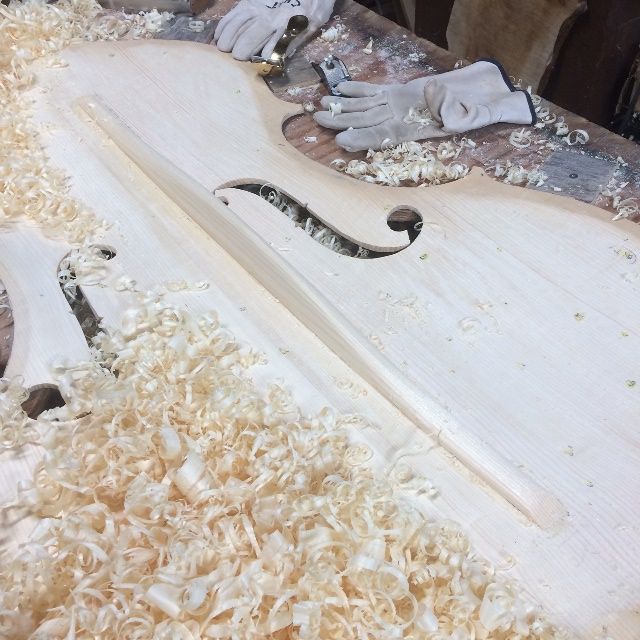
Cutting the F-holes
I used a coping saw to cut out the f-holes. It was slow and laborious but it worked, and there was little chance of any catastrophic errors. The result was two f-holes cut within a millimeter of the line and no errors. It is starting to look like a double bass!
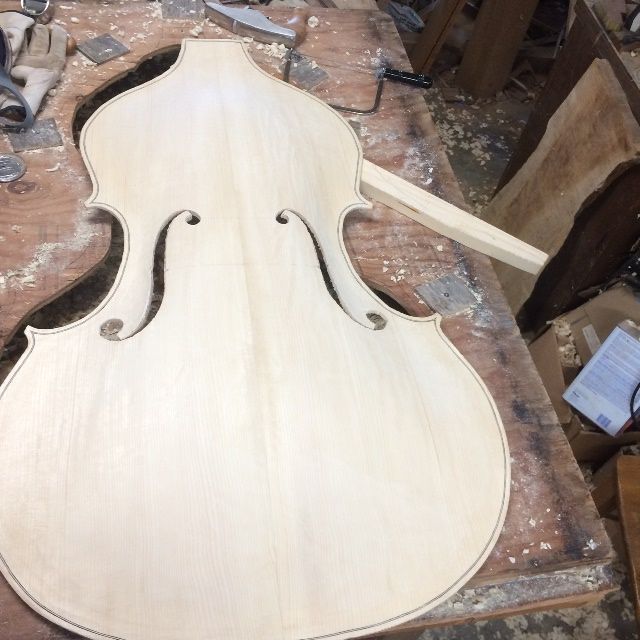
F-holes cut out.
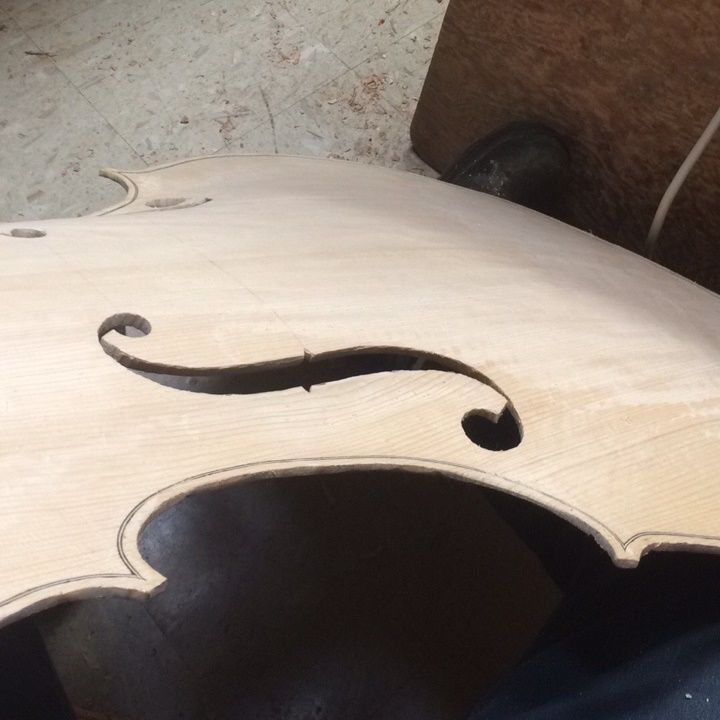
Rough-cut f-hole ready for refinement.
Using a knife to refine the f-holes. ( I will finish them with a file.)
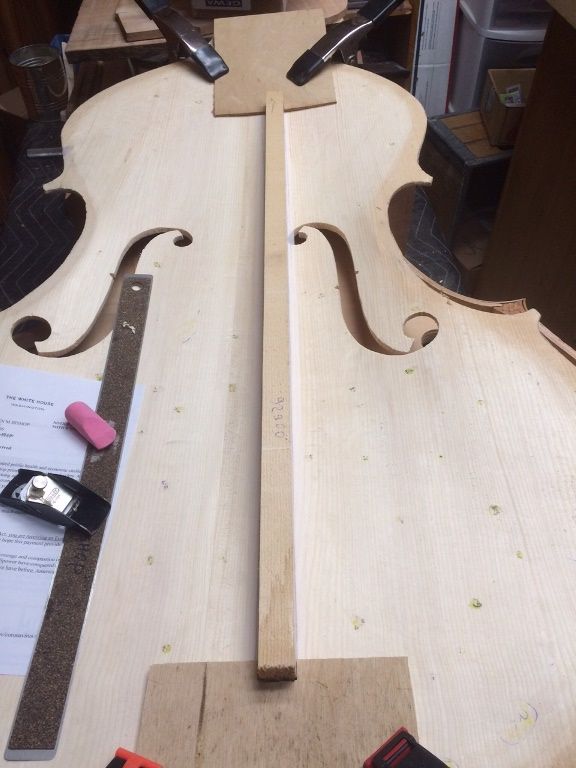
Bass-bar fitting
Fitting fixtures for fitting the Sitka Spruce bass-bar.
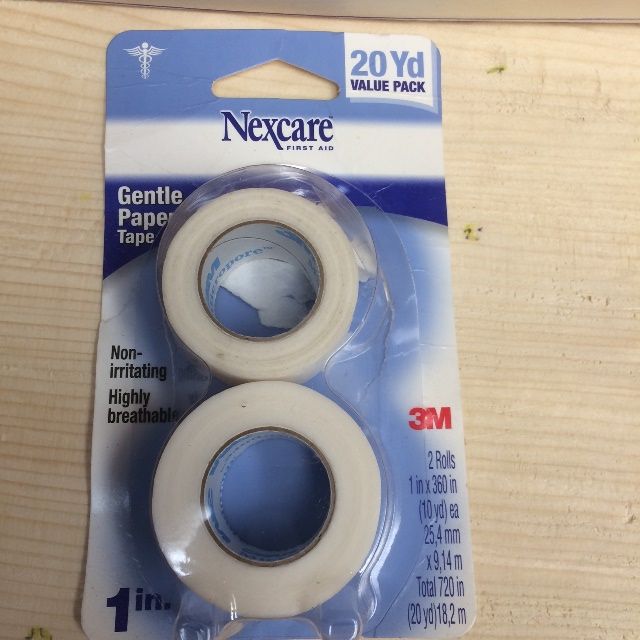
I use a very thin paper gauze tape for chalk-fitting bass-bars.
This is the tape I use, along with sidewalk chalk.
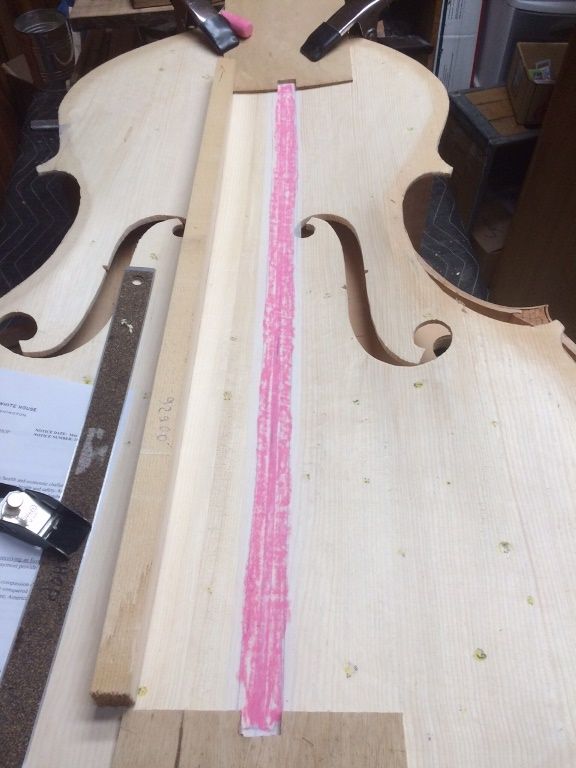
Paper tape with chalk applied.
The trick is to press the bar into the chalked tape, and “wiggle it” slightly, to pick up chalk on the high spots. then plane off just the chalked places and do it again, until all of the bass-bar comes up with chalk on it. That achieves a perfect fit. When the tape is finally removed, it takes all the chalk with it.
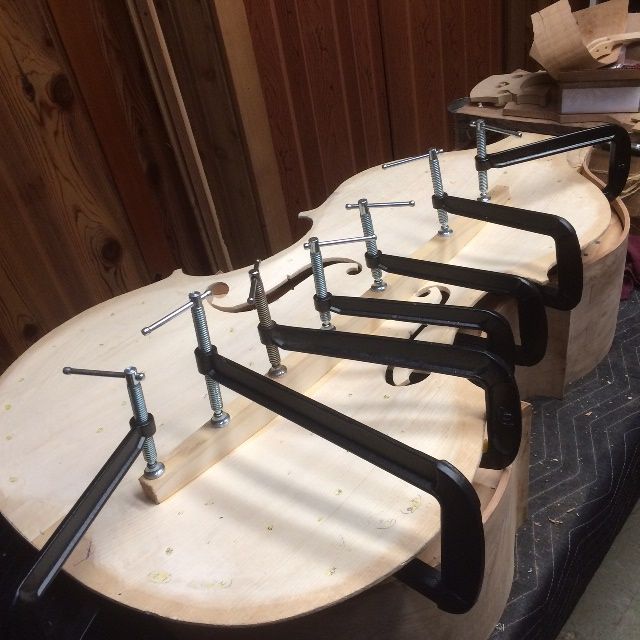
Then I warm the wood using a heat gun, apply a liberal coating of hot hide glue to both surfaces and clamp the bar in place. I leave it overnight to dry, just to make certain it will not pop back off (I have had it happen.)
Bass bar fitted, glued and clamped.
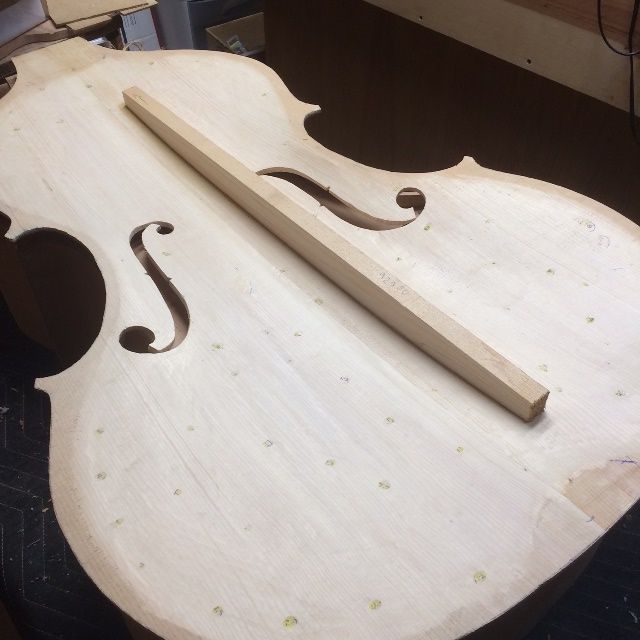
Installed bass-bar, ready to carve to shape.
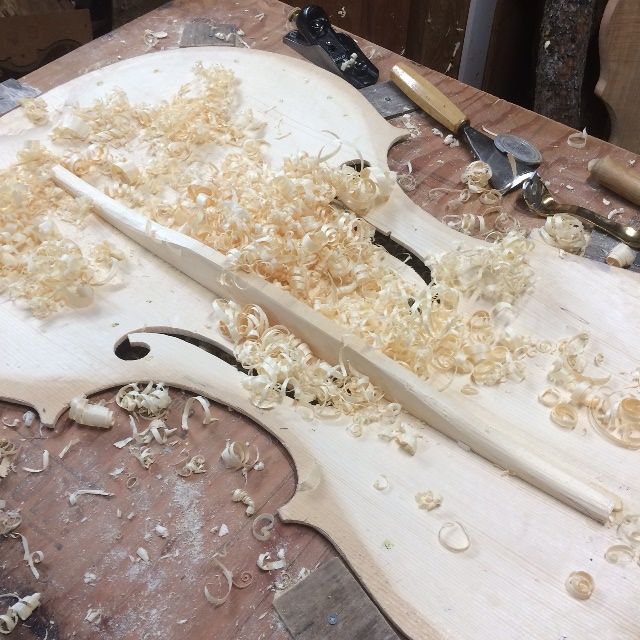
The properly-installed bass-bar still has to be carved to the appropriate shape. I use planes to accomplish the carving.
Beginning to carve the bass-bar.
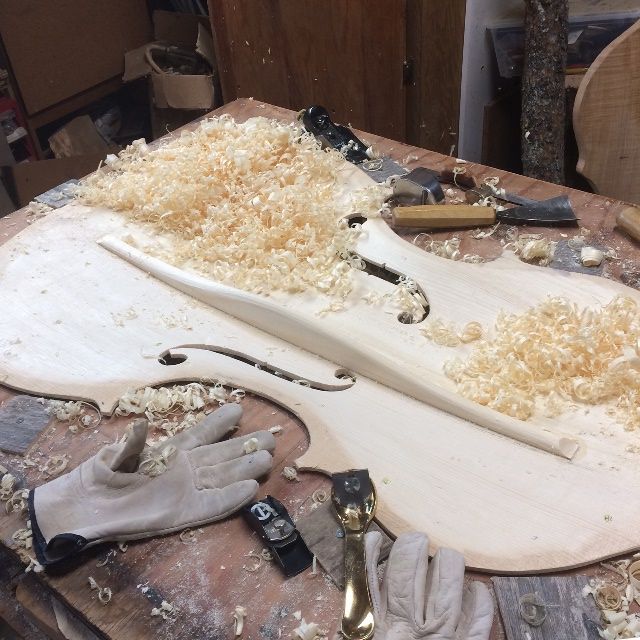
Bass bar nearly complete.
Bass bar complete
Interior of completed Front plate sitting on the garland.
Completed front plate resting on the garland. (Starting to look like a double bass!)
Back Plate Vision
There is still a good deal to be done, before I can install the Front plate, so I am stopping there for the time being.
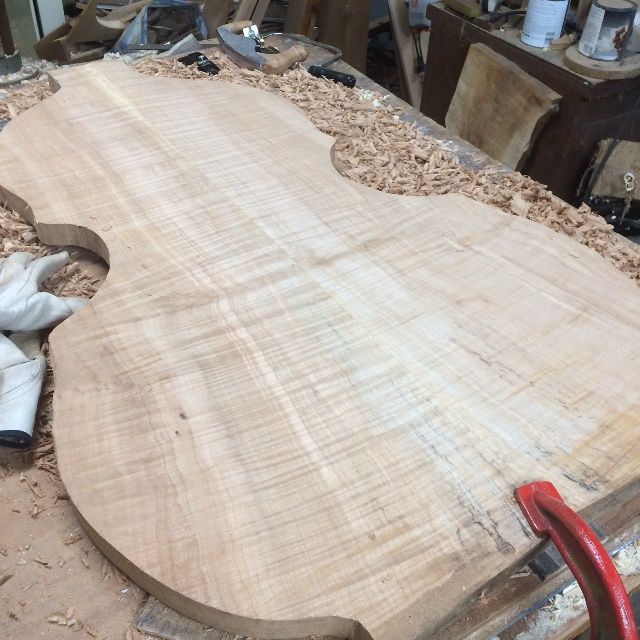
But I really wanted to get a foretaste of what the Big Leaf maple of the back is going to look like; so I planed the inside and outside of the back plate flat, just to have a look at it:
Back plate inside surface.
Back plate outside surface.
It is pretty stuff! I am really looking forward to seeing it completed.
As I was ready to begin the inside carving of the front plate, I realized that the little caliper I use for graduating violins and violas was simply not going to serve. I had a much larger caliper I had built 13 or 14 years ago, when I built my first bass, but it had been hanging in my workshop untouched for all those years and I was afraid that the battery might have corroded and ruined the digital indicator.
I had purchased the electronic tool from Harbor Freight, back in 2006 for about $10 (If I remember correctly,) and built the caliper out of hardware from a local outlet and a scrap of 1″ plywood decking. It was pretty crude, but it worked and was quite accurate.
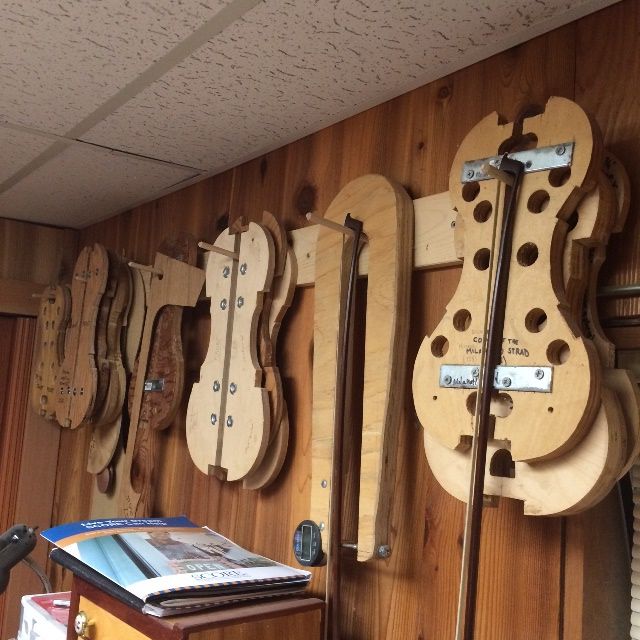
Bass caliper, hanging amongst molds and templates.
I took out the little “battery-tray” thing, to see if my fears were justified, and it seemed as though the battery had not leaked, but was simply dead. So I went and bought a new battery, inserted it, and “Hey! It works!”
Bass Caliper with large display.
One of the things I like about the tool is that I can actually read the display. My small caliper has such a tiny display that I have difficulty reading it. Notice that it is reading .03 mm when it is not in use. The plywood flexes that much, under the weight of the lower jaw, so I hold the instrument upright and level, and press the “zero” function. Then it reads “zero” when it is held upright, and .03 mm when it is lying flat on its side.
So that was the first tool I was concerned about. The next concern was that I really did not want to gouge out the interior with mallet and gouges, as I had done the exterior. I was fearful of cutting too deep. So, in my mind, a “scrub-plane” with a curved sole was in order.
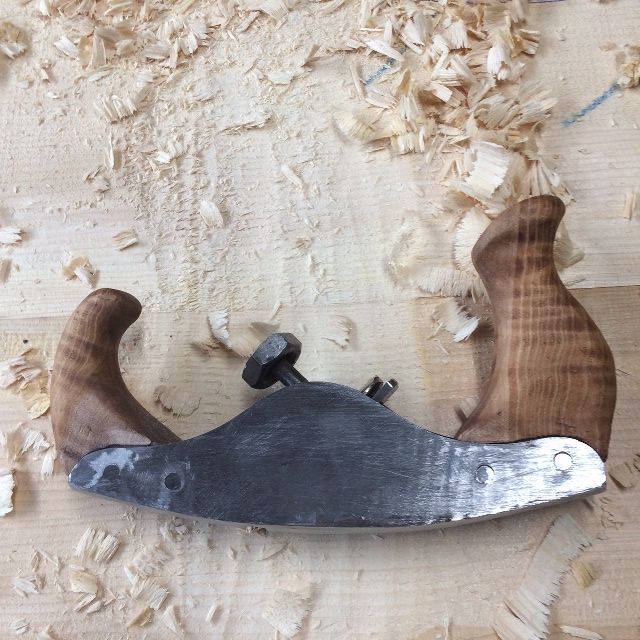
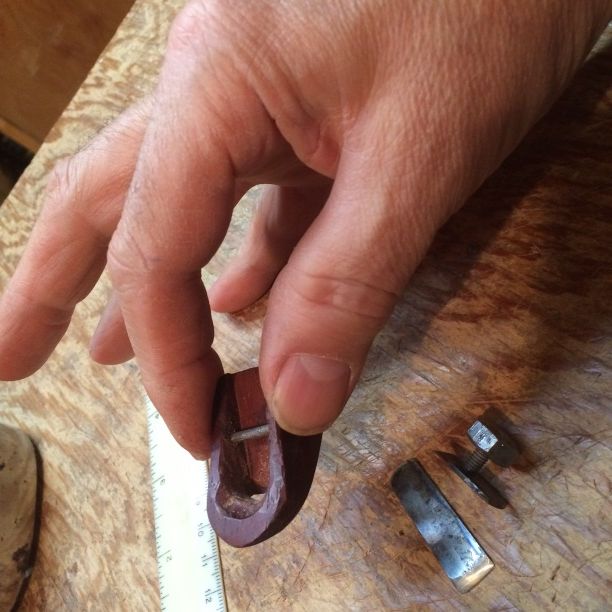
Curved-sole Scrub-plane
This also was one I began years ago, but did not complete soon enough to use it on the bass, nor even the cellos I made later, so the pieces languished in my toolbox drawer, waiting for me to finish the job.
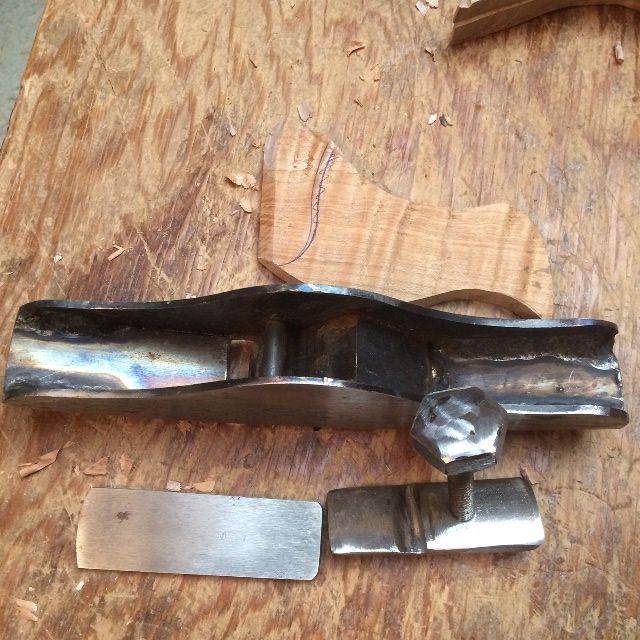
I had made the body by welding together a slice of scrap stainless steel pipe, and some mild steel plate, along with a little section of angle iron and a 1/4″ pin. The cap iron was a shorter section of the same slice of stainless pipe, and the blade was (if I remember correctly) a piece of A1 tool steel. I had even gone so far as to cut sections of curly maple for handles, but had stopped there, and all the pieces were together in the toolbox. So– the time had come!
Pieces of the curved-sole scrub-plane.
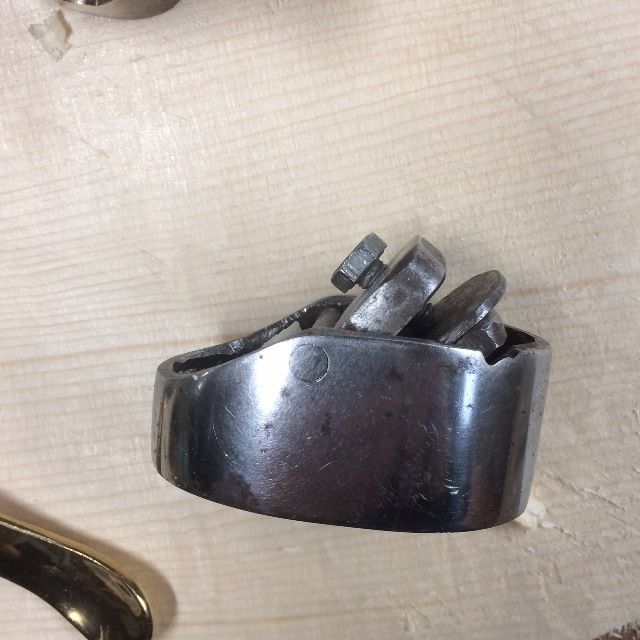
Bottom view of Curved-sole Scrub-plane.
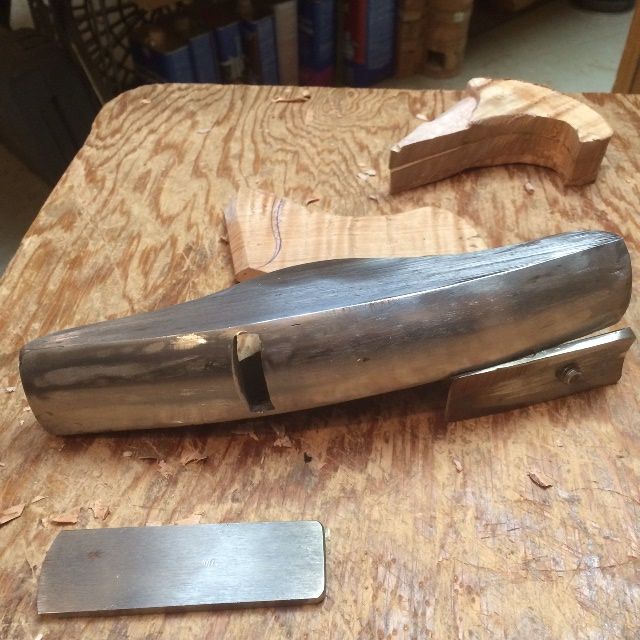
Partially assembled plane.
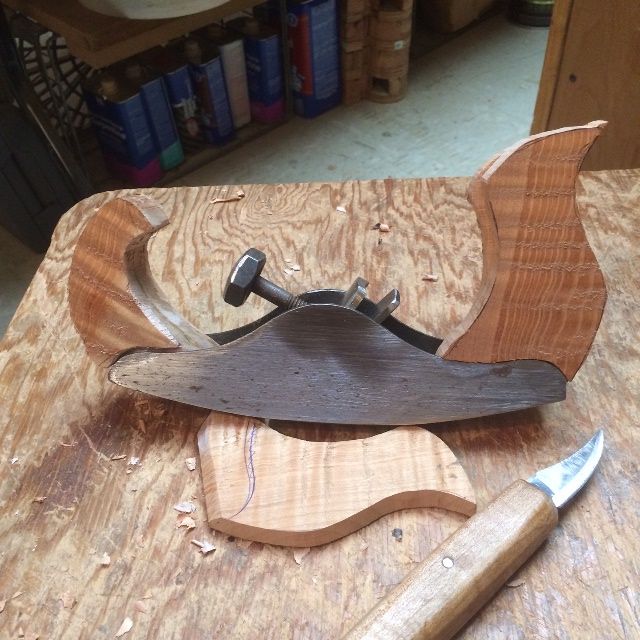
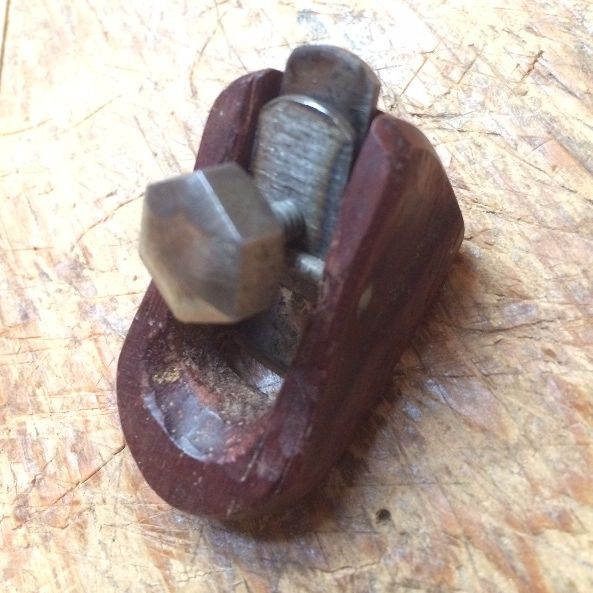
Completed Curved-Sole Scrub-Plane.
The completed plane, after a little adjusting, worked very well, and fit my hands comfortably, so the task of carving the inside of the bass front plate went very well.
Carving the inside of the Double Bass front plate using the Curved-sole Scrub-plane.
The only fault in the scrub-plane, because of the deeply curved sole, is that it tends to leave a rather un-smooth surface– like ruts in a dirt road. So, as I got closer to the desired thickness of the plate I was going to need a plane with a much less aggressive curved sole, and broader, as well, to produce a smooth surface.
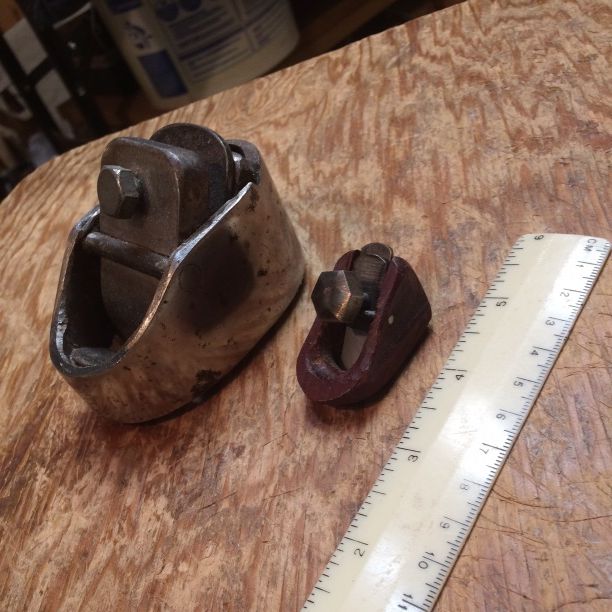
Palm Plane
Fortunately, this one, I had built during my first bass-build, though it had not seen much use, as I never really got it adjusted right, and was busy enough that I just set it aside and completed the first bass using other tools. I got it back out and carefully sharpened the blade and adjusted the depth of the cut, and it turned out to work splendidly, though it took a little practice to get the angle in my grip just right.
Steel Palm Plane.
Steel Palm plane with a wooden finger plane.
All of the planes I have built work on the same principle: a blade is fixed at a given angle, and clamped in place by means of a cap-iron that slides under a transverse pin, and a screw that wedges the cap-iron between the pin and the blade. The principle is very old, and works well. It is used in many commercial planes, and predates all the companies that use it.
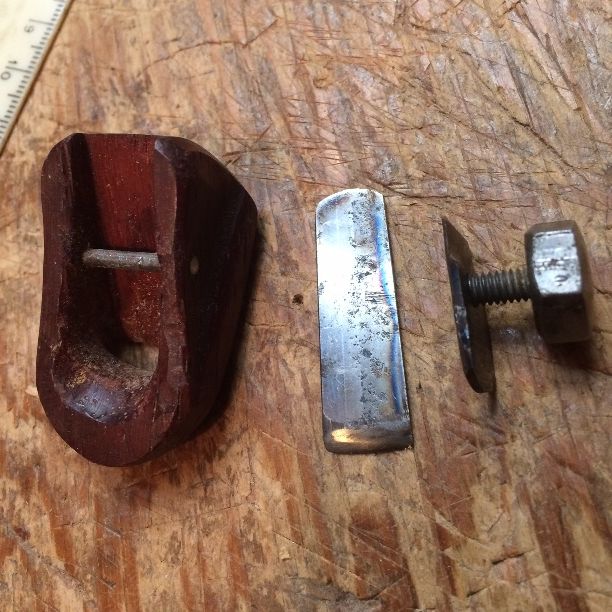
This little wooden plane was the first one I ever made. It is made of Padauk wood and is pretty crude, but it works well. (Ibex planes work better, but at the time I made it I had no money for an Ibex plane.)
Wooden plane disassembled. The thin end of the cap iron slides under the pin.
It is not a really tiny plane, but it fits my thumb and forefinger pretty comfortably. The blade was a section of scraper blade, and, while it works, I think I could improve it with a better choice of steel.
Wooden plane showing interior and relative size.
Assembled Padauk-wood plane.
Other Tools
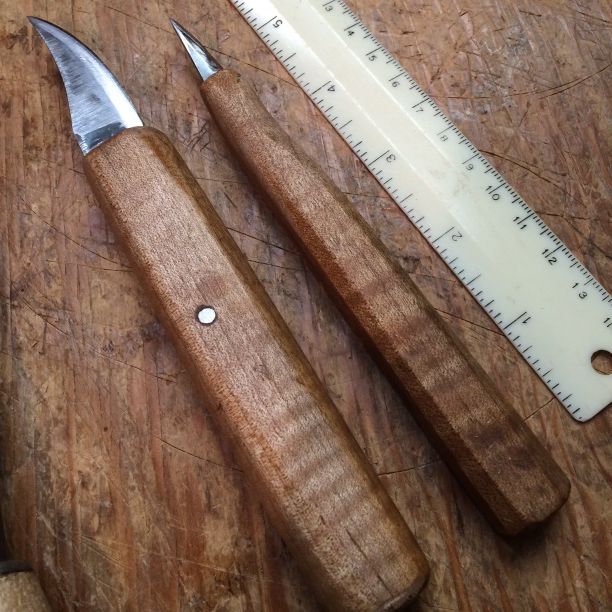
The other tools (below) I had made years ago, and have been using regularly.
Homemade knives from an old sawzall blade.
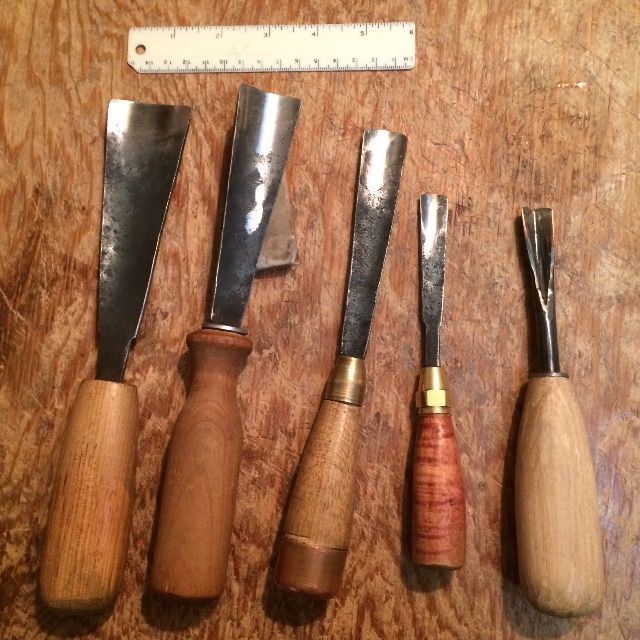
Homemade gouges, forged from plow-steel or drill rod.
Many of my other tools are homemade, too– spool-clamps, scrapers, work cradles, templates and molds are all hand-made originals, as well as my workbench (which is usually buried in tools and materials…sorry).
So…that’s how I acquire tools! 🙂
Rationale
You might ask, “Why would you go to all that trouble when you can buy professional-level tools for reasonable prices?” The answer is two-fold:
In the first place, I really enjoy making tools! And then, there is a special joy in finding that the tools I make usually work very well, so I then have the pleasant experience of making musical instruments using the tools I made.
But the second reason is financial in nature: I simply did not have the extra money to buy every tool I needed when I began building instruments. But one does not haveto expend a great deal of cash, to get started in a craft, if one is willing to think, read, and learn the skills to make tools.
The time I spend building a tool is repaid many times over, by the pleasure I get in using the tool and the fact that all these tools will be used for many years to come, as I continue to build instruments. Are there sometimes failures? Once in a while an idea doesn’t work as well as I expected, but usually I find it very rewarding to make my own tools.


.JPG)
.JPG)
.jpg)


.JPG)