I got a text message from Andy Pastor, stating his only complaint so far, regarding the new five-string fiddle he bought last week:
He isn’t getting enough sleep!
He finds that fiddle to be utterly addictive, and has been staying up ’til midnight playing the thing, even when he knows he has to get up and go to work in the morning! 🙂
Great problem to have!
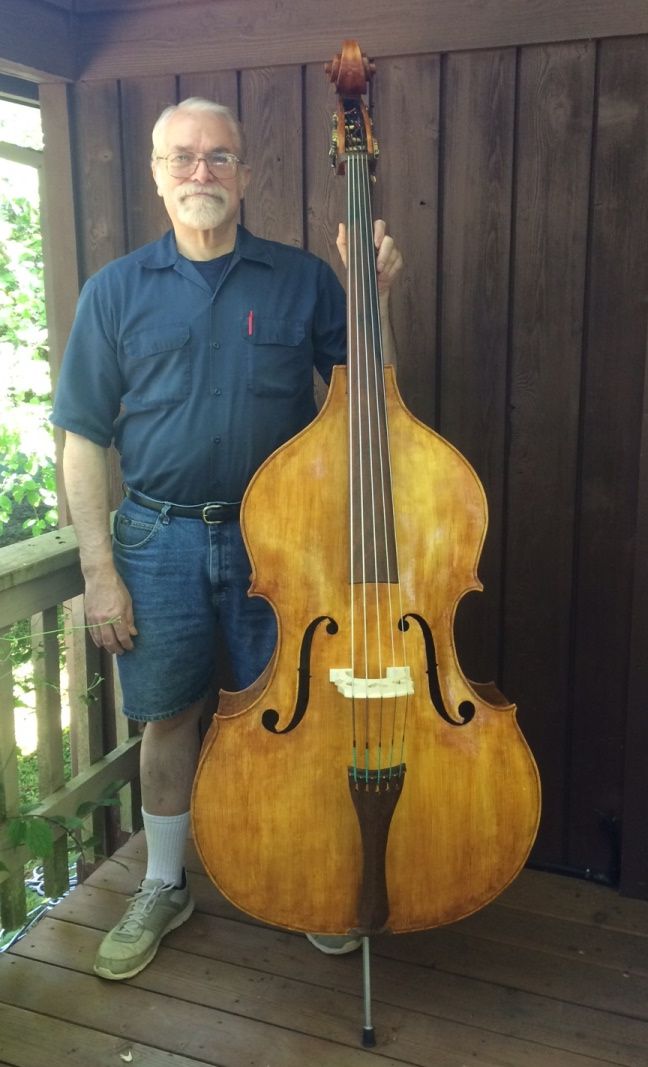
Here is Andy, playing his new fiddle:
Happy Fiddler!
And here are two sound clips (actually recorded in his bathroom where there are high, vaulted ceilings, producing a bit of an echo-effect…which he likes. )
🙂
First one is “St. Ann’s Reel” Second is “Arkansas Traveler.”
A couple of months ago, I received a phone call. I glanced at the “caller-ID” thing, and I thought, “I don’t know anyone in Ohio: this is probably spam!” But I cautiously answered, and was surprised to hear: “Um, hi! Yes, I was interested in a five-string fiddle…” (I instantly changed gears, mentally, and shifted from “Is this another spam-call?” mode, into “Yes!How can I help you?” mode!)
Turned out he specifically wanted a handmade,luthier-made acoustic five-string violin. I had a couple in stock, but he looked at the pictures and asked, “What else have you got?”
(Hmmm! Now what?)
“Well, I have one that I had begun, using scrap from the five-string double bass I just completed….” So I sent him pictures of the beginnings of an instrument:
Wood for the new 5-string fiddle
There wasn’t a great deal to see, but he liked it and asked how long it would take to complete it. I guessed “at least a month,” and he said, “Fine! Send me pictures as it progresses!” And that was that!
Progress Reports
So I sent photos and progress reports, and he asked questions. We chatted via e-mail and phone chat messages, during that month, during which he saw things like:
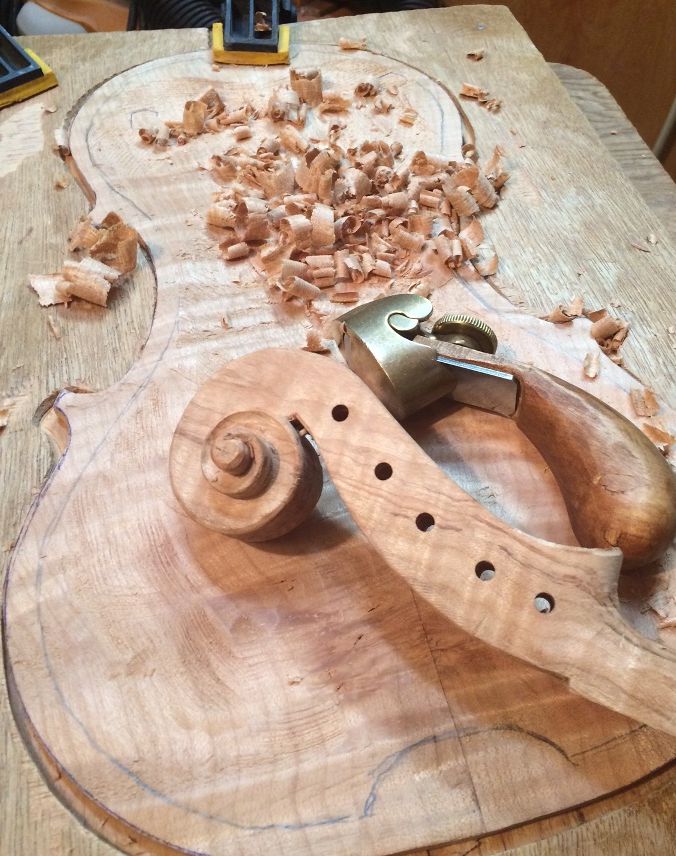
Progress on back plate and neck.
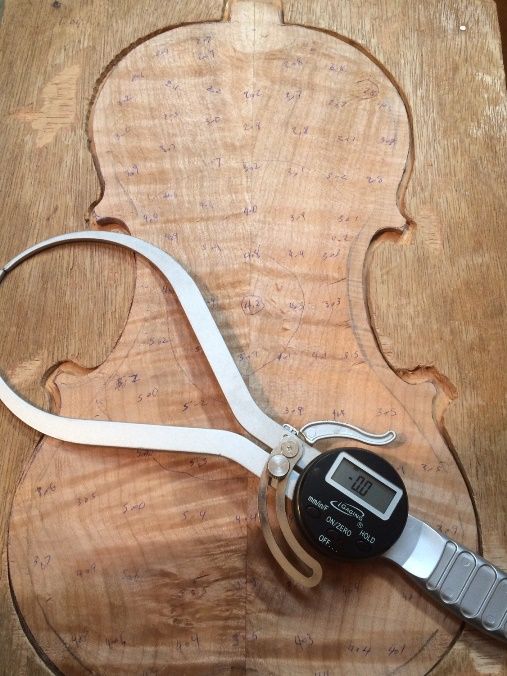
Beginning graduation of the back plate.
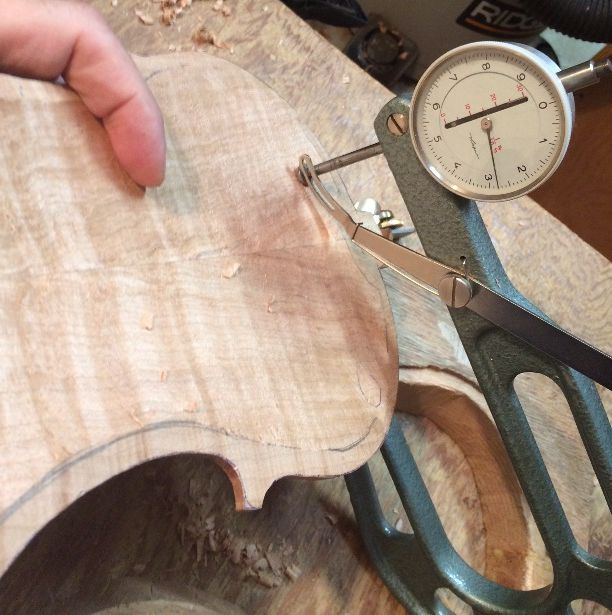
Graduating the back plate.
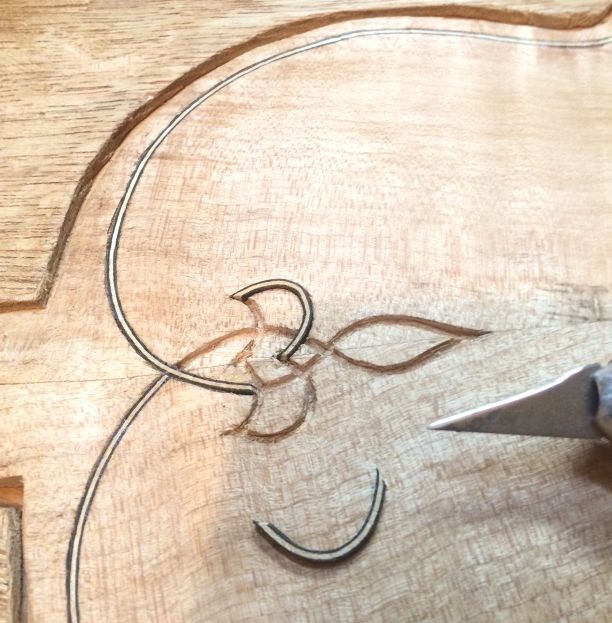
Completing the Purfling weave on the back plate, using wood purfling.
He was especially encouraged to see proof that I actually build my instruments from the raw wood. He had already discovered that there are makers who put their label on other people’s factory-made instruments and claim they made them. (If someone can’t afford a handmade instrument, I willoffer the option to buy one purchased in the white, and finished in my shop, but I never put my personal label in such an instrument: I did notbuild it! My own work is all signed and numbered.)
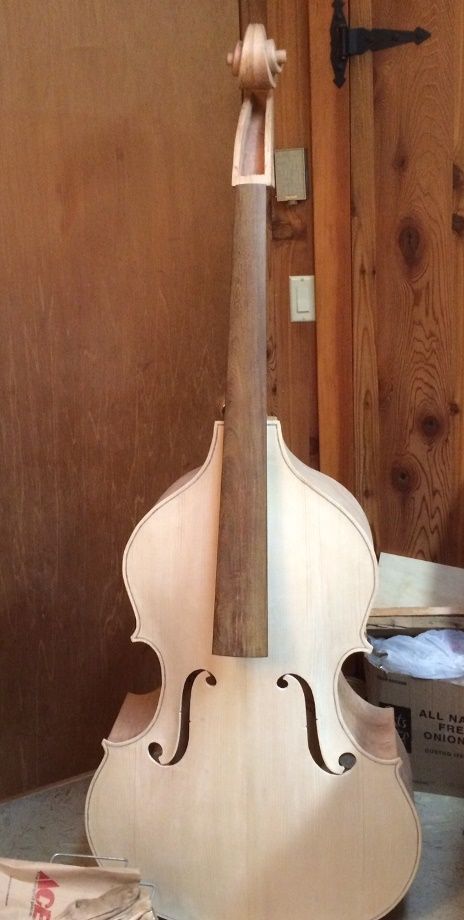
Closed corpus, front view.
Closed corpus, back view.
Final varnish, front view.
Final varnish, back view.
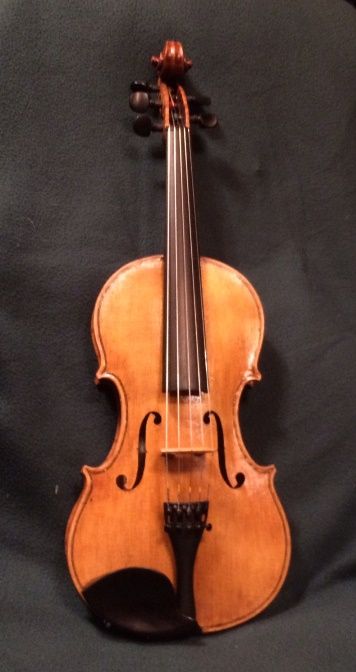
And finally, the set-up instrument:
Finished Five-string Fiddle, Front View.
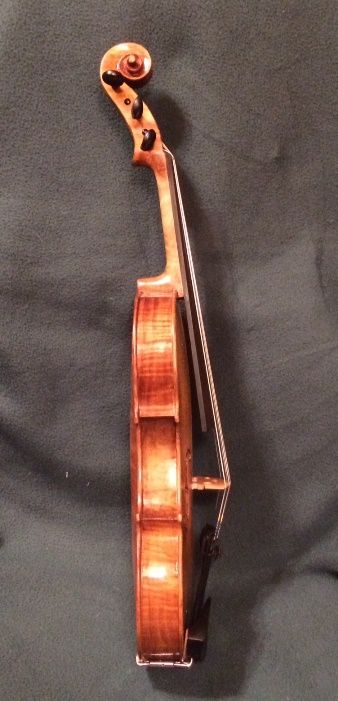
Side View.
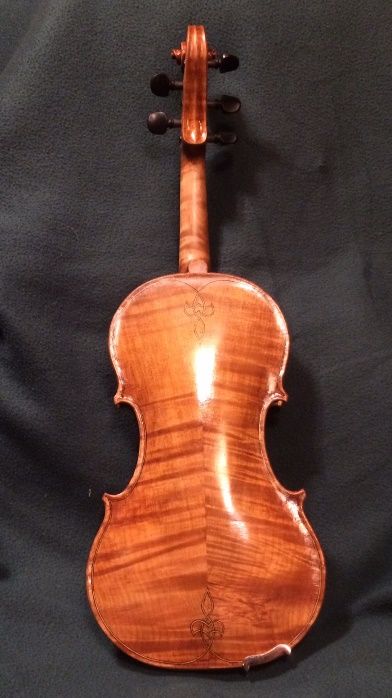
And Back View!
The Visit and Delivery
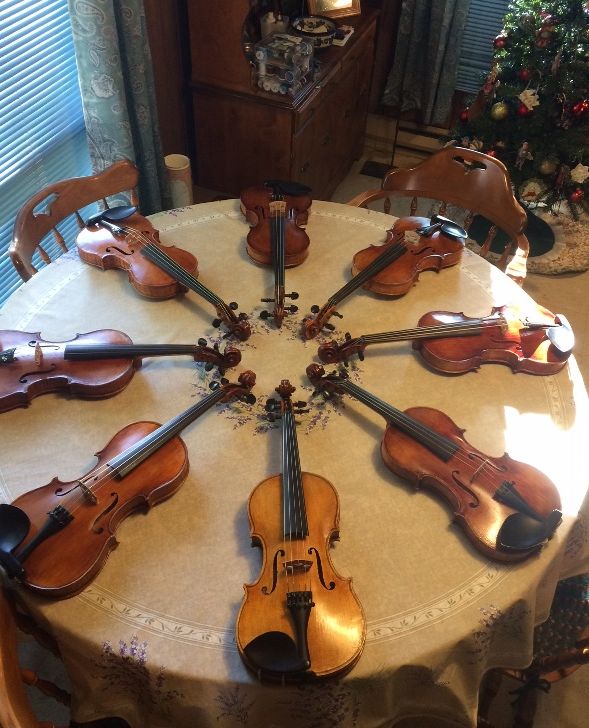
He was growing more and more attached to “his” instrument as it progressed, so, as it neared completion, he made plans to fly here to Oregon (with his family) to be the first to play it! This is what he encountered when he and his family arrived:
Dining table display of violins: the five-string is front and center!
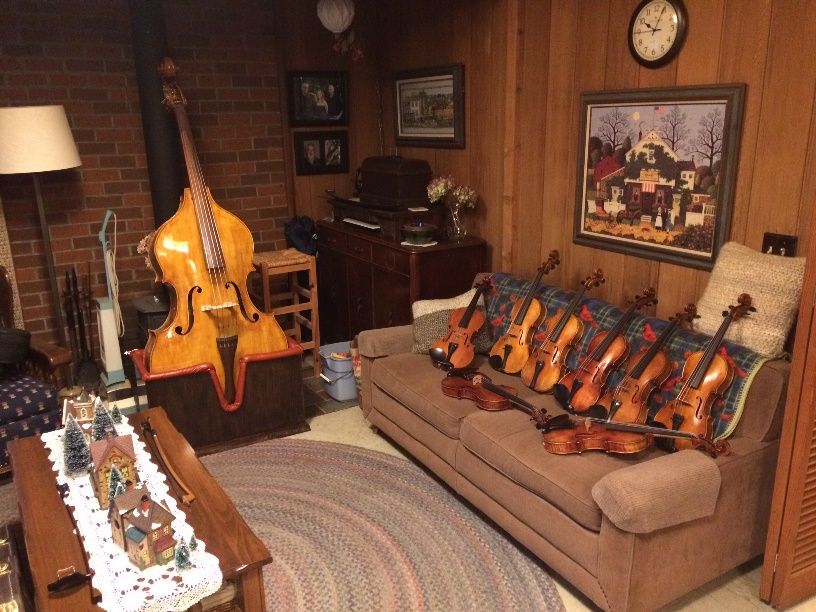
He brought his wife and two sons with him, and they patiently waited (From about 1 PM to 10 PM!) while he played ten of my violins, three of my violas, and, of course, the “prize five-string!” (I stillhave “Orange Blossom Special” racing through my head, today!) This is how the living room looked when they left! 🙂
Living Room results: the five-string fiddle is GONE!
He ultimately bought the five-string fiddle, packed it into a hard-shell case, and then he and his family headed off to the Pacific coast (the next morning) to hike around the Cannon Beach area, as well as Ecola State Park.
Family at Cannon BeachView from Ecola State Park trail.
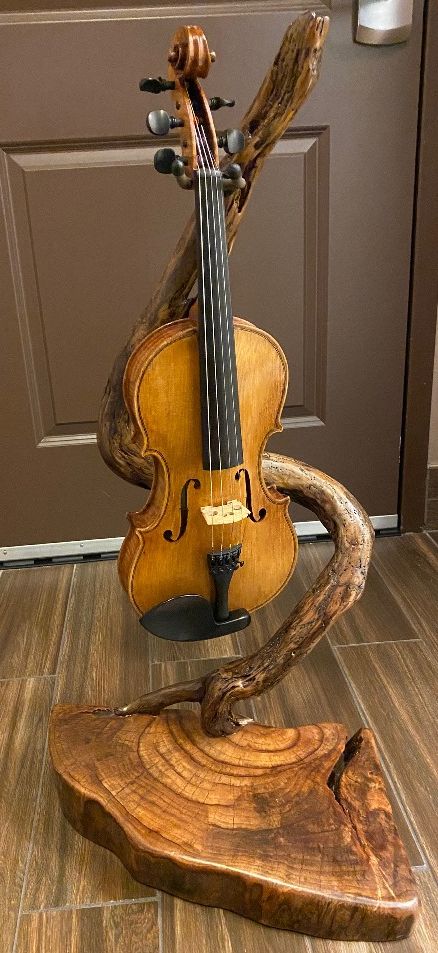
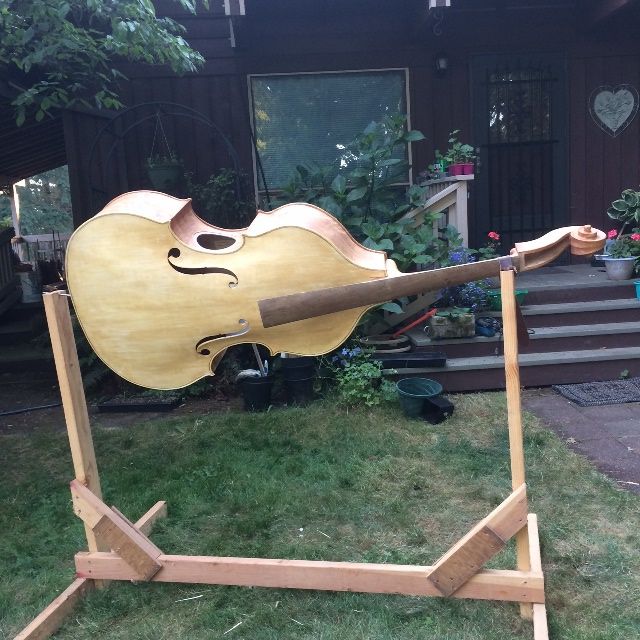
They found a little shop in Cannon Beach where he bought a stand for his new fiddle:
Fiddle Stand for the New Five-string!
And then they flew home to Ohio! But He graciously took time to write a review, and allowed me to post it here, including his name!
Andy Pastor Review
I’m leaving this message of gratitude to Chet Bishop and his family for others to see and hopefully help them make a decision to purchase one of his fine instruments.
I purchased a five-string violin which he had just begun carving months ago and which became a commission violin for me. I flew from Ohio to his beautiful place in Oregon where I had the pleasure to meet Chet, his wife Ann, and his son Brian Bishop. By the way, Brian is a premier guitar luthier who had several guitars with him as well as guitars in local well-known music stores. His guitars sound better than any Martin, Taylor, or Gibson I have heard (attention to detail and work performed inside the body of his guitars sets them apart).
There is so much to say about a Chet Bishop violin and the experience, so I’ll make it bullet points:
The sound of a Chet Bishop violin is perfectly balanced on all strings. This is not easy to get a deep clear tone from a C string on an acoustic violin, but this is his specialty. No issue getting that rich sound out of the C string with my lighter weight carbon fiber Coda Bow Diamond GX or my Franz Winkler Pernambuco bow. No need for a heavy bow to get the C to ring!
The violin is handmade (not a kit) and he knows exactly where the wood used is from. He has specific wood he uses ( and showed me his supply) which I feel gives each violin its own unique and beautiful sound and, of course, look. The quality of the build process is fully under Chet’s control. (Unfortunately, there aremore than a few violin makers using pre-made “white” violin kits and selling them as hand-made. Be aware and do your investigation!)
The feel of the five-string Chet Bishop made violin is so similar to a four-string, it makes transitioning between a four and five-string violin easy. The string spacing and bridge/fingerboard arching are dialed-in, and his years of violin making are apparent.
The finish of my violin as well as all the other Chet Bishop violins that I had the pleasure to try is similar to the old Master violins from Italy. Cheap student violins all have that high glossed finish look, it’s hard to see the grain on the top of these foreign-made violins, and even harder to feel the ever-so-slight structure of the grain. Probably why these factory violins made in low-cost countries all sound the same; no real soul.
Attention to detail can be noticed at first glance, even by any non-musician. The unique purfling design on the back, the internal strengthening (used by the old master builders to make their instruments last hundreds of years), small unique features of the saddle and nut, the wood sealing and varnish process, cycloid arching of the back plate, just to list a few, all add to the quality and beauty. This detail will certainly allow the violin to actually improve over time (not that it needs to!!).
Then there is the experience of watching the violin get made. Chet provided daily progress photos and explanations, we communicated via text and sometimes email. This was very exciting. I know more about how a violin is made than I ever thought possible, at least without going to a violin-making school. I also got to know the luthier during this process, such a bonus to know your violin maker. He understood what music I played (in a band environment) and kept that in mind during the build process. (Although any of his violins could easily be (and are) top performers in any style: classical, jazz, country, bluegrass, spiritual, klezmer, Irish, Celtic….)
The benefit of visiting the violin maker and trying out the instrument cannot be overstated. Chet and his wife are extremely inviting people, as he said, “ordinary folk.” I probably tried out over 10 of his violins and violas, this was a real pleasure to hear each instrument and compare sounds to the five-string I purchased. Chet and his wife are so patient: I spent a full day with them (10hours). We did some minor adjustments to the five-string violin after I had played it: changed the chin rest, changed the e string, lowered the bridge a very slight amount, and a tiny soundpost move. He made sure everything felt perfect before I left. His wife made us some fantastic burritos for dinner, hot apple cider, and apple scones for snacks/dessert! As I said, very welcoming people, we had great conversation: Chet is extremely knowledgeable and I’m so grateful he shared some of this knowledge that day. Although these are truly the benefits of a visit, he has no issue shipping a violin, and I feel these minor adjustments could be handled remotely and/or by myself.
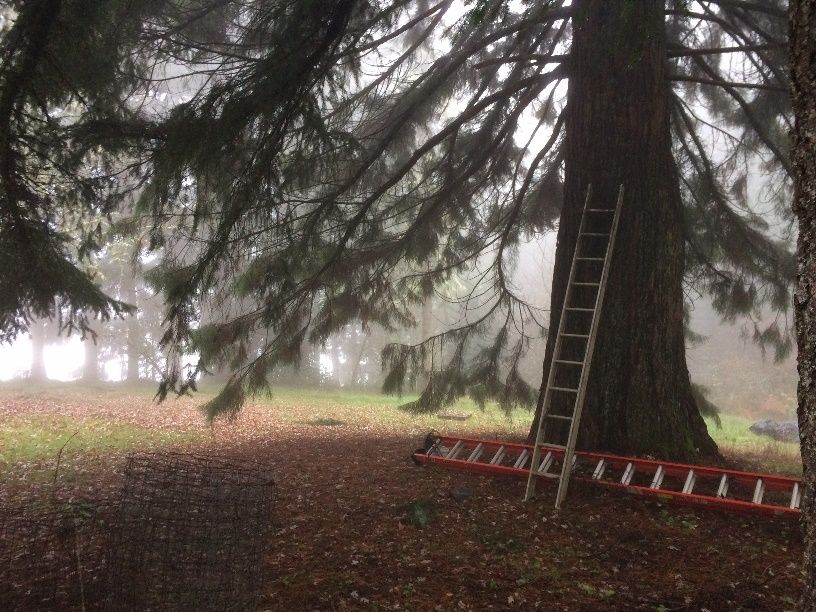
I’m including this last bullet point because… how many people can say they have a Sequoia tree on their property? He has at least two! (I got photos by both.) Chet is a wealth of knowledge about the area, I’m so thankful he suggested visiting Cannon Beach / Haystack Rock / Ecola State Park on the Pacific Ocean. This added to making the trip even more memorable. Even saw a herd of wild elk grazing just feet from me at one of the scenic views.
I hope this review not only expresses my gratitude to Chet Bishop and his family, but also provides assurance and guidance for anyone considering one of his fine instruments. He makes the whole violin-family of stringed instruments and his son, Brian Bishop, covers the family of guitars. Looking forward to another visit in the future. Truly an heirloom instrument!
Thank you, Chet!
Andy Pastor,
From Ohio
Here is one of the “baby” Sequoias which Andy liked so much: My mother planted them 50+ years ago. 🙂 They are only 5 or 6′ in diameter.
I just began a new website for teaching-related articles, photographs, and videos. The Layman’s Institute will be at http://laymansinstitute.com and will have lots of teaching articles: whether math lessons, violin-making, or anything else.
No content is there, just yet: I will begin adding content in the next few days, I hope.
Gotta have a stand for the bass…can’t let it just lie around the house.
Heavy base-plate adds stability for the five-string double bass.
Nearly 4″ thick particle-board base-plate lowers the center of mass.
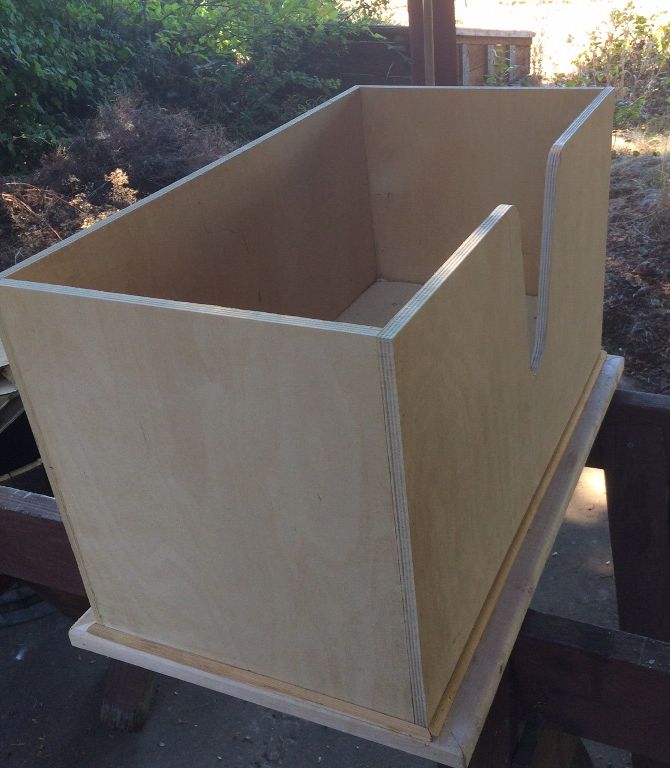
Exterior of 1/2″ birch plywood for strength and beauty. Ready for varnish
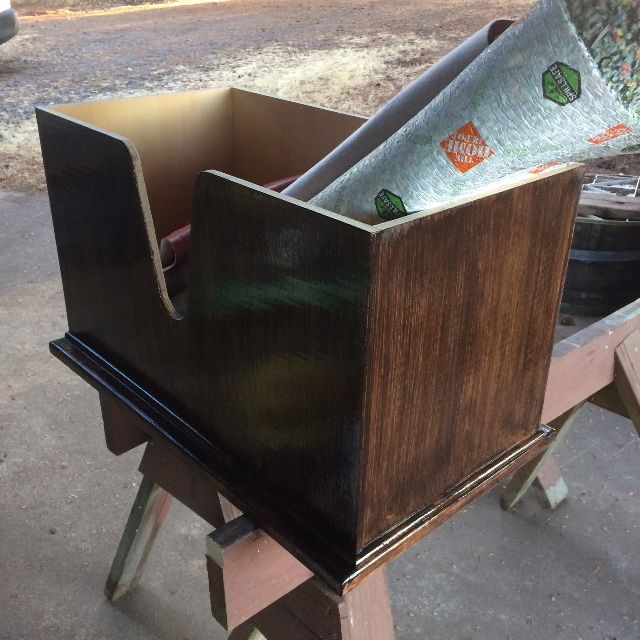
Varnish complete: ready for upholstery.
Carpet padding with vinyl upholstery.
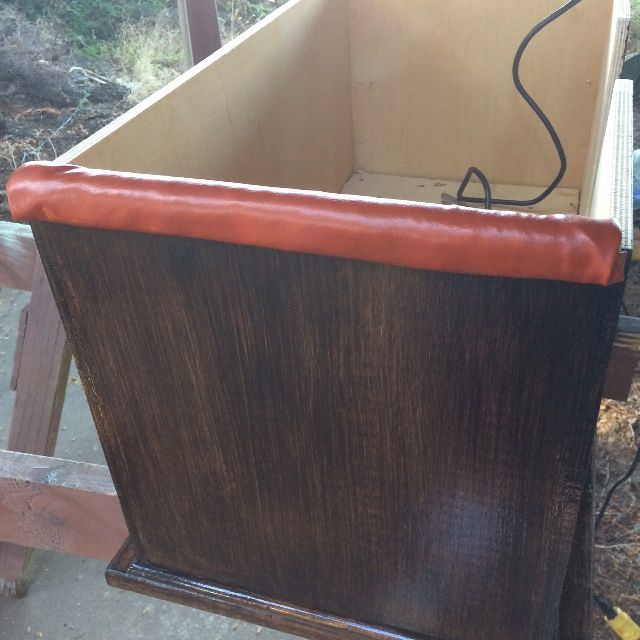
Upholstery begun…outside view.
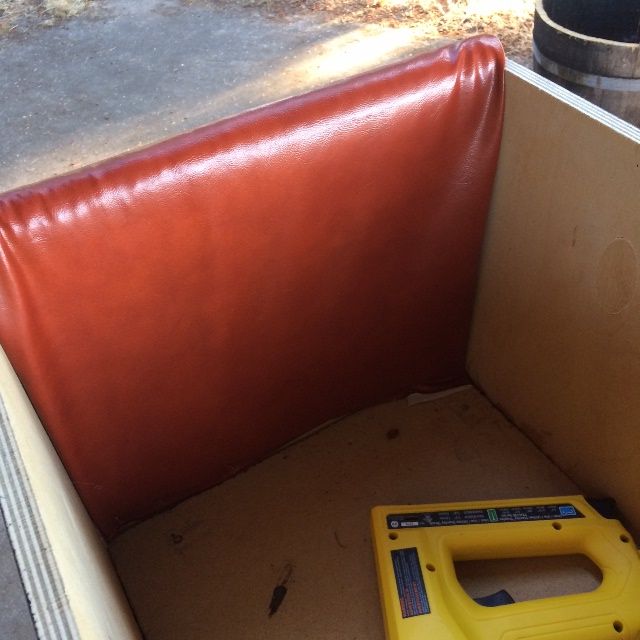
Inside view.
Upholstery completed.
Bass stand with the bass, secure against tipping.
Looking good! Safe, too!
Travel Case Coming!
The next project has got to be a travel case for this bass. A “Travel-bass” with a removable neck is less than optimal without a case in which to travel. And such cases don’t seem to be readily available for reasonable prices.
So, it is back to the drawing-board for me. 🙂
Probably looking at a foam-core fiberglass case. Shouldn’t be too much harder than building a boat. 🙂
I began to build a bass bow! but other things intervened, and I had to set it aside for a bit. I posted about it back then on my other website: Bass Bow Beginning
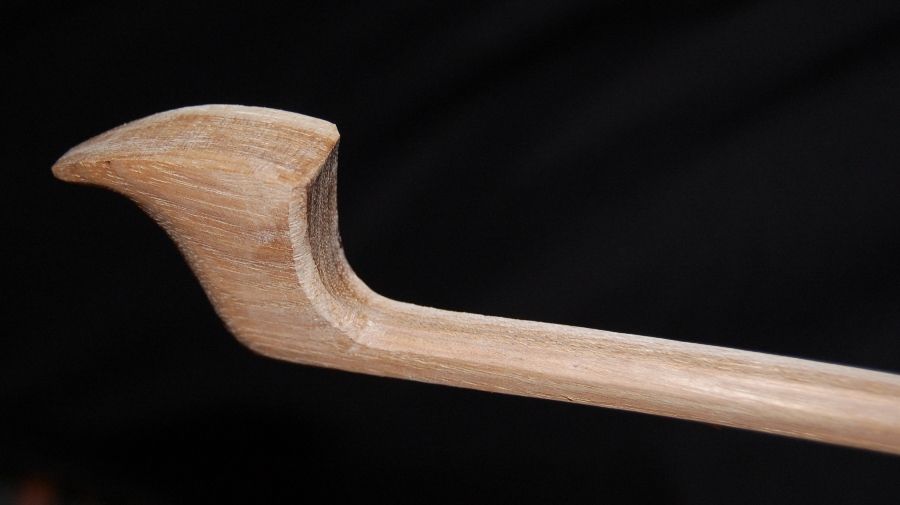
Beginning of a bass bow.
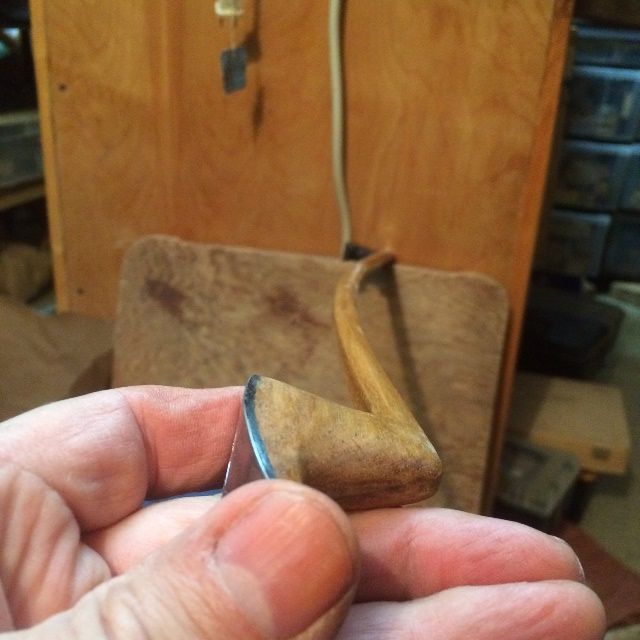
Beginning a bass bow Frog.
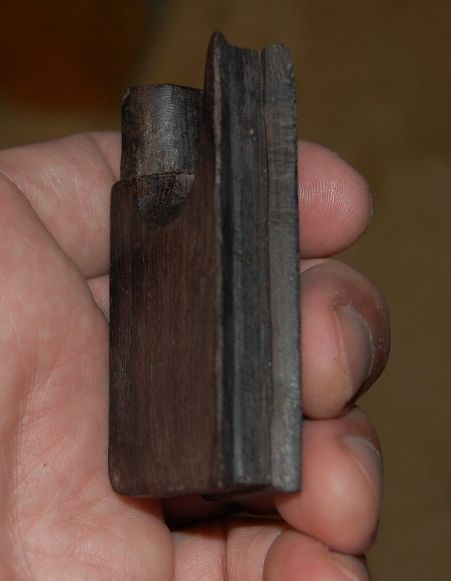
But then I got another little block of time, and I made more progress. That was fine, but it was still not terribly high-priority, so it was again set aside while I did what life demanded. (I had gall-bladder surgery somewhere around that time…kinda captures the attention somehow… I had posted about that progress, and the surgery, as well. But it really set me back as far as productivity goes. Sigh…) Bass Bow Progress
Frog Progress
Status as of six years ago.
Annnd, as luck would have it, the gall-bladder surgery disturbed the existing scars from bowel surgery four years earlier, so I ended up with three hernias along the old scar, (sigh…) and was back in the hospital again for hernia repair. (Getting reaalllly tired of this game!)
But now… Everything seems to be healed up and I am once again productive, at one thing or another. 🙂
Completing a Bass Bow
I built my second upright bass, a five-string, 5/8-size double bass with a removable neck for safe transport, and I was struggling to adjust the sound. The bow I had was annoyingly cheap, and soft, and the hair as fine as I would expect on a violin bow… so it was frustrating, and I kept thinking, “I need a better bass bow!” So, the time had come!
Completed five-string double bass.
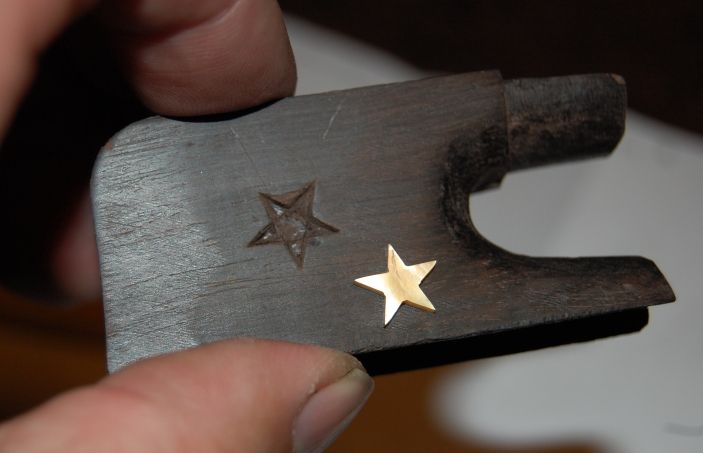
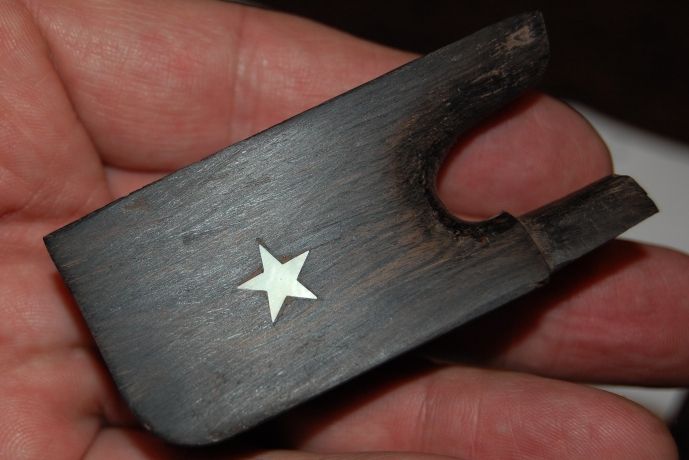
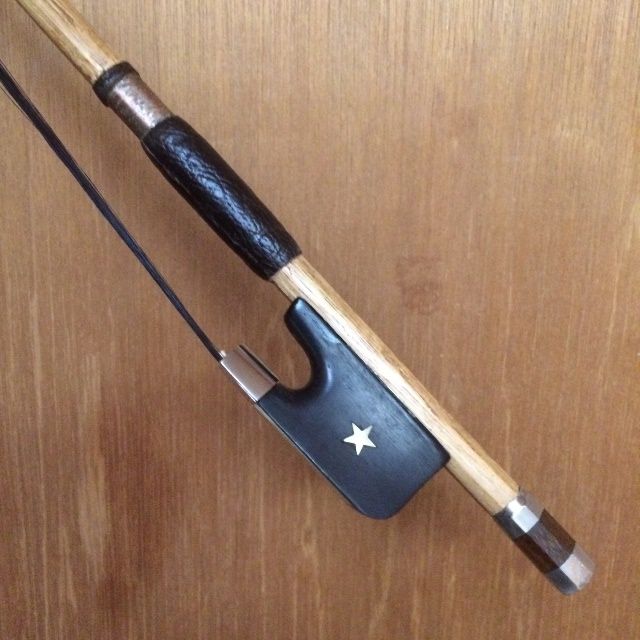
I knew where the Hickory bow was, which I had begun years before, and most of the things I had bought to go with it, so I got moving on it. I finished inlaying the second gold star on the side of the frog, cut gold Mother-of-pearl for the slide and the dot on the end of the adjuster screw, and started on a ferrule.
Beginner’s Errors!
All you bowmakers are already shaking your heads, because you know (as I did not know, that I should have built the ferrule first, and then made the frog to fit the ferrule, instead of the other way around. It is much simpler to carve hardwood to match an existing metal structure, than to bend and braze (that’s what silver-solder is, technically) metal together in an attempt to match an existing wooden shape. (Ah, well, never let it be said that I passed up an opportunity to learn things the hard way…)
Anyway…the ferrule was a real pain to make, because I failed to do it first. The under-slide, by comparison, was a piece of cake.
I had to make a new metal bow-tip, as I had accidentally made the original one a tiny bit too small. Also, I had chosen to use stainless steel, because it was cheap, easily available, and very durable. (Another beginner’s error: Yes, all of the above is true, but it is also much harder to cut, solder, file, and drill holes in than silver would have been.)
At any rate, I got back on the project, and in a day or so, had what looked like a promising bow! But I couldn’t find the hair I had bought. (I remember seeing it, and I remember putting it somewhere so I’d be sure to find it again. Must have been a really special place…I have no idea where it went.)
New stainless steel tip plate, ebony lining, and longitudinal view of arching.
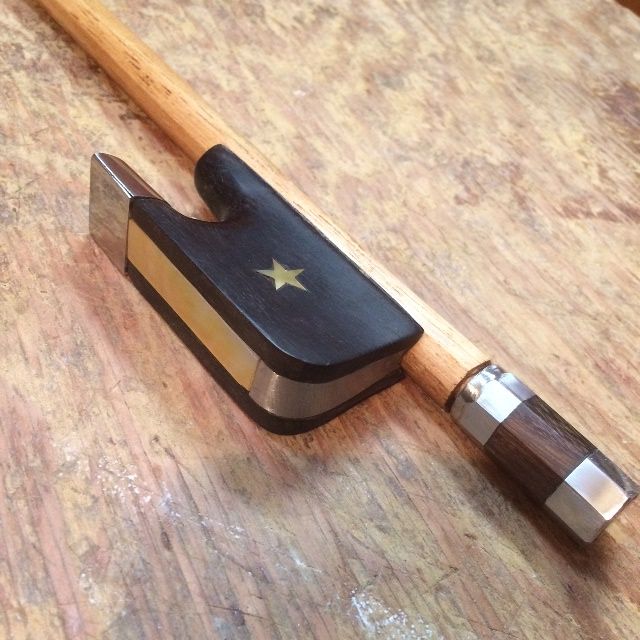
Fully stainless steel-lined Bass Bow Frog with stainless steel and Ipé adjuster screw.
Completed double Bass bow… minus windings, thumb-pad, and hair.
I looked and looked for the hair I had bought, but had no luck: I finally decided to quit messing around, and just order more hair. Usually, there are specialist suppliers I would patronize, and I prefer to do so, but they all would take a week to ten days to deliver: so I ordered through Amazon, and had it the next evening! (Amazing!)
While I was waiting, I added the leather thumb-pad and the wire windings.
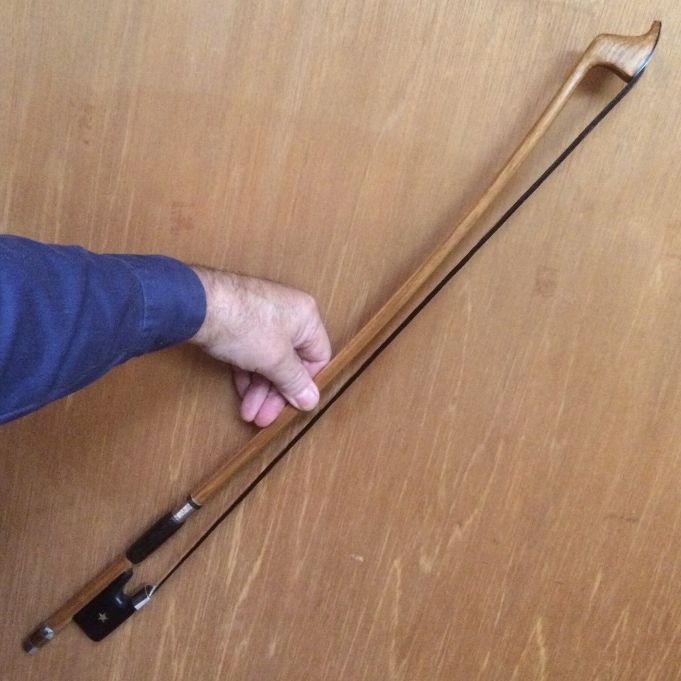
Completed Double Bass Bow with leather thumb-pad and wire windings.
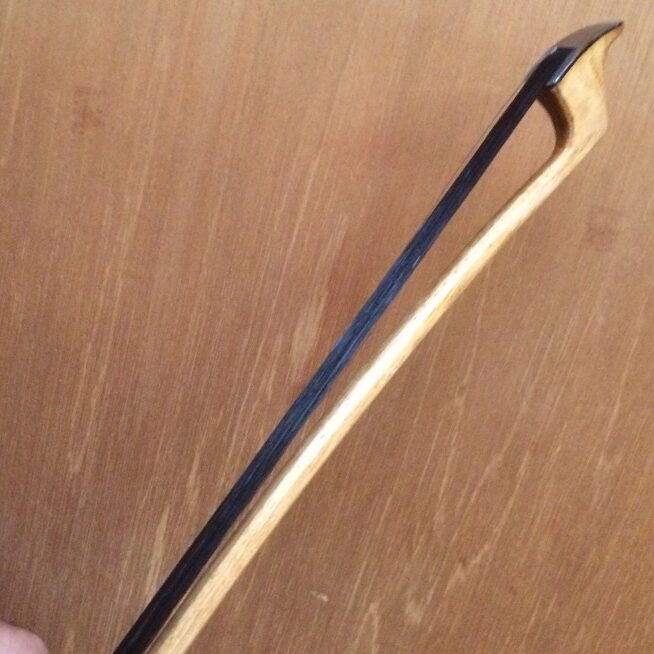
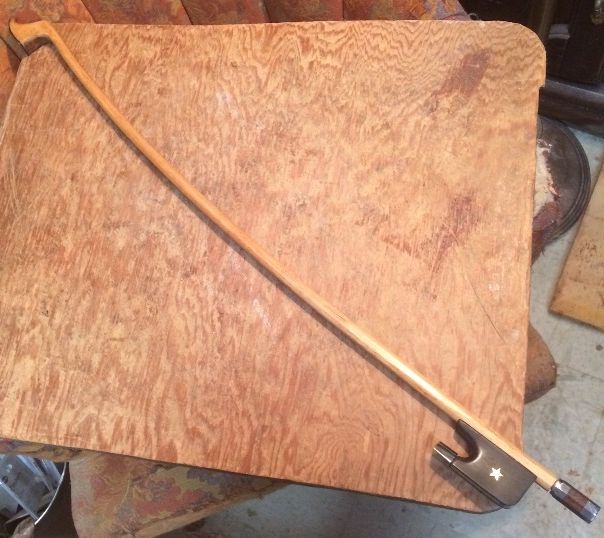
And…that is what the new bow looks like!
Completed hickory bow for double bass.
And it Works!
I am grateful to be able to say, it works well! I get better tone and more volume with this bow than I did with the cheap student bow I already had.
Undoubtedly, a bow made of Hickory cannot be expected to match a good bow made of Ipé wood, let alone one made of Pernambuco. But this bow is quite satisfactory, and I feel pretty good about the project as a whole. I may try making another bow of Ipé, or Bois d’Arc, though, before I attempt a bow of Pernambuco.
Fit and install the End Pin. (Already done on this instrument.)
Fit and install the Saddle. (Already done on this instrument)
Fit and install the Tuners (in the case of a double bass, that means “tuning machines.” Already done on this instrument.)
Fit and install the Soundpost. (already done on this instrument.)
Fit and install the Nut, file the string slots to the correct depth in the correct places.
Establish the correct length for the Tail-gut (or tail-wire in this case) and install it.
Fit and install the Bridge, filing the string-slots once the height is correct.
Install the Strings.
Play for sound adjustment, string clearance adjustment, etc.
End-Pin
On violins and violas, the end-pin (usually called the end-button) only serves as an anchor-point for the tail-gut. But, in cellos and double basses, it also must serve as a height-adjustment, so that the instrument will rest at the correct height for the particular player. In this case, I had chosen an Indian Rosewood plug with a tubular steel end-pin fully adjustable and locked by a thumb-screw on the bass side. I installed it earlier, so here it is, without details about shaping the plug or reaming the hole:
Endpin assembly installed.
Saddle
I cut my saddles with a large radius on each of the upper corners, where the saddle is cut into the front plate. There is a strong likelihood, historically, that cracks will eventually develop, emanating from the corners of the saddle. They are so common that they have a name: “saddle-cracks.” There are two ways to try to avoid such cracks:
The first is to make the mortise for the saddle (the part cut out of the front plate) a little wider than the actual saddle, by maybe a millimeter or so, so that, when (not if) the front plate shrinks during dry weather, it will not find itself up against the unmoveable saddle, and be forced to crack, to allow for the shrinkage. This is a good practice, and I try to follow it.
The second is to make the saddle with sound corners so that there is no “notch” in the plate at the “corners” of the mortise, but rather a smooth rounded curve, which eliminates the stress-riser and minimizes the chance of a saddle crack in the first place. (Round discontinuities essentially do not cause stress risers, hence, do not cause cracks.) I always do this, (since about my sixth instrument) and will continue to do so.
I already explained all this, including the purpose of the saddle, in a previous post. Suffice it to say that this part is already completed.
Saddle with round corners, to prevent saddle cracks.
Tuning Machines
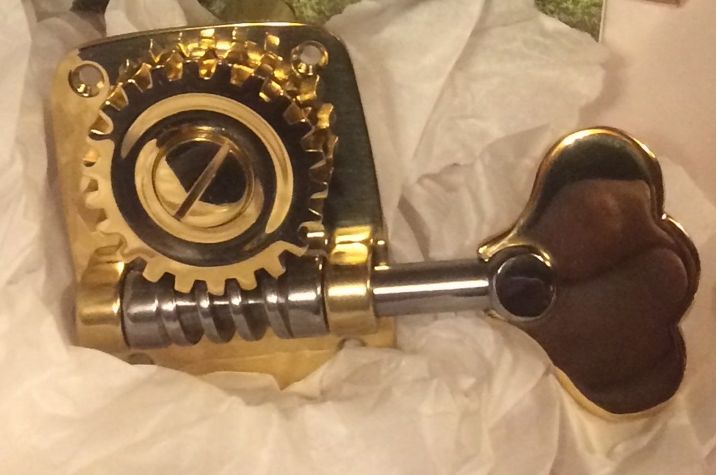
There is a wide variety of choices for tuning machines for a double bass. Some are better than others, some fairly plain, but fully functional and reliable, others beautifully engraved or ornate in some other way, and understandably far more costly. Someone had to spend the time and money to do all that “pretty stuff,” so, if you want that, you gotta pay. I chose plain but functional. (They are pretty, too, but not fancy.)
Rubner tuning machine (one of five.)
At any rate, they are already installed on this instrument, as of my last post:
Tuning machines installed on five-string double bass.
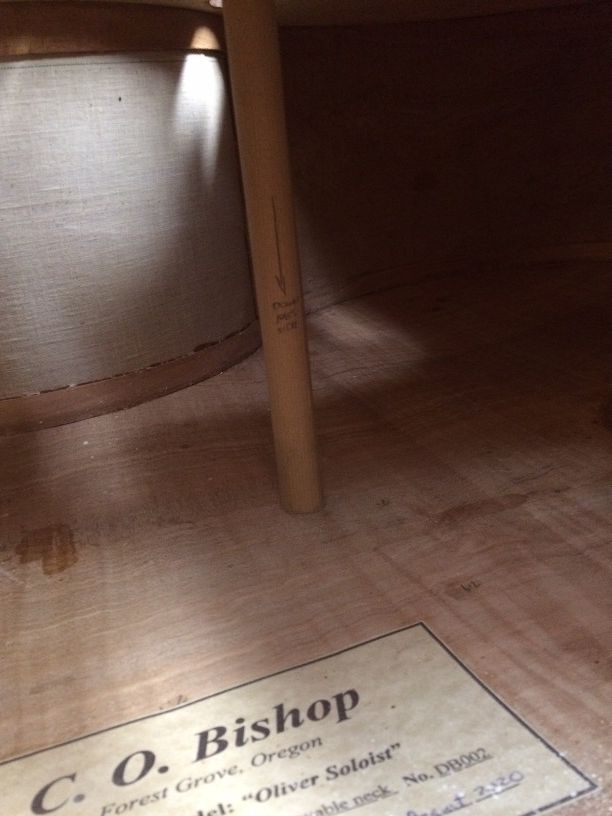
Soundpost
The soundpost is a “dowel,” usually of fine-grained spruce, that spans the gap between the inside of the front plate and the inside of the back plate, just south of the treble bridge-foot. My understanding is that it transfers the vibration from the front plate to the back plate, and “couples” the two plates so that they work together to make the sound from the vibrations created at the strings (whether by bowing or plucking.)
There may be (probably is) more to this function: It is an important enough part of the set-up that in some languages, the soundpost is referred to as the “soul” of the instrument, and it is definitely one of the most important adjustments that can be made. It is held in place simply by the compressive force transferred through the bridge by the tensile stress on the strings. Adjusting the position of the soundpost has a profound effect on the character of the sound the instrument can produce.
I already installed the soundpost, but I fully anticipate that I will continue to adjust it as the instrument settles in, in an attempt to produce the best tone, volume and balance that I can achieve in the sound of the instrument.
Soundpost installed, in preliminary position. Adjustments will be made from here.
Nut
The nut is the transverse piece of hardwood (usually Ebony, but in this case Ipé, ) across which all the strings are resting, directly above the fingerboard. It serves as a positive stop for all five strings, so that the strings are not in actual contact with the fingerboard when the player is not fingering a note, but are suspended about 0.5 mm above the surface of the fingerboard. the idea is that an easy touch from the player’s finger should put the string in contact with the fingerboard at the correct position for the desired note. The nut is glued to the neck and fingerboard, usually, but in reality, it is held in place by string tension, and the glue is “just a formality.” (I glue them so that they can’t fall off and get lost, during transport or a string change.)
I carefully laid out the string locations, so that they are spaced equidistant, center-to-center, and then cut the slots for the strings using first a small razor-saw, and then a round file of the appropriate diameter for the string in question.
Nut installed and slots filed for a 5-string Double Bass. The corners will be rounded later.
Tailpiece and Tail-wire
I chose to make the tailpiece of Ipé wood, to match the fingerboard, nut and saddle. The tailpiece fret (transverse bar forming a positive “stop” for all five strings) is also Ipé, and after being heated and bent, it resisted being glued. I eventually took it off entirely, scraped off all the failed glue-layers, washed it down with acetone to remove the oils in the wood, and reglued with epoxy. But this time, I anchored it with six small brass rivets. It is permanent, now! (Besides, I like the look of the shiny little brass rivets!)
I also attached the tail-wire; a 1/8″ diameter stainless-steel aircraft cable. I established the length so that the distance between the nut and bridge would be as close as possible to being in a 6:1 ratio with the distance between the bridge and the tailpiece fret.
Completed tailpiece assembly for a five-string double bass.
Bridge
I chose a bridge blank that was tall enough to serve with the projection angle I had already established, and wide enough to comfortably accommodate five strings.
I fitted the bridge feet to the surface of the bass front-plate, so that it would have an airtight fit when placed between the inner “notches” on the f-holes, and centered over the centerline of the plate.
Once the fit of the feet was established, I marked the bridge for the approximate height, hoping to achieve a string clearance of about 11 mm above the end of the fingerboard, but erring on the side of “too high.” (I can’t very well “put it back,” if I remove too much wood.) I then marked the locations of the strings, giving them 25mm from center to center. I filed the string slots, so that the strings would stay put when installed, and I went ahead and installed the strings.
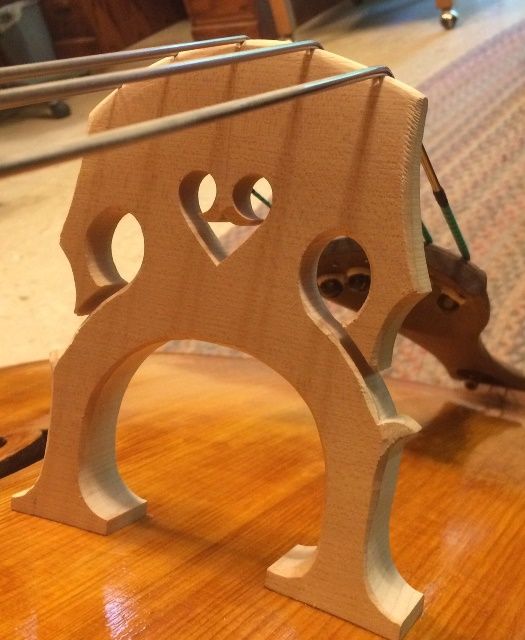
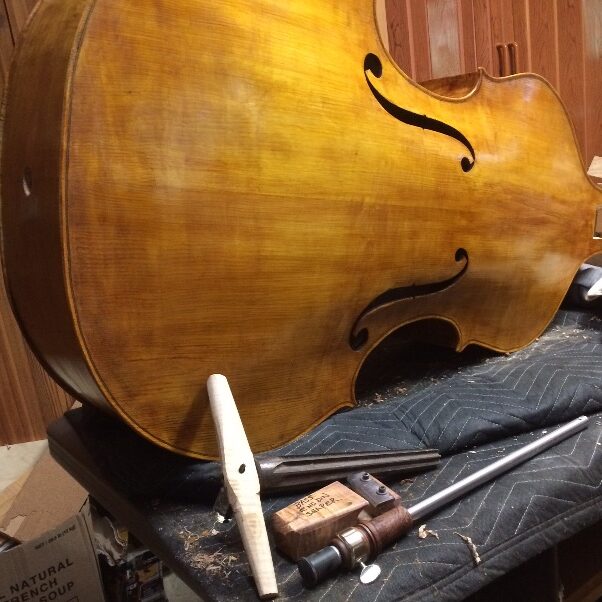
Bridge for 5-string double bass.
As it happened, I ended up with about 14mm under the B-string, ranging to 12 mm under the G-string…way too high. No problem: I simply re-marked the bridge, this time having a better idea of where things would line up, re-cut the top of the bridge, re-filed the string slots, and tried again. This time I had 11mm under the B-string, and 6mm under the G-string, with the strings in the middle at about 8mm. That is acceptable, so I finished trimming excess wood from the bridge, tuned up the strings, and I was ready for the final adjustments for sound.
Five-string double bass set-up and ready for final adjustments.
It is quite a relief to me to finally have this instrument nearly complete. It was actually begun several years ago; but it was set aside for a variety of reasons, and only resurrected as a project, this Spring.
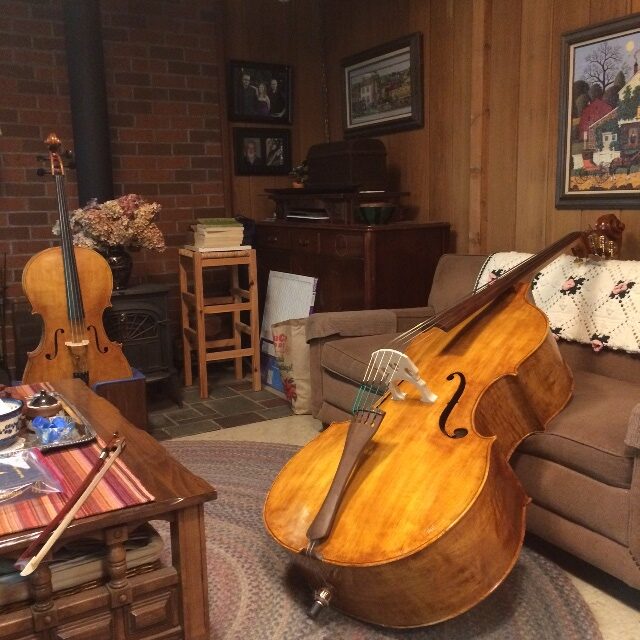
The sound, at first set-up, is satisfactory, but I hope to achieve a better balance, more volume, and better clarity as the instrument “settles in’ a bit, and with subsequent adjustments of the soundpost. But for now, I’m happy with it. It looks good and sounds good. For a brand-new instrument, that is a good start.
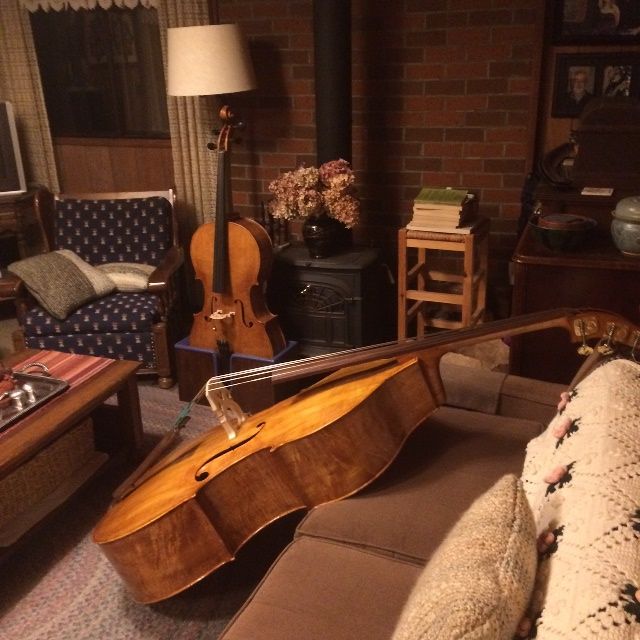
Completed 5-string double bass with cello in the background.
So, for now, that is it! There are a few “finishing touches” and re-touch of varnish, etc, as well as the aforementioned sound adjustments, but the bass is essentially complete!
I hope to make all the necessary adjustments, and then find a player or two to “test-drive” it for me, since I am not a player, and can’t do it justice.
I will post the “verdicts” from those players when they happen.
The color varnish, as you might imagine, gets the instrument looking the way we want, but the clear coats keep it that way…we hope.
So, after the color coats were mostly complete, I waited a few days for the varnish to cure a bit and then added two clear coats as a protection for the color coats, so that they will not experience undue wear.
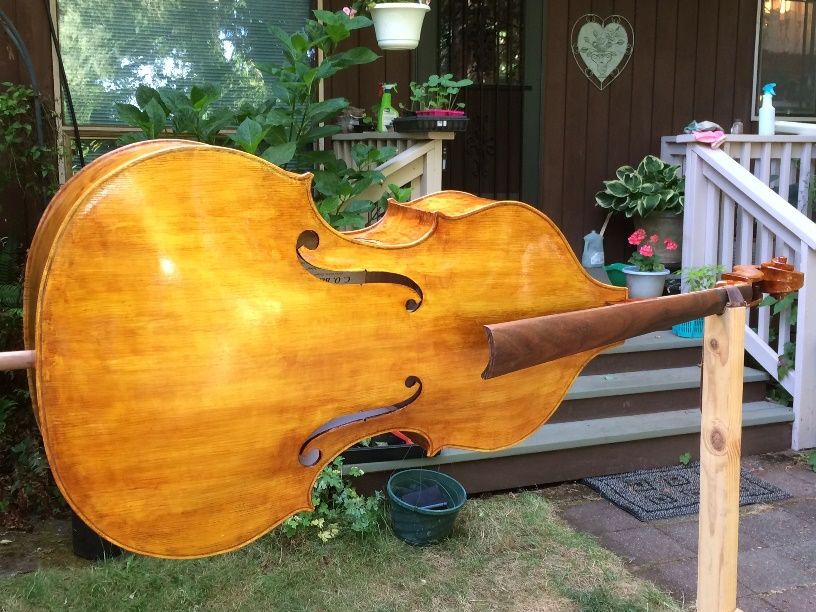
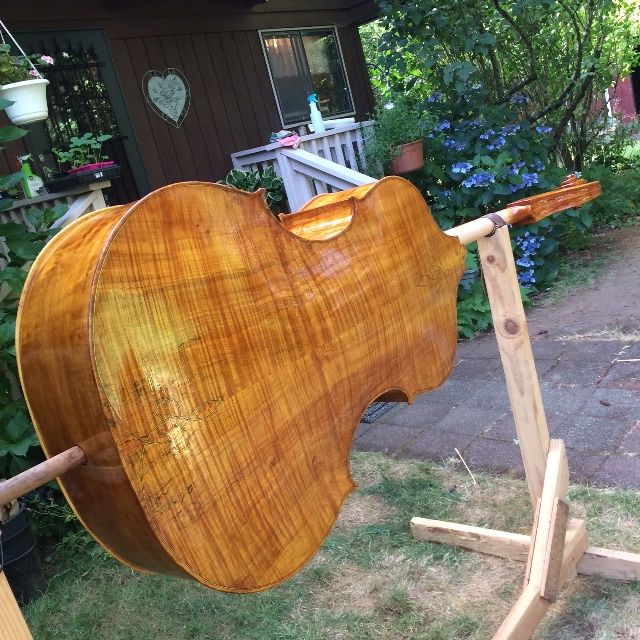
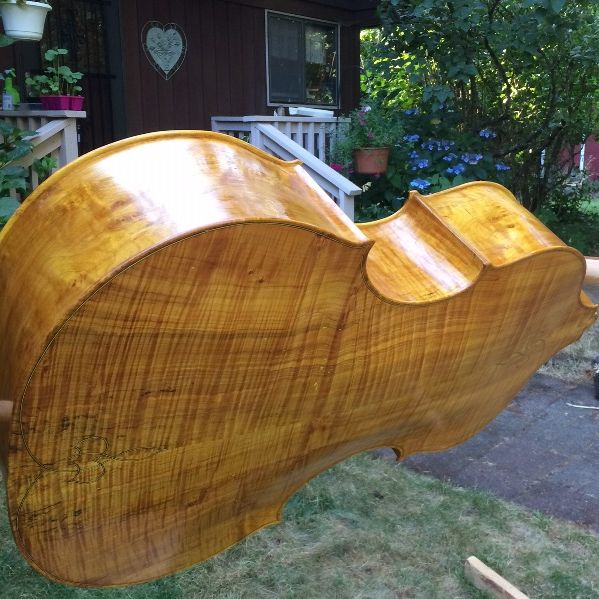
Final clear coats of varnish on five-string double bass in sunlight.
Final clear coat; Back view in sunlight.
Final clear coats in the shade.
There is still a lot of work left to do at this point: There will be endless “re-touch” of spots in the varnish that I wasn’t quite satisfied with, but they can wait until after the set-up is under way.
Saddle
I usually wait until the varnish is complete, before installing the saddle. The saddle is the transverse piece of hardwood upon which the tail gut rests, as it crosses the edge of the front plate. (Ebony, frequently, but, as I had opted for an Ipé fingerboard, Ipé seemed the right choice for the saddle as well.)
I make my saddles with radiused ends, to avoid saddle-cracks. To some extent, saddle cracks are caused by the shrinking and swelling of the spruce plate against an essentially unmoveable ebony (or Ipé) saddle. However, the other factor (possibly more important) is that, for hundreds of years, luthiers have cut the saddle with sharp-cornered, square ends, requiring a sharp-cornered square-ended mortise in the spruce…which inevitably inclined itself toward eventual cracks. Sharp corners are extreme stress risers.
Round discontinuities (holes, for example) do not cause stress risers, and are far less likely to cause cracks. I try to leave the ends just a little loose, as do most luthiers, but the fact is, the sharp notch is the primary cause of the cracks. So I make round corners.
Saddle with round-cornered ends.
Tuning Machines
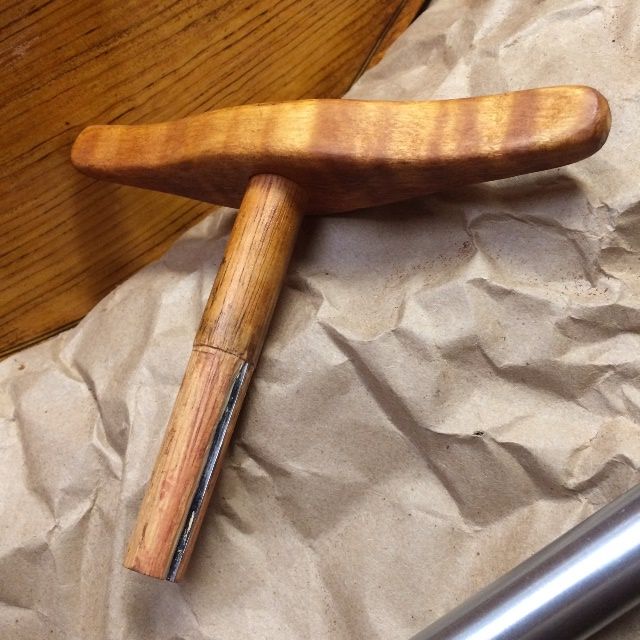
The next task was the tuning machines. There are many possibilities to choose from: I chose these tuning machines partly based on looks, partly on cost, but primarily because, with the curvy pegbox, I wasn’t completely sure that any other style could be made to work. (There are some multi-piece tuning machines, which, I would imagine, could be made to fit nearly any configuration, but I have no experience with those, so I opted for something I knew about.)
Anyway, I knew that this type of tuning machine has a tapered spindle, which is not designed to go all the way through the pegbox, so I designed and built a small reamer, all wood, except for the blade, which is spring steel (just because that is what I had available.) It works well, but I have to be gentle with it, and stop periodically to clean the chips from the reamer.
Handmade reamer for fitting double bass tuning machines.
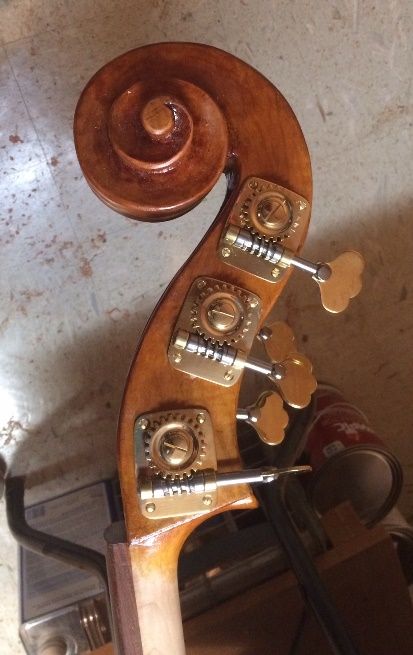
I made a template, laying out the hole locations with the hope that I could avoid the strings from the G and D tuners rubbing on the tuners below them in the pegbox. I used the template to lay out the holes on the pegbox, then drilled to appropriate depths and used the reamer to taper the holes to match the spindles of the tuning machines.
Finally, I installed the machines and secured them with screws.
Tuning machines installed on five-string double bass.
It was amazing to see how much weight the tuning machines added. The bass no longer easily balances on the two bouts: it wants to rock down and put its head on the floor!
Ready for set-up!
I installed the nut at this point, as well, so the bass was really complete.
Five-string Double Bass, ready for set-up!
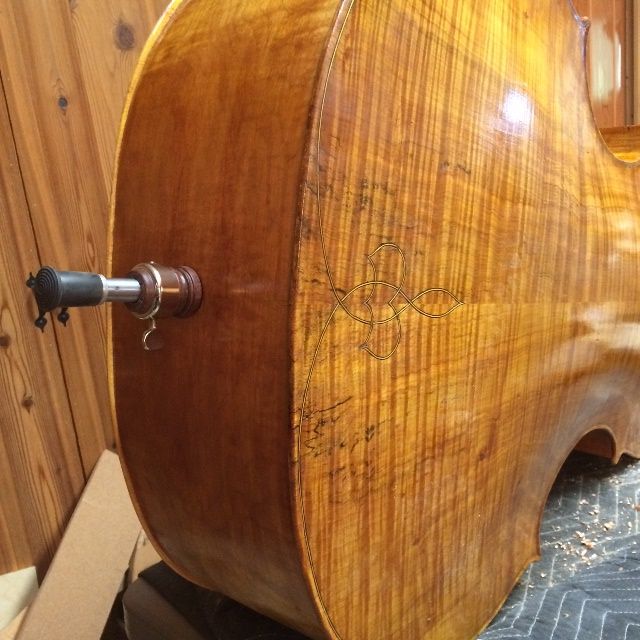
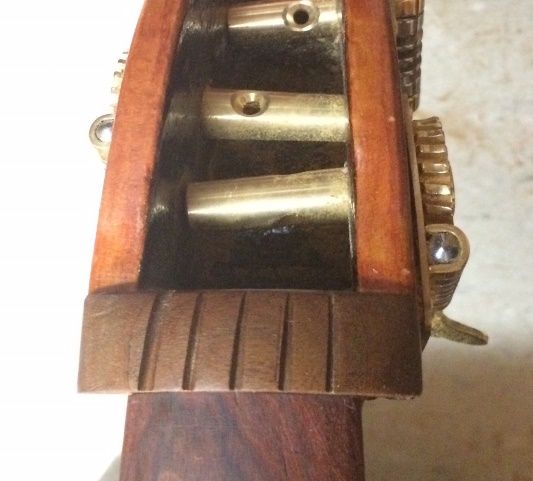
If you have sharp eyes, you will probably notice the hole above the tuning machines on the bass side. The pegbox was narrow enough there, that I actually went through the second side by accident, and was forced to create a plug for the hole, from some leftover rib material. I cut it to exactly fit the hole, and glued it in place, pressing it home, so that it was nearly exactly flush, then scraped the wood of the plug to exactly match the wood of the pegbox, and was ready to begin varnishing to complete the repair.
Repairs in progress for pegbox damage. When complete, the repair will be virtually invisible.
Anyway… that is as far as I wanted to go today. Some of you may have known from other forums’ content, that I had also had trouble getting the tailpiece fret to “stay glued” in its slot. So I eventually gave up, removed the fret, scraped all the layers of glue down to clean wood, and washed the Ipé with acetone. Then I reglued with epoxy, but this time I drilled and anchored the fret with six brass rivets! (It’s permanent, this time!)
Completed tailpiece.
Next time, I hope to complete the set-up of the bass and have it ready to play!
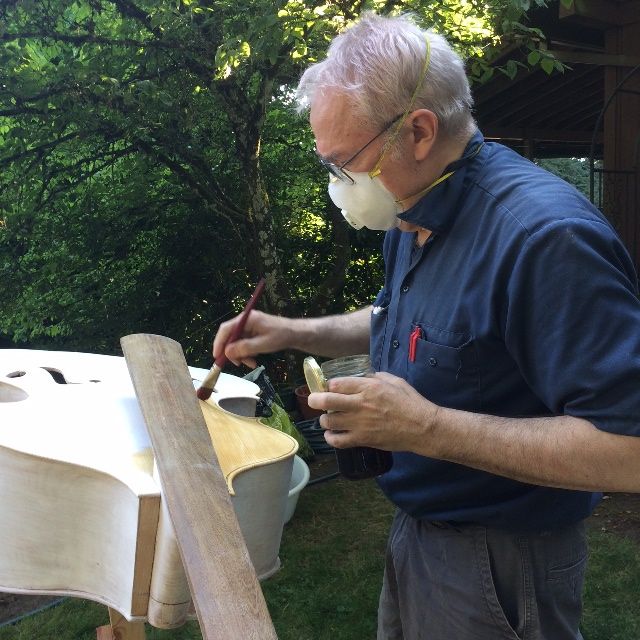
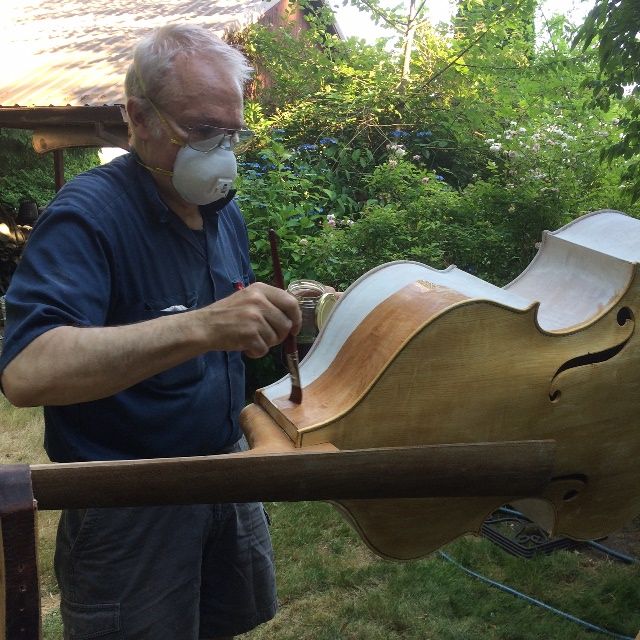
I begin with yellow varnish for a base coat at least…sometimes two or three coats to get it even all over, as some areas soak it up rapidly, and look “dry”. though they have the same amount of varnish.
After the base coat is dry, I rub it down with fine sandpaper, just to remove any bits that stick up–whether dust, debris, wood fibers that raised up earlier…whatever is sticking up needs to be flattened, or there will be a “cone” of varnish growing around it with each coat.
if I am going to do any “wear” or “antiquing,” I need to begin thinking of it now. It will affect how much color I apply to what areas, as well as whether I intend to add “dirt” in wear areas.
If I have induced the type of wear that involves “scratched areas” or “dents”, I apply them now, and rub dark pigment into those discontinuities, to imitate dirt in old scratches on old instruments. Then I rub off any excess pigment, so that the dark color only remains in the low areas of the “distress.” This would also be when I apply “dirt” in wear areas, where grain is raised and where a player’s clothes or hands would typically wear off the original varnish.
Next I begin applying darker colored varnish in the areas where least wear would occur (Or, of course, if no “antiquing” is planned, I apply the darker varnishes over the entire instrument except the “handle” area of the neck, which is left bare until the very end. I sand between coats, using 400-grit paper.
As the color builds, I have to watch, and make a decision as to when to stop: I do not want the grain to be obscured, but I do want enough varnish thickness to provide a moisture barrier against sweat, etc.
When I finally decide (usually after six or more coats) that the color is acceptable, I give it two more coats of clear varnish, to deepen the sheen and to protect the colored varnish from damage.
Finally, with the varnish complete, I allow it to dry thoroughly, then I can begin final fitting and set-up.
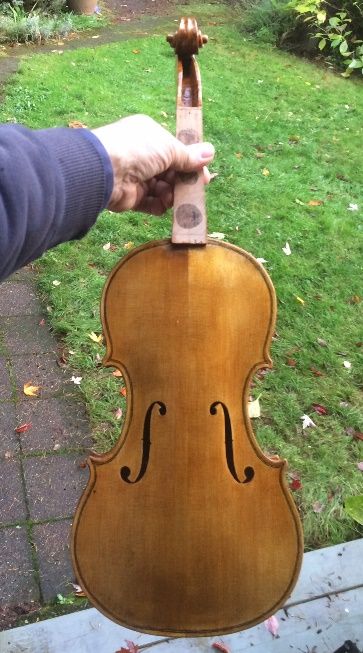
So, since we are effectively at step “zero”, and the last time you saw the instrument it had only the rosin sealer coat applied,
Back with sealer complete.
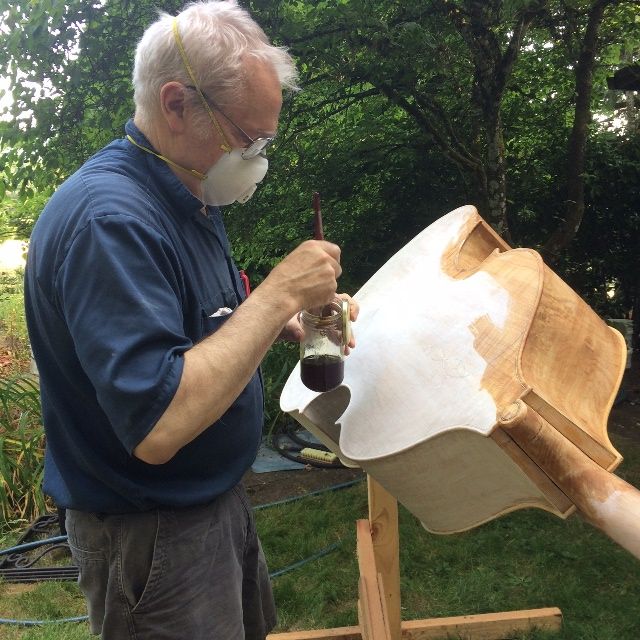
The first thing was to wash down the sealer coat with alcohol to remove any excess rosin from the surface. I wanted the rosin in the wood, not “on” it. Then I applied a full coat of yellow varnish. The result is always a little disconcerting, as it is veryyellow after that first coat. But the yellow mellows and calms down under the subsequent coats of colored varnish, and becomes the “inner glow” that shows through the darker varnish.
At any rate, here are several pictures of the yellow varnish:
The yellow base coat: front view.
Side view yellow base coat.
Back view of the yellow base coat.
End view of yellow base coat.
And, that is pretty much what the base coat looks like. Step one is complete!
I chose to add a second coat of yellow to the sides, back and neck, but began adding color to the front, in order to balance the front color with the rest of the instrument.
Here is the first color coat for the front plate. It reduces the glaring yellow quite a bit.
Second yellow coat for sides and back plate. They are beginning to balance, I think!
New Fingerboard
About this time, a friend in Australia, who is a great bass maker, contacted me to point out very kindly that I had made my fingerboard too flat for a five-string bass. (Well, rats!) So I had to make a new fingerboard with the correct radius for playing a five-string double bass with a bow.
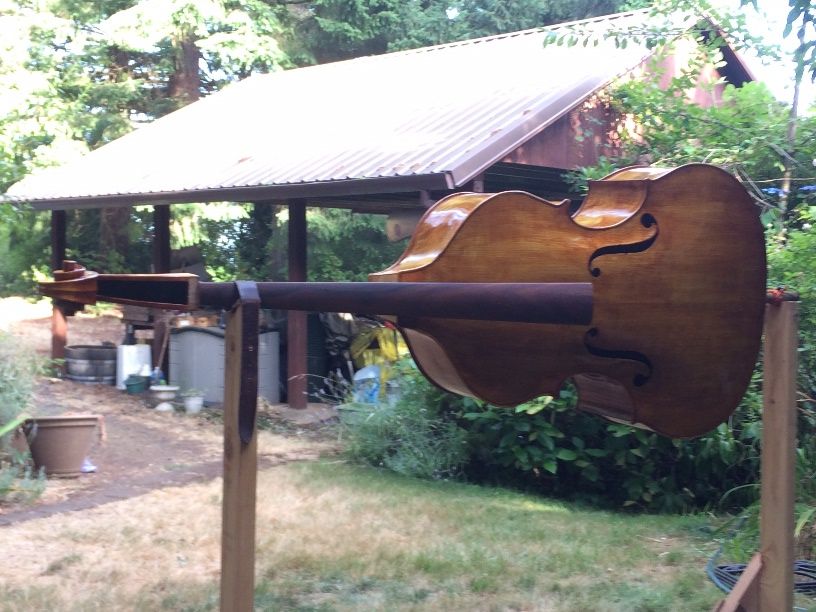
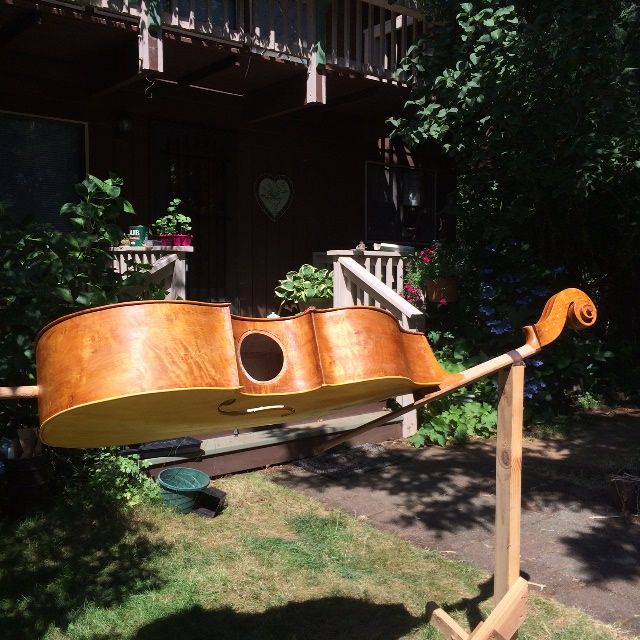
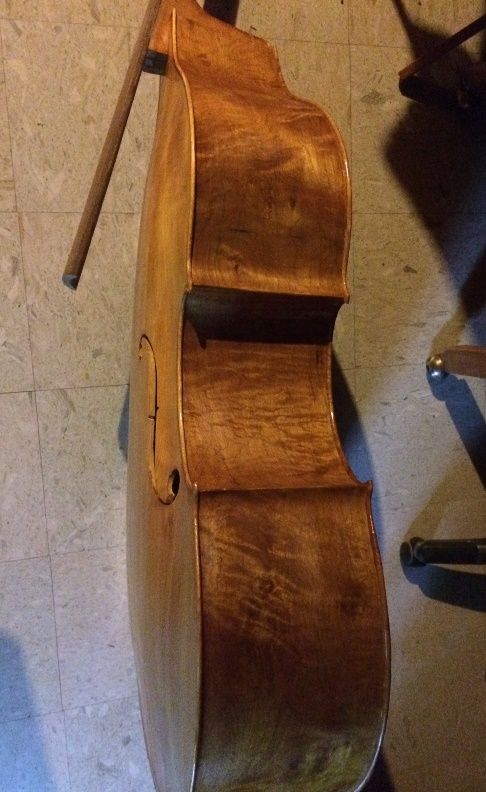
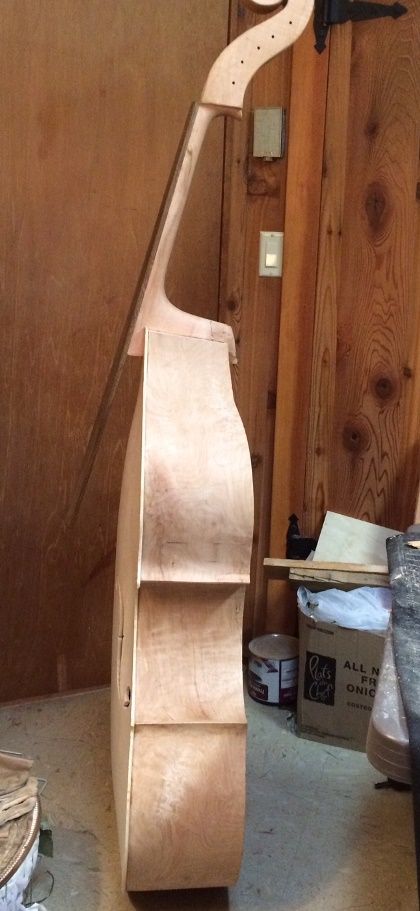
Here is the side view with the old fingerboard:
Side view of the bass with the excessively flat fingerboard.
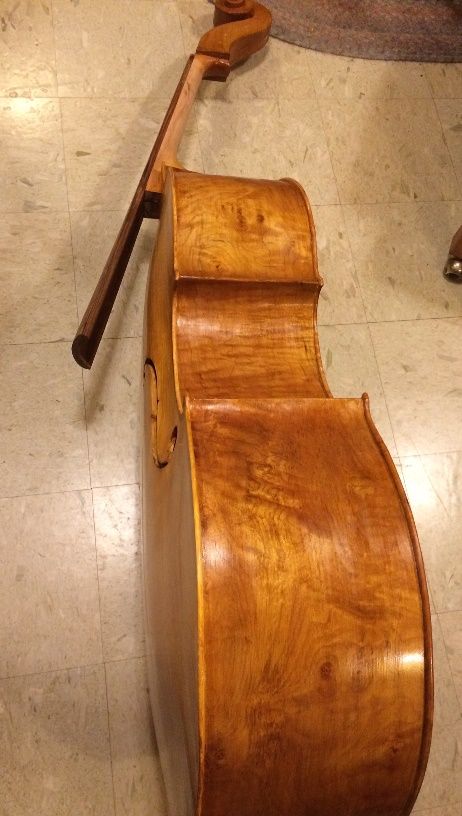
And here it is with the new one!
Side view of the new fingerboard.
End view of the new fingerboard.
Without that tighter radius, it would have been next to impossible to avoid playing two strings at once. I am very grateful that my friend alerted me to my error before I had completed the bass. Not being a player opens me up to some “sins of ignorance” that a player would notice immediately. He had also pointed out that I had made the upper end of the Fingerboard unnecessarily wide, so the new one is narrower…but that meant re-carving the neck to match the new board.
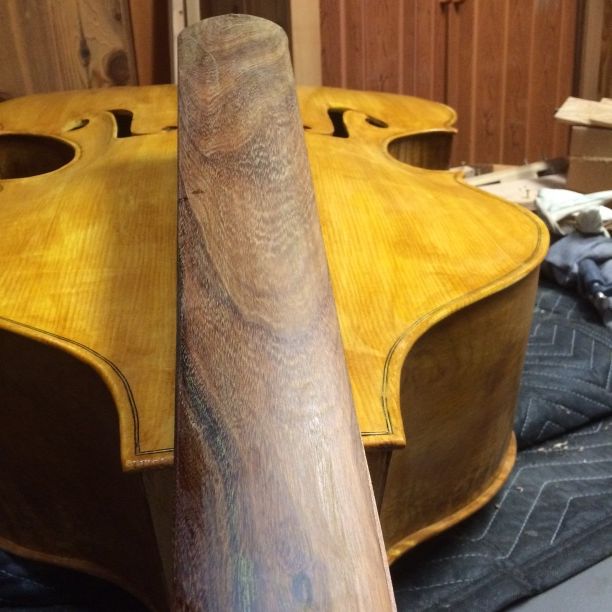
New fingerboard before re-carving the neck. (You can see the edge of the neck.)
The neck feels better to my hand, now that it is narrower and a little thinner.
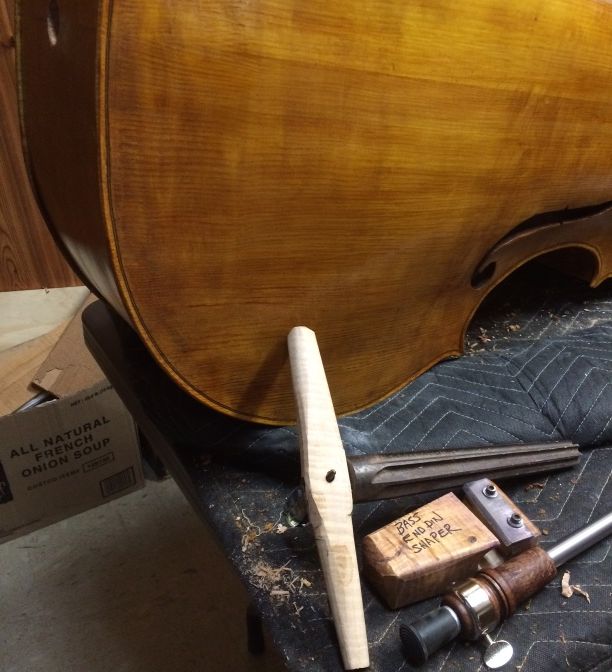
Endpin Assembly
I decided to go ahead and fit the endpin assembly as well, before pressing on with final color coats. I had a double bass reamer made for me by a friend, about 2006, and I made a shaper for myself about that same time. In both cases, the occasion was the building of my first double bass.
I had hoped to make an Ipé endpin plug, to match the rest of the fittings, but since I wasn’t sure either that I was able to do so, or that I would have time, I went ahead and purchased an endpin assembly with a plug made of Indian Rosewood, and it turned out that the color was so similar that I gave up the idea of hand-turning one of Ipé wood.
Double Bass with endpin, reamer and shaper.
Double Bass with endpin assembly installed.
Final Color Coats
Then I sanded down the whole bass, and re-touched the whole bass, adding color in areas that I felt were too light, and filling in places where the previous coats had not been thick enough. when that was dry, I gave a second color-coat to the entire bass. This will be the final color coat, though I intend to add at least one clear coat, and probably two. The clear coats deepen the sheen of the varnish and make it look more transparent. while actually adding very little to the thickness of the varnish film. They also protect the color coats against premature wear.
Final color coat.
I really like the deep amber color that is developing in the bass. The clear coats will accentuate it, but not make it much darker.
Wet down the wood,to raise the grain and accentuate “problem” areas
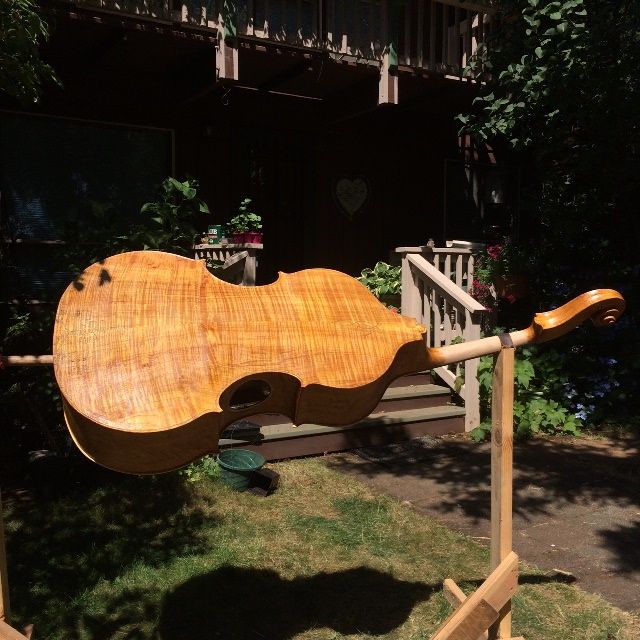
I wetted the whole bass down with coffee, mainly to raise the grain a bit, but partly to add a little color to the white wood of the Sitka spruce belly. The Oregon Big Leaf Maple is already pretty colorful.
Back plate, wetted with coffee.
Then I turned the lights off in the workshop and went over the whole bass, inch by inch, with a small flashlight, held at a low angle, to make shadows wherever there was a discontinuity in the surface. As I located them, I scraped or sanded away the problems, before moving on. It took quite a while, but I was pretty happy with the outcome.
Mineral Ground
The next step is to coat the wood with a mineral ground: a suspension of extremely fine particles of gypsum in water is what I use. I brush it on, one section at a time, rub it in vigorously, to get the tiny particles into the pores of the wood; then rub off any excess, with a rag. It always looks as though I took all of it back off, until it dries.
Mineral ground in progress; sides nearly dry; back only begun.
Mineral ground continuing: Back is 2/3 complete, and beginning to dry.,
Mineral ground complete on back and sides of bass. Drying rapidly.
After the ground is fully dry, I sand all over with fine abrasive, to remove any dry patches of excess mineral. There will be very small discontinuities that have been filled by the mineral ground: this is desirable, and I am not trying to remove those places.
When the ground dries, the bass will be stark white, but when I apply the sealer, to lock the mineral particles in place, the mineral ground becomes completely transparent, permanently. It will never be visible again.
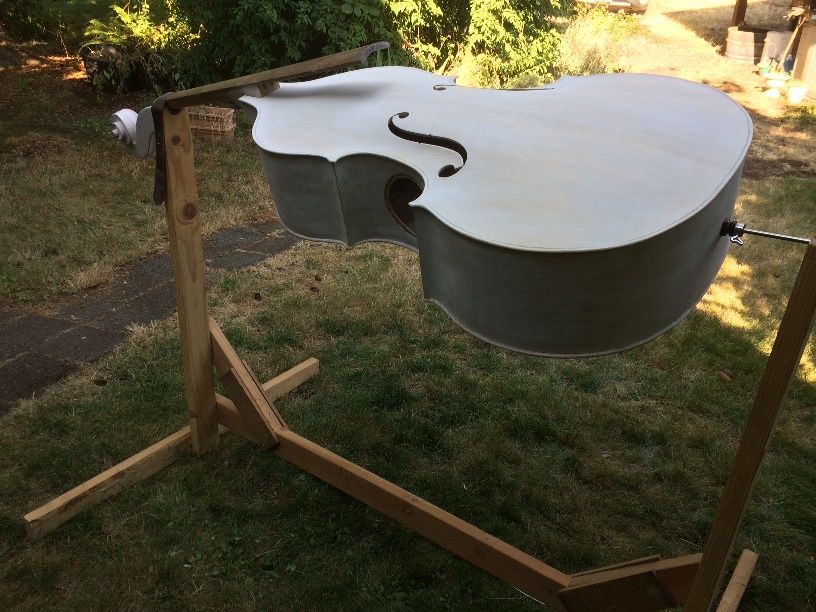
So, here is the bass, with the gypsum fully dry, mounted in my varnishing fixture, and ready for the sealer:
Ready for sealer.
Sealer
I am currently using rosin dissolved in turpentine and alcohol as a sealer. The liquid (alcohol first, then turpentine) evaporates, leaving the rosin in the pores of the wood. When dry, this helps prevent the varnish from soaking into the wood, so as to minimize the sound-dampening effect of excessive varnish penetration.
This is the part of finishing I like best: it seems almost magical to see the stark white of the mineral ground disappear instantly and permanently as the sealer permeates the gypsum and renders it transparent, so that the beauty of the wood is revealed.
I begin by sealing the front plate.
Then I rotate the bass in the fixture and seal the ribs.
Then I work on the back plate, and continue…
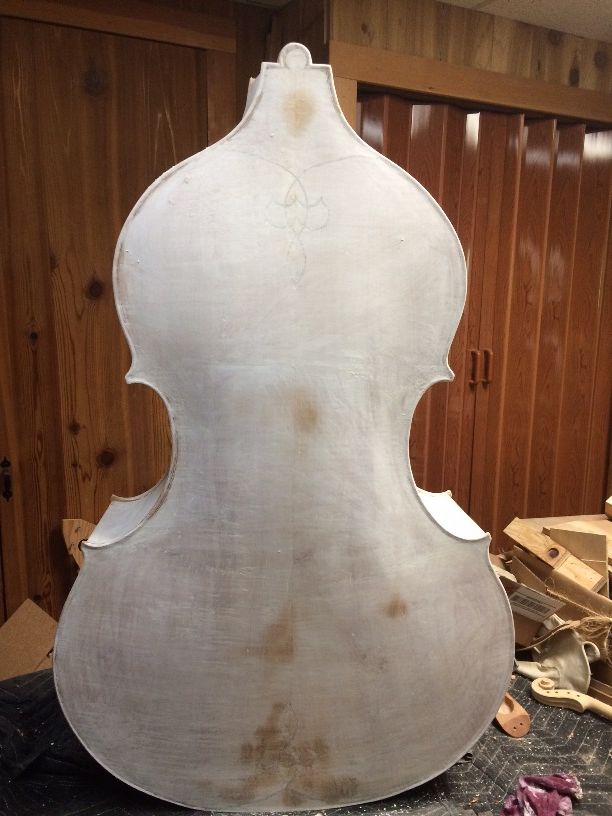
Until the whole thing is done! Here is the front view.
And here is the back!
After the sealer is dry, or just before it is completely dry, I rub down the surface of the wood with alcohol, to pick up any rosin that may have remained on the surface. When the sealer is fully dry, I go over the whole surface, lightly, with fine sandpaper, to pick off any bits of wood fiber that may have raised during the ground and sealer process.
Varnish plan
I always begin with a yellow varnish: I like the way it shines through the darker pigmented varnish when all the finishing is complete. In this particular case the maple was dark enough that even the yellow varnish will end up looking pretty dark. So, though I will still begin with the yellow, I will have to add a good deal of darker varnish on the front, to balance the color with that of the back. This is just a type of “Judgment call” that the maker must always consider when finishing an instrument. As I add coats of varnish, I will pay attention to which areas need darker varnish, and which could use yellow or clear varnish.
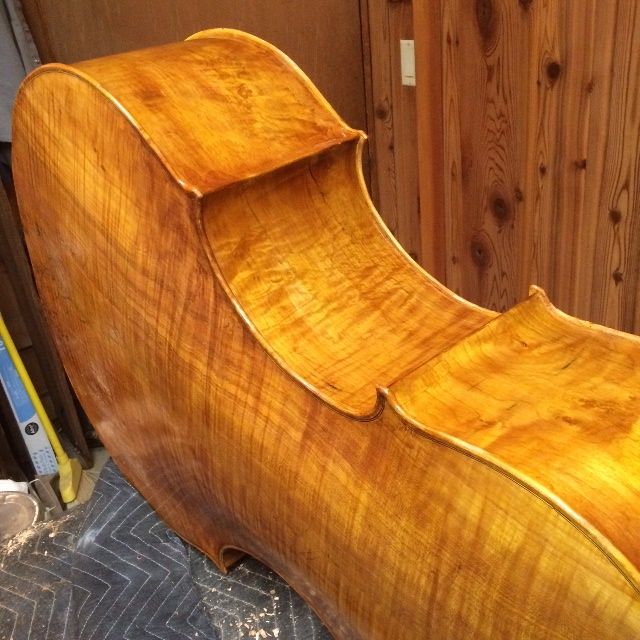
The last time I posted, I had temporarily installed the neck, and (I thought) I had glued the neck heel root in place, as it was to be a permanent part of the corpus, glued to both the neck mortise and the back button.
So the bass looked like this:
Bass with temporary neck set.
Side view, showing neck heel break-away joint.
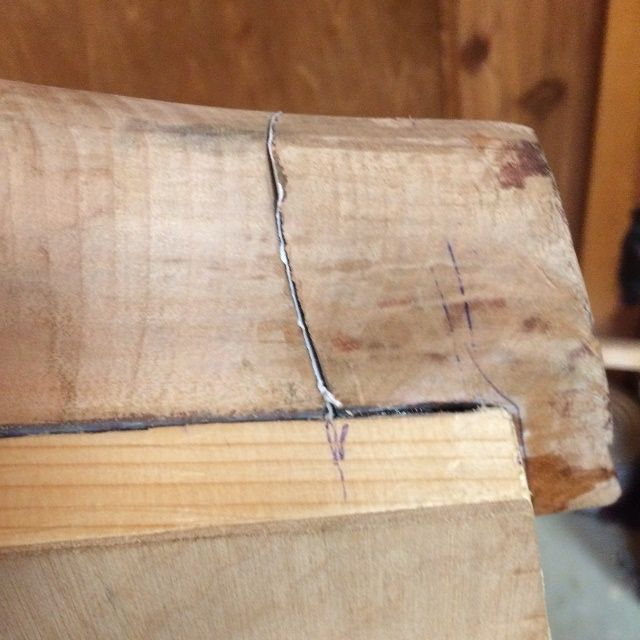
The heel root looked like this:
Heel root positioned and glued to mortise, using hide glue, with paper break-away joint.
I was so confident that everything was right, that I even sawed off the excess heel root, visible in the above photo, and planed it flush with the back of the neck block, in preparation for installing the back plate. But! When I broke the paper “break-away joint” (see the above photo) the heel root gently let go of the mortise and was completely loose. (Rats!)
It turns out that hide glue doesn’t stick to carbon fiber plate! Ok… so I had to start over, and this time glue it home with epoxy. I put a plastic bag around the neck heel to protect it, coated the heel root with epoxy on the bottom and two sides, and slid it all back into place, this time bolting the neck in solidly, and clamping the heel root tightly against it. It all worked this time.
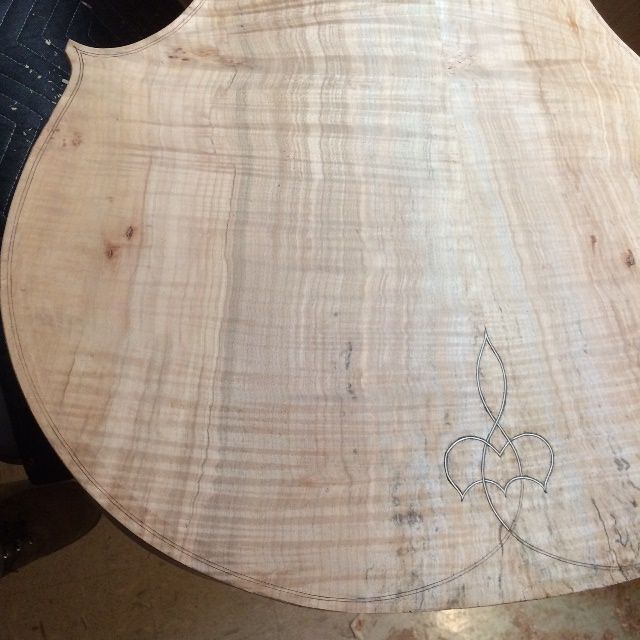
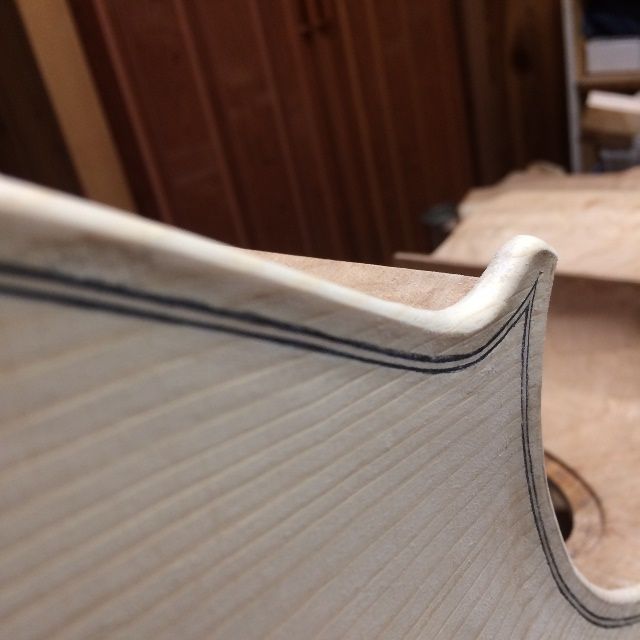
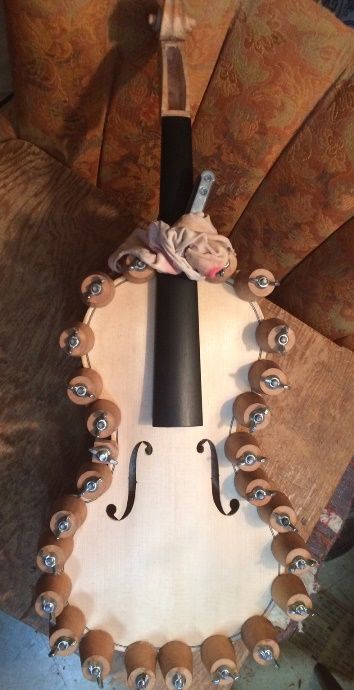
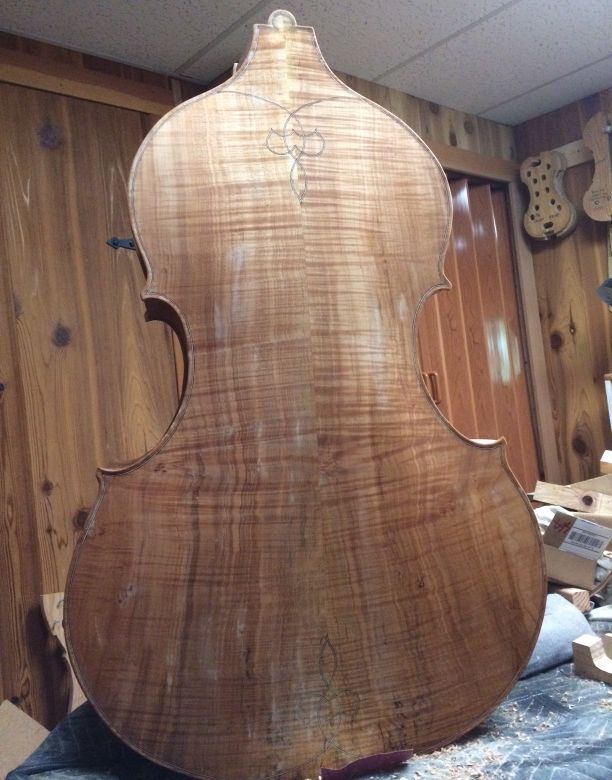
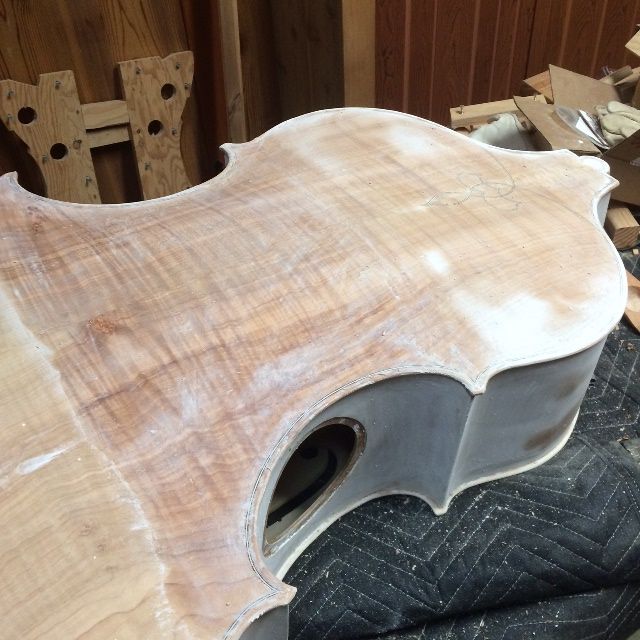
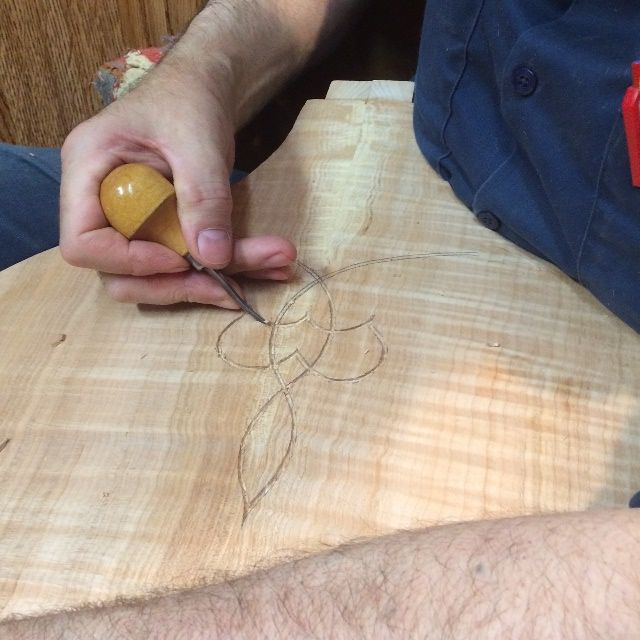
Beginning the purfling of the back plate
While the epoxy was curing, I decided it would be a good idea to at least install the “purfling weave” portion of the back plate purfling, before installing the plate. I figured it would be easier while the plate was still loose. The reason I wait until the back plate is installed to do the rest of the purfling, is that the corpus often changes shape a little when the mold is removed, so I can’t guarantee that the overhang will still be the same. If I have already installed the purfling, then I am stuck: but if I have not, then I can maneuver the overhang to being as close as possible to what I wanted, and install the plate, then plane away excess all around until the overhang looks right again, and finally put in the purfling so that it looks as though everything just worked out right, to begin with.
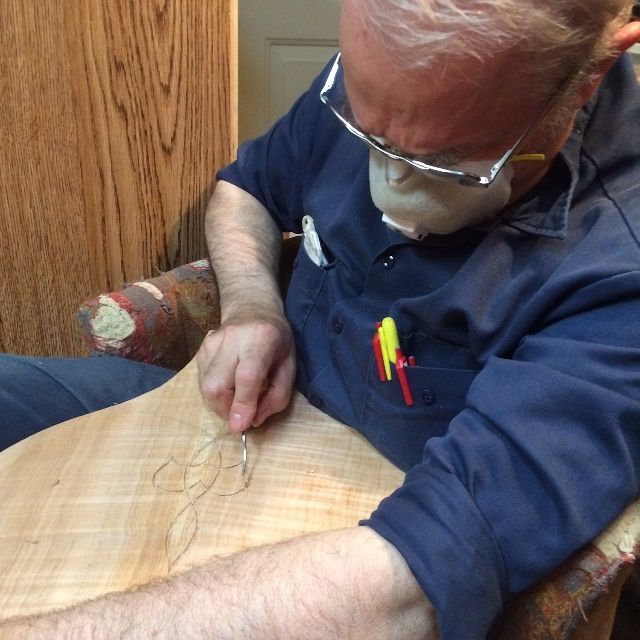
Cutting the slots for the lower purfling weave on the back plate.
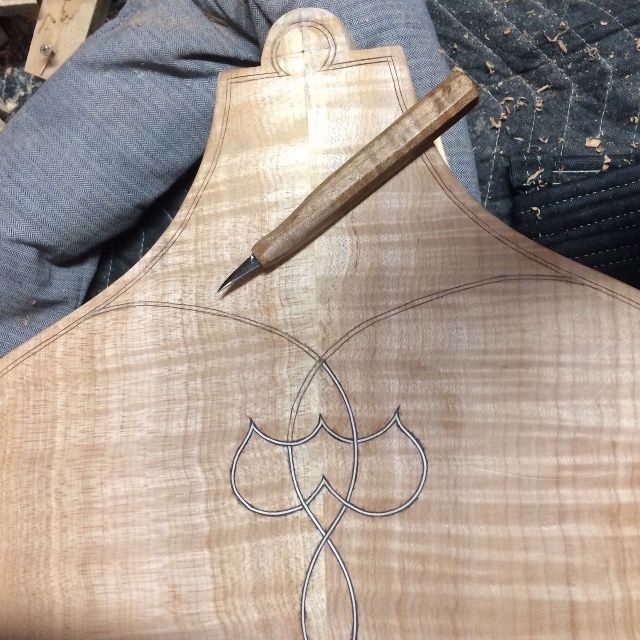
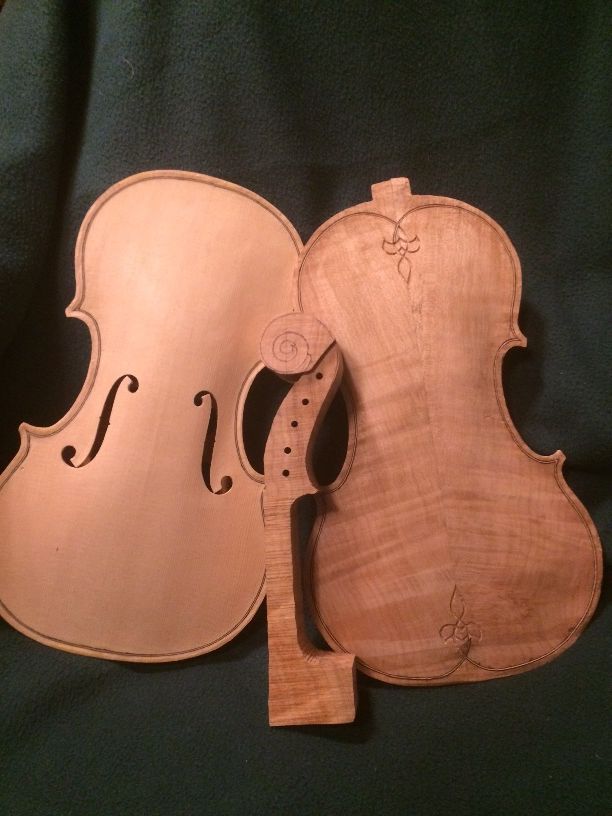
This is a weave that I came up with for my very first five-string fiddle and which I have tried to incorporate on all my subsequent five-string instruments. It is just a modified “fleur-de-lis”…nothing really special, but I like it. I use the same design, upside down, in the upper end.
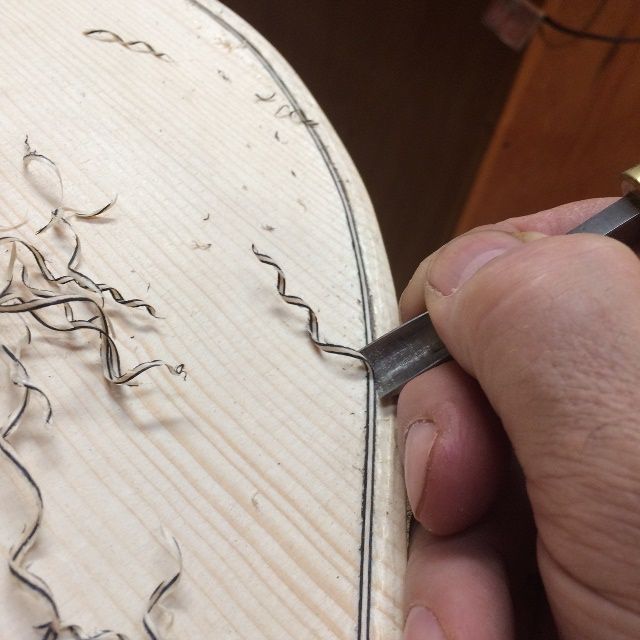
Picking the waste wood from the upper purfling weave.
Upper weave slot nearly complete.
After cleaning the slots out, I used heat and water to bend the purfling strips to fit the curves of the weaves, and glued them in using hot hide glue.
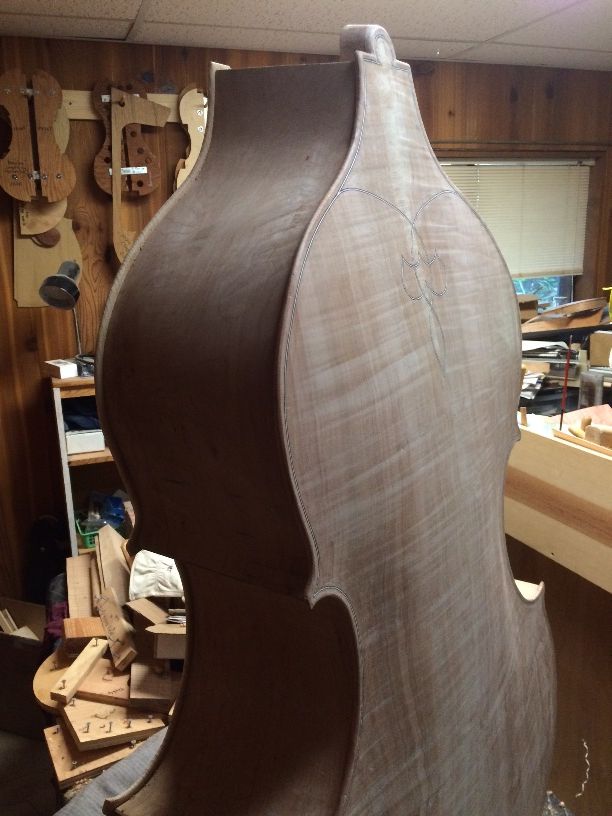
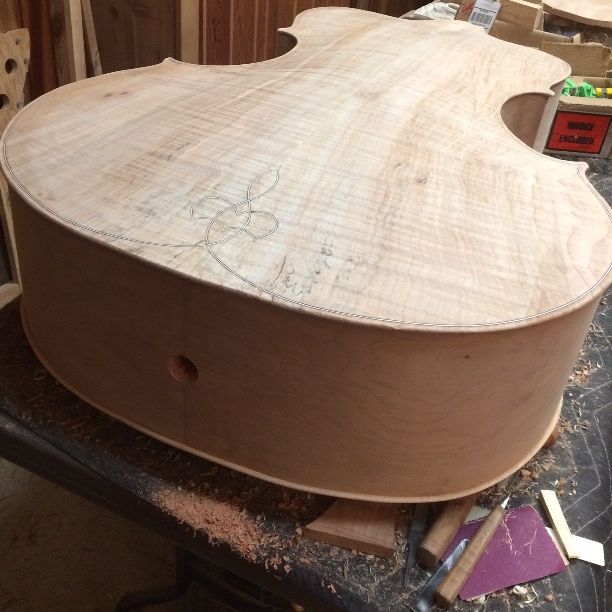
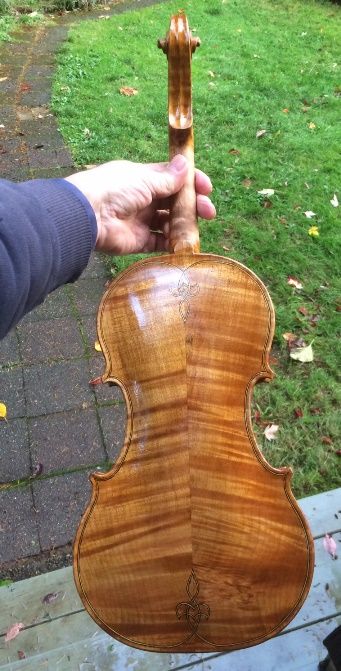
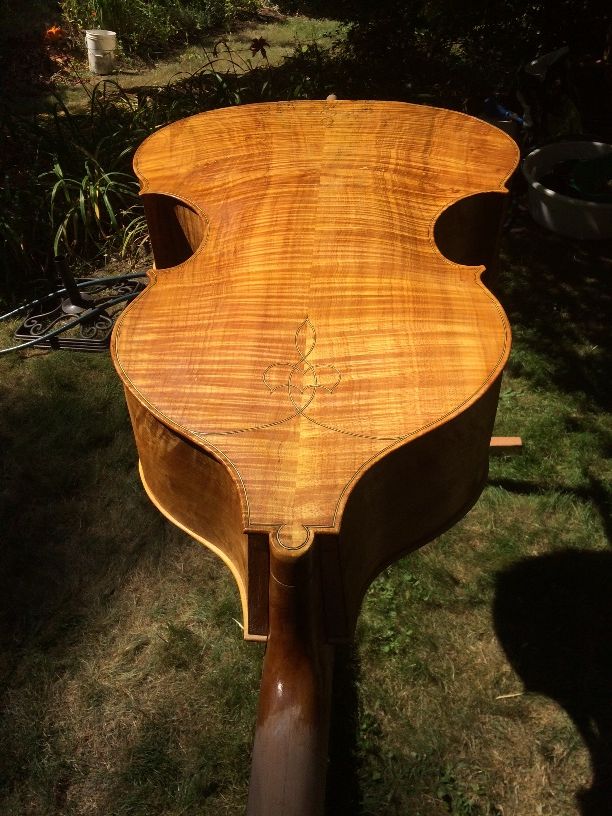
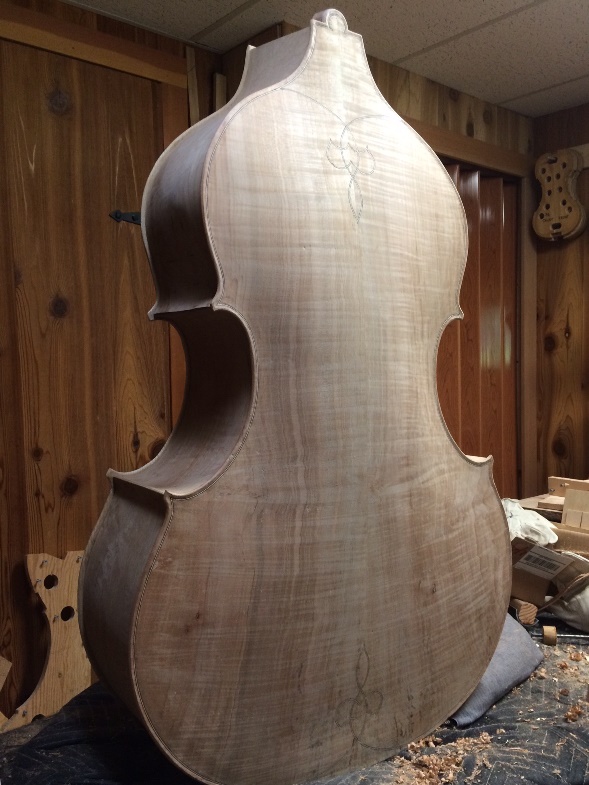
Both purfling weaves completed on the Oregon Big Leaf Maple back plate.
I planed the weaves flush with the plate after they were dry, using a gouge, a small finger-plane, and a scraper. You can see the beginning of the rest of the purfling slots, how they will connect to the weaves.
Purfling weave planed flush.
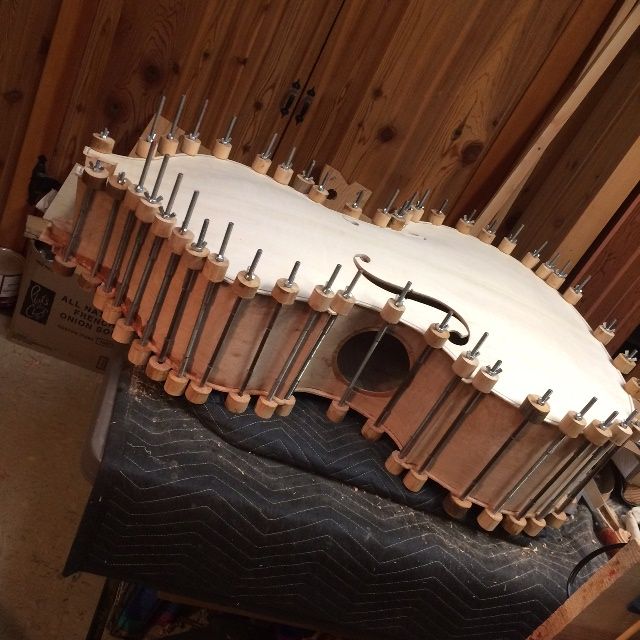
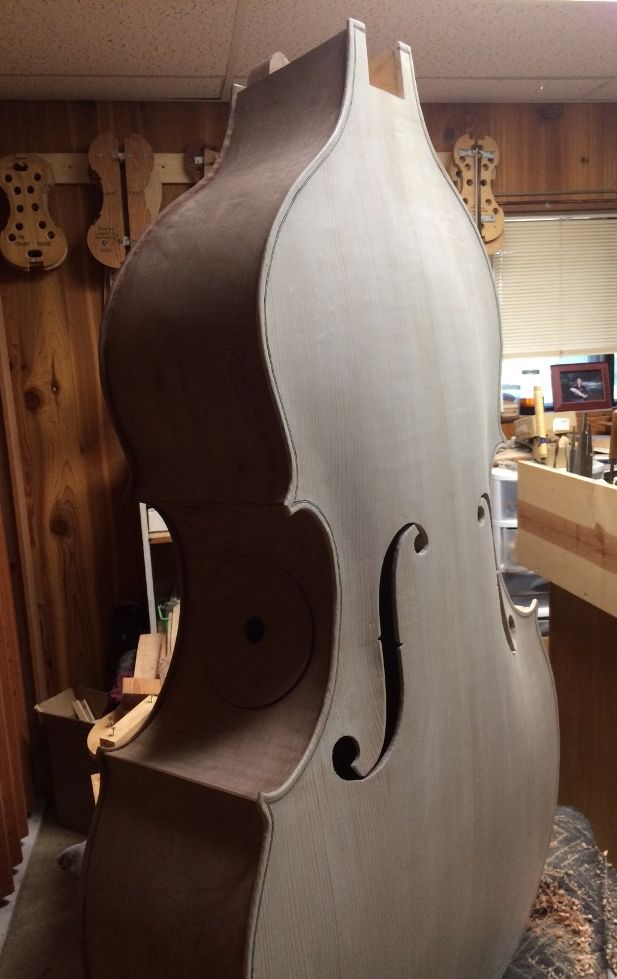
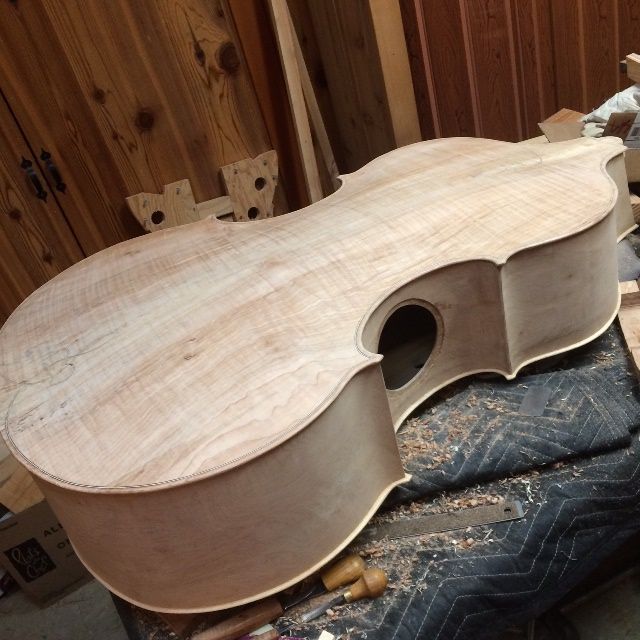
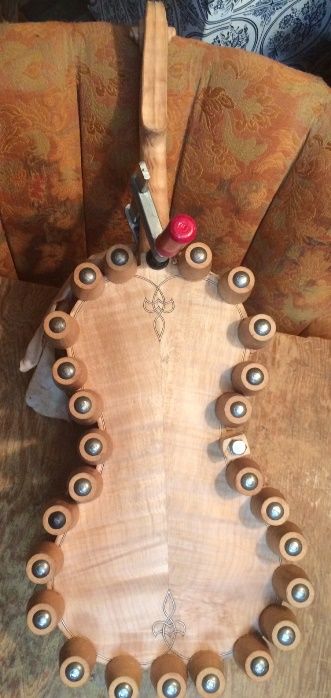
Closing the corpus
I finished scraping the interior and then laid the corpus onto the back plate, positioning it carefully, adding spool clamps, and constantly checking the overhang all the way around. When everything was as close as I could get it, I removed a few clamps at the bottom block, used a thin palette knife to ladle in the hot hide-glue, and replaced the clamps, tightening them securely. I added more clamps over the glued area, then repeated the process for the next section on either side of the bottom block, and worked up around the sides that way: removing clamps, inserting glue, replacing the clamps and adding more…until it looked like this:
Closed Corpus.
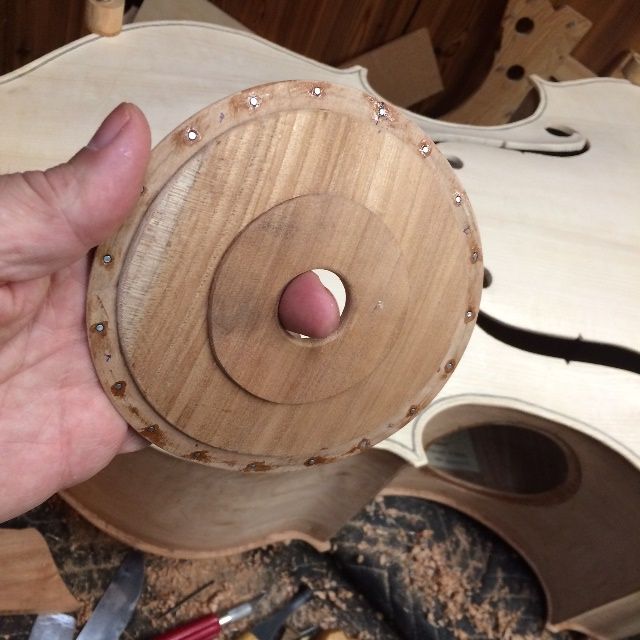
I still had not put the magnets into the cover plate, because, when I added the reinforcements to the cover plate, it changed the curvature, and it no longer fits cleanly into the access port flange. (Rats, again!) So I kept wetting and clamping the cover plate in different configurations until I got it to a close fit, then I added the magnets.
Here are the magnets in the cover plate.
Annnd… it turns out they are too weak. (Sigh…) I will have to order some bigger magnets after all.
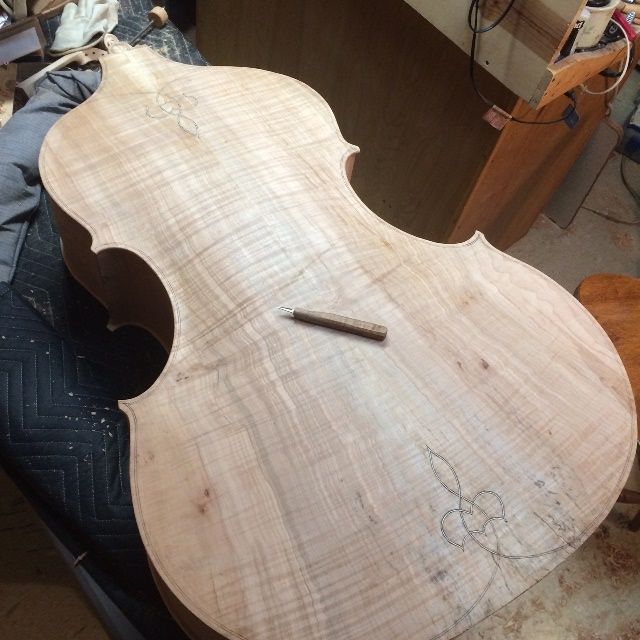
At any rate, I was now ready to correct the overhang all around, and begin the final purfling.
Overhang corrected, beginning final purfling.
Tracing in the slots for the final purfling.
The bottom end of the back plate has the same design.
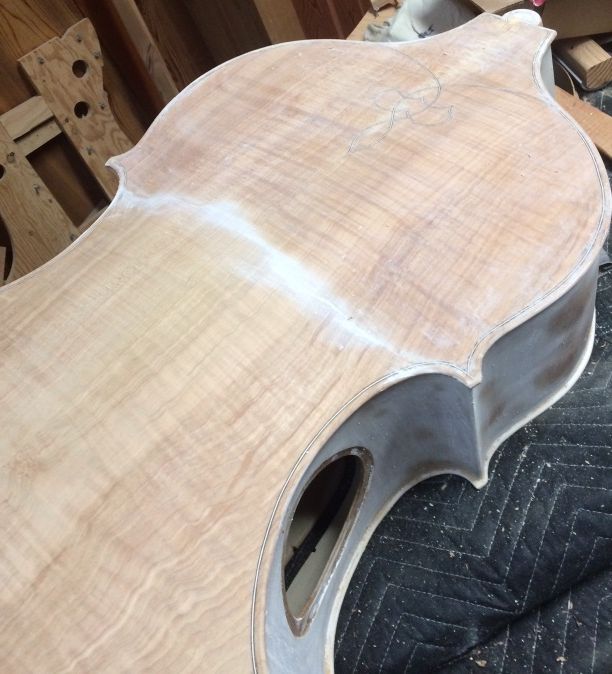
Carving the Channel
After the purfling was completed, I still needed to trim back the purfling and carve the plate channel. This involved marking the edge crest all the way around, about 2 millimeters inside the outer perimeter, and carving the channel to barely touch that line. I used a sharp gouge, in the manner of a drawknife, to carve the channel, then used a riffler file to smooth the outer curve, where it meets the crest line.
Using a gouge as a drawknife, to carve the channel.
(I actually made a very short video of how this works, but I was unable to successfully link it to this post. Sorry.)
After the channel was complete, it was time to begin final edgework:
Beginning final edgework on back plate.
And the same for the front plate.
The goal is to make sure that the edge contour is correct all the way around, and that the plate channel fairs smoothly into the surface of the plate, without ridges or lumps. Getting the light at a low angle across the plate makes shadows which will show me where the lumps and ridges are so I can scrape them away.
Using shadows to complete edgework.
It suddenly occurred to me that my bass-varnishing fixture requires that the end-pin hole be drilled, so I drilled the endpin hole but did not ream it to the taper it will eventually have. On smaller instruments I usually varnish before drilling the endpin hole, so that there is no likelihood of causing sags or runs where the varnish brush touches the hole. But on the bass, I have to have that hole as a place to attach the support for varnishing. (I can’t hold the bass in one hand, and the brush in the other, as I can with a violin!)
End pin hole drilled.
And, that is pretty much where it sits, for the moment! The bass is ready for final varnish-prep, which will involve wetting down the whole surface to raise the grain, so I can sand it smooth again, then repeating until the grain no longer responds to moisture. Then I will rub in a compound to add color to the wood itself (not a stain, which might “reverse” the grain colors) and a mineral ground to close the pores in the wood. Finally a sealer locks in the mineral ground, and I will be ready for varnish.
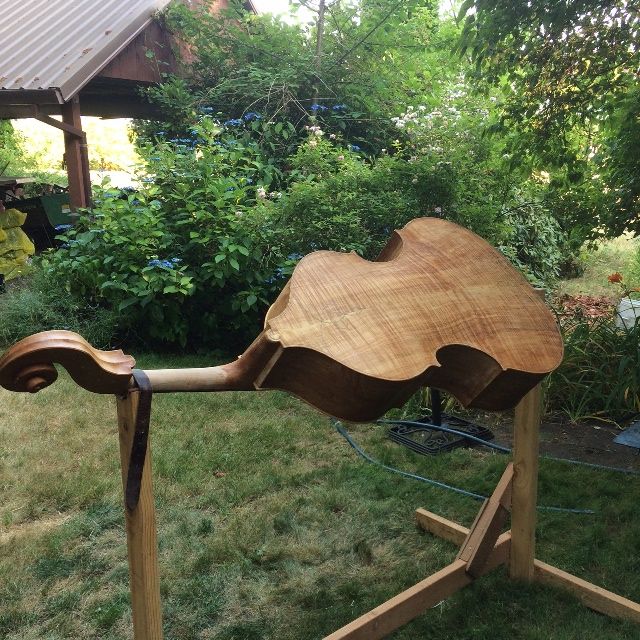
So there is the bass corpus, ready for final varnish prep!
Five string double bass corpus ready for varnish prep.

.jpeg)


.jpg)


.jpg)
.JPG)


.JPG)
.JPG)
.jpg)