Sadly, these have been a difficult couple of years. For one thing, Health issues within the extended family and increasing responsibilities in other areas of life have made it difficult to actively work on new builds. Consequently, I hardly get started, and something else is needed
However, currently, I have one new Five-string Fiddle that should be done in the near future.
Originally, I bought the figured maple for this instrument as a billet, years ago, from Bruce Harvie of “Orcas Island Tonewoods.” However, the European Spruce, the purfling, and the fittings are from “International Violin Company” in Baltimore. Serendipitously, I secured the linings and blocks from a local source. They are weeping willow, (And it came from a large downed limb in someone’s yard after a windstorm).
This is my original design from the first five-string fiddle I built. For some reason, it has proved my most popular build, both for tone and playability.
Scroll Graft
Obviously, (If you look closely, you can see it) I was forced to perform a scroll graft on this instrument. The cause was that there was a series of small knots that penetrated all the way through the neck, right at the nut line. As a result, they would have produced a fatal weakness in the neck. I had already carved most of the scroll when I realized it wasn’t going to work.
Also, obviously, (fortunately,) I had a block of curly maple at hand that could be shaped into a new neck-block and grafted into the scroll.
Progress Photos:
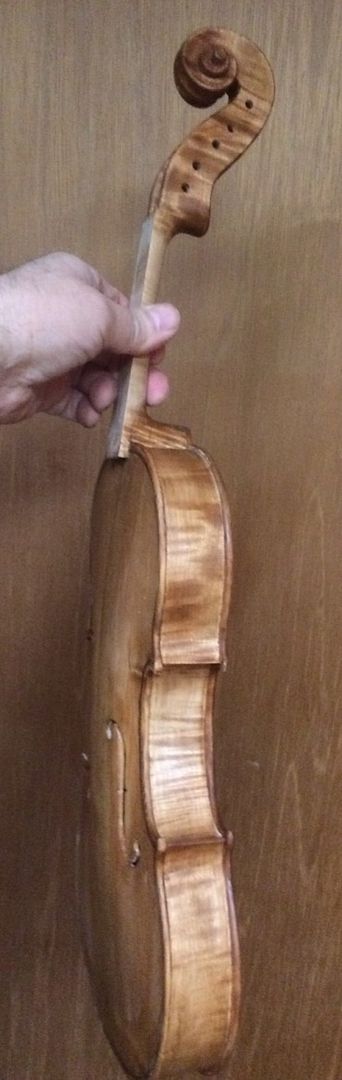
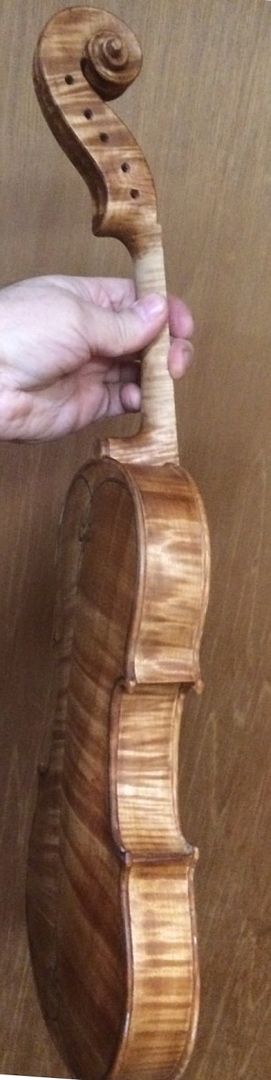
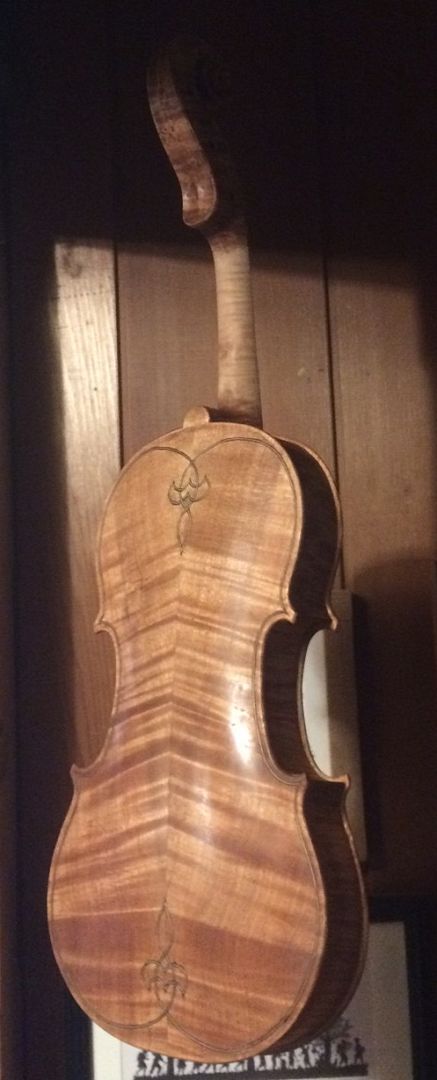
Completed Back PlateInside Front Plate with GarlandFront view Front plate with GarlandTreble Side View of NeckNeck FrontBass Side NeckBass Side Neck SetFront View Neck SetFront View Completed Fiddle in the WhiteBass Side Completed Fiddle in the WhiteBack Side Completed Fiddle in the White
The next step will be to complete final smoothing and varnish preparation, then I will apply a mineral ground. Finally, after the ground is fully dry, I will apply a coat of a sealing compound. Then I can begin varnishing.
A customer ordered a new, custom-made Five String Fiddle, and it is on the way! He chose heavily spalted, heavily-flamed, Oregon Big Leaf Maple for the back plate, the sides, the neck and scroll. My wife’s parents gave me the wood from this maple tree.
Ann used to play under and climb on this tree as a child, and we hated to see the tree cut down. Her parents still live there, less than four miles from our house. However, they had to remove the tree because it was dying. I have salvaged wood for a few instruments from that tree and they all look and sound wonderful!
Given a choice between Spruce and Douglas Fir, the customer chose the Douglas Fir, for his front plate. This tree also grew just a few miles from my home. (A famous violin and viola maker, Otto Erdescz (1917-2000) used to make violins and violas with Douglas Fir soundboards. Professional musicians still play some of them, today. But very few luthiers use Douglas Fir. I didn’t either, until a few years ago!)
Not my usuaI Choice in times past
For many years, I refused to try such a thing. But a friend gave me a load of very straight grained Douglas Fir firewood, a few years ago. I was splitting some of the firewood, and the split-off piece hit the ground: it rang like a bell! I had never seen such straight-grained, clear Douglas Fir, with zero runout!
Unfortunately, that particular piece was too short for a fiddle. I had to search through the pile for a piece that was long enouigh for a violin plate.
Since then, I have made several such instruments, and they all sound great. (I find that the Spruce is definitely easier to work with, though, and, for classical, orchestral instruments, I still use only European maple and spruce.)
Customer Preferences:
This man showed up at my shop and he played all the five string instruments I had. (He really had not played 5-string instruments before. He laughed for joy, hearing the rich deep C-string on each one. After a short while, he declared, “OK, I’m addicted!”)
He played the full range of all of them. He finally settled on my earliest unsold 5-string (#3 on the “Chronology” page) as being exactly what he wanted.
But not to buy that instrument. No! He wanted a commissioned instrument “just like that one!” (He wanted one especially built for him! Sure! We can do that!)
And, as it turned out, that was a good thing. A week later, thenext customer who came to try out all my instruments also loved that fiddle, but she bought it that day, and drove away! So, it is gone, now!
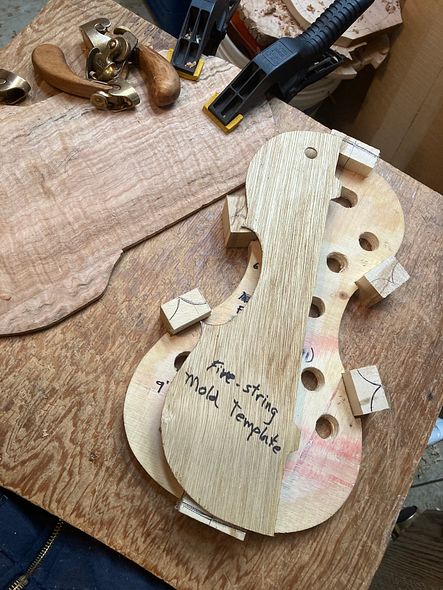
Which Mold?
I knew which of my molds was the source of that fiddle: I have made at least four off of that specific mold. All of them have sold, now, so, for the moment, there are none available. (This instrument will “solve that problem,” for a moment, but it will disappear immediately after completion.)
The commissioning customer also wanted localwood. so that he could say, “My violin came from a tree on that hill!” So…choosing the wood was the first step.
Choosing the Wood
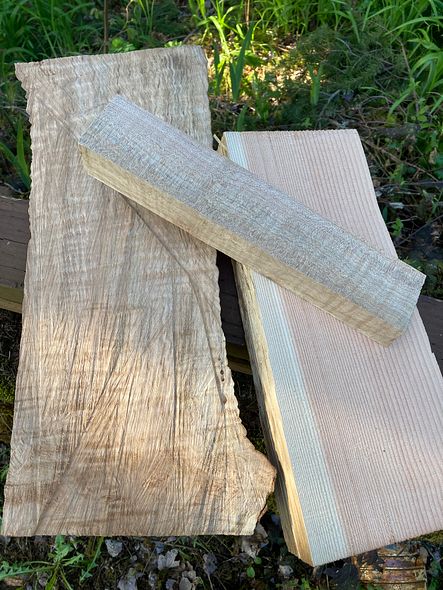
The model I would use had already been chosen, so that was not an issue. I also knew what the wood source would be: I still have a little of the maple my wife’s parents had given me. And, with the customer’s approval, I chose a clear piece of Douglas Fir, salvaged from the firtewood I mentioned earlier. He loved both pieces.
“Fiddle in the rough!”
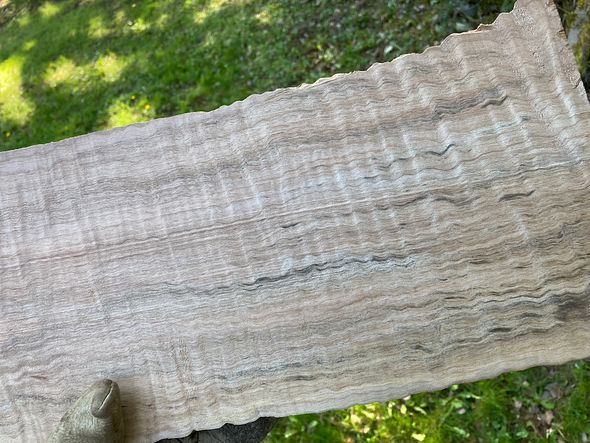
Here is a closer picture of the maple:
Heavily Spalted and Heavily Flamed Maple
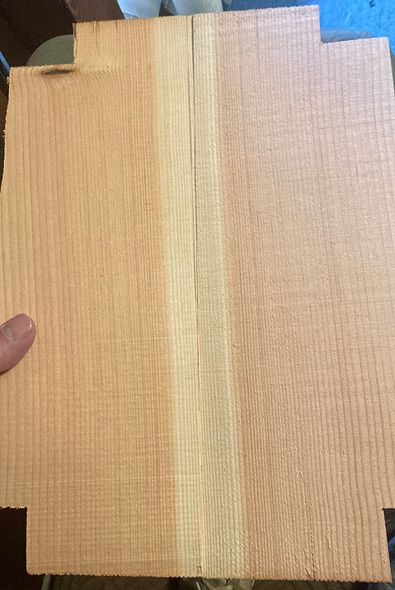
I book-matched the spruce, by cutting a single billet in two equal halves and gluing them together to make the front plate.
Douglas Fir, cut and ready to joint and glue the Center seam
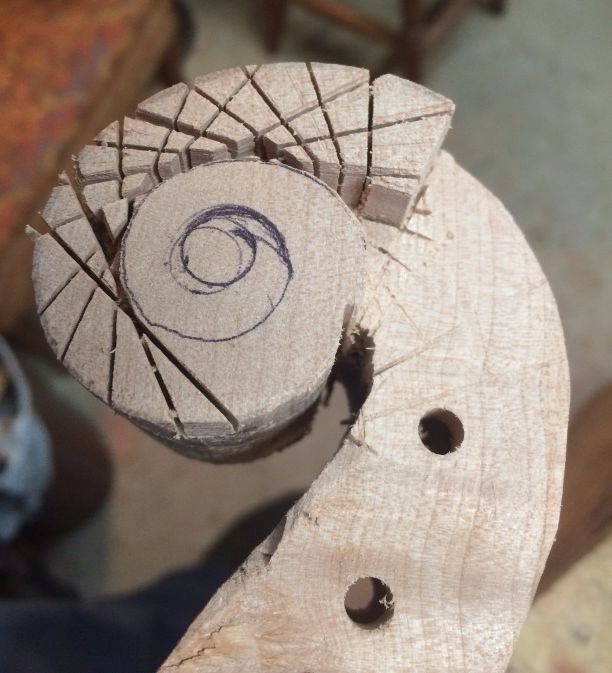
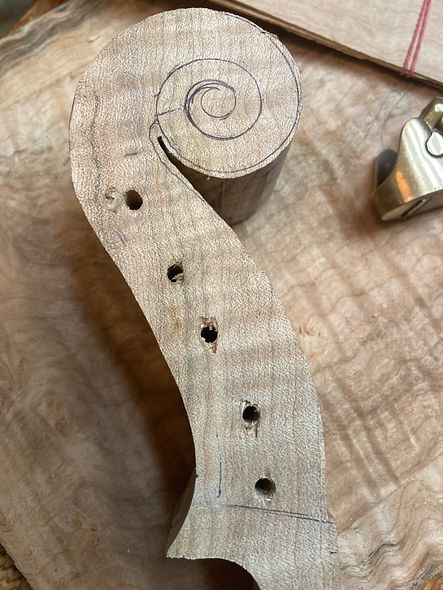
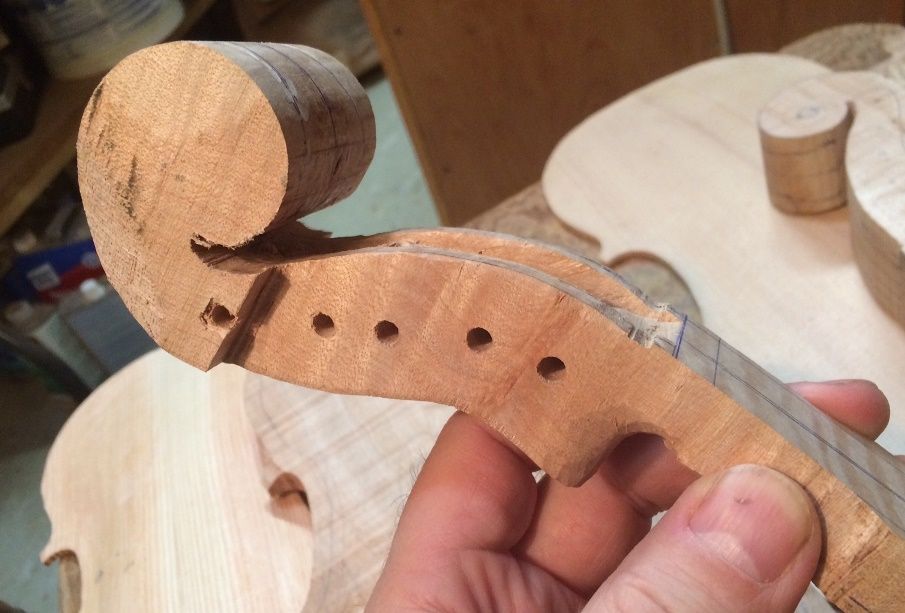
I laid out the neck outline on the billet I had chosen for the neck, and I drilled the pilot holes for the tuning pegs. Then I cut out the side profile on a bandsaw.
Scroll profile cut out, and pilot holes drilled.
Mold Preparation
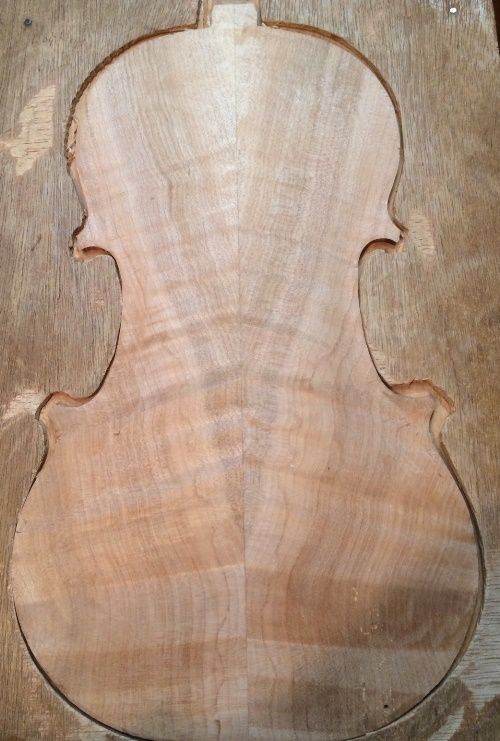
Meanwhile, I got the blocks glued into the mold. Then I traced their shapes from my template, so the whole job could begin. I also planed away the rough surfaces of the maple to ascertain that it actually would serve well as the back plate of a new five-string fiddle. And, I found that it was just a little too narrow in the lower bouts.
So, I “transplanted” a small piece of wood from the area above the upper bout on each side and grafted them in on the lower bouts. (This practice is not at all uncommon: It will be every bit as strong as the center seams on two-piece backs. And, once the double purfling is installed, the joints will be nearly invisible, under the varnish.)
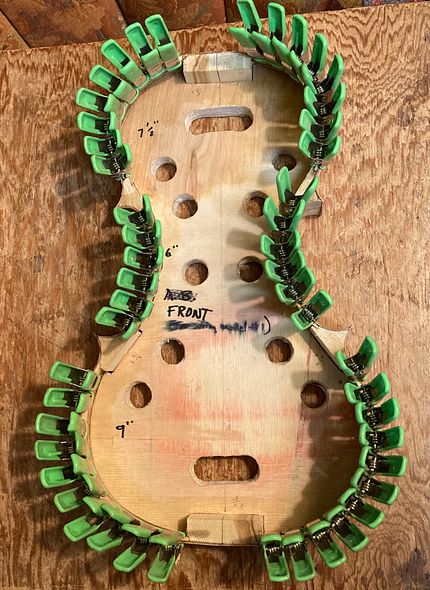
Back plate in progress, blocks in the mold, and the shapes traced from the template.
Preparing the Ribs
I had chosen wood for the ribs, as well, and I sawed them to a thickness of a little over 2 mm. I thinned them, using a wooden fixture I made, clamped to my oscillating spindle-sander. The fixture allows me to gradually reduce the thickness to 1 mm.
Here are the ribs:
Rib-stock, sawn and thinned: ready to be cut to size and bent.
Installing the Ribs
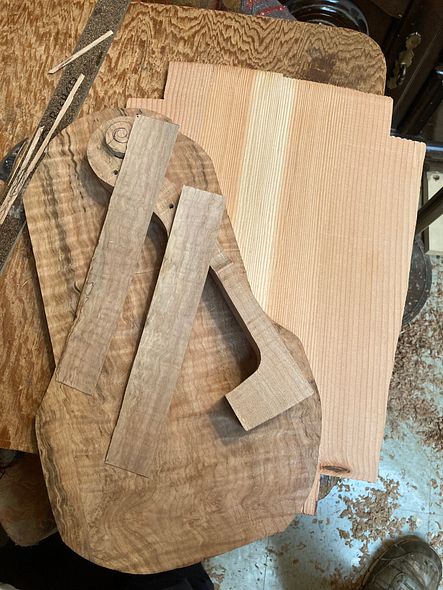
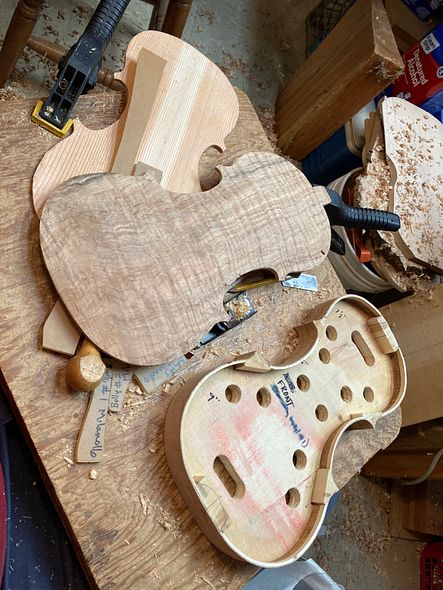
Next, I cut the ribs to the correct length and width. I carefully considered which grain from one side would “mirror” which grain on the otherside. I had already been tinkering on the neck, as you can see in this photo, but I will explain that process later. (It isn’t always possible to do everything in a precise order. While I am waiting for glue to dry on one section, for example, I may jump ahead on another piece.) You can see the bookmatched front plate, too.
Bookmatched top plate, neck and back billets in progress, and rib samples, cut to size.
I cut all six ribs, and marked them as to inside, outside, upper and lower ends, etc, as well as which side of the fiddle they would call their home…treble or bass side.
Then I bent the ribs using a hot “bending iron” (actually made of aluminum, but, in the old days, they wereiron.)
(I forgot to take photos of the shaped blocks: Sorry.)
I had cut and shaped the corner and end blocks, already, so I applied a generous coat of hot hide glue to one block at a time. then, I clamped the rib into the block surfaces, making certain that everything fit correctly before tightening the clamps.
First, I installed the center bout ribs, and when the glue had dried, I used the spindle-sander to trim the ends of those ribs to match the curvature of the outer faces of the corner block, so I could install the upper and lower ribs. Here are the upper ribs, glued and clamped:
Center and Upper bout ribs installed, using hot hide glue and clamps.
The lower end of the bass-side center bout rib was not fully tight, so I reglued it and reclamped it. (left lower side of photo.)
Then, when that glue was dry, I installed the lower ribs, by turning the mold upside down in the vise, so I could see clearly. It also meant that both hands were free to adjust the rib position, and apply clamps.
All the ribs are installed, but still need to be trimmed, before installing the linings.
Linings bent and installed
I also did not take photos of bending and installing the linings. (Sorry.) Here are two photos of the result, still in clamps.
Front view of linings clamped in place.
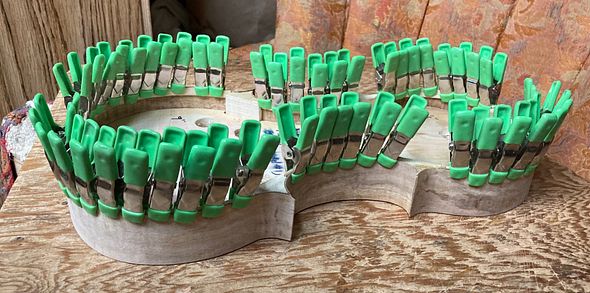
Side view of lining clamps and rib garland.
Tracing the plates
Once the linings were installed and the ribs thus strengthened, I could trace the shape of the plates, and begin cutting things out.
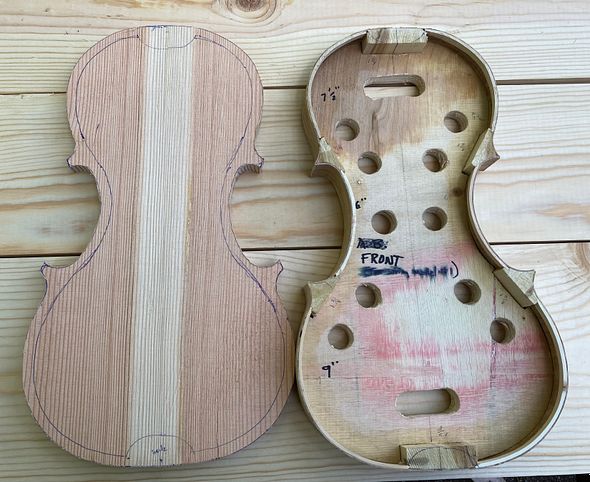
Garland and Front plate billet cut to shape.
And, that is the progress, so far!
Thanks for looking! I will try to keep everyone posted as to progress.
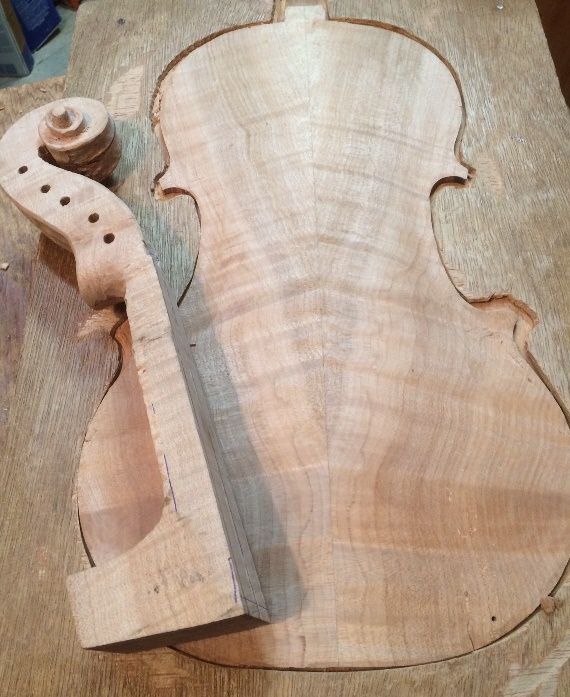
This instrument was actually begun last winter, but is only now coming into completed form. The back, sides and neck are all salvaged from a tree taken down years ago on my wife’s parents’ property, where she grew up. (I built a commissioned instrument from this same tree last year.) I wish I had a lot more of it, but much of the tree was lost to rot. Too bad… it is pretty wood. The Sitka spruce top came from somewhere here in the northwest, but I don’t know exactly where: all I can say is that I bought it from a local wood dealer.
Early stage… at this point there was a long way to go!
Eventually, I had the corpus (body) completed and had begun working on the neck and scroll. Additionally, arthritis was plaguing me a little, so it was slow progress.
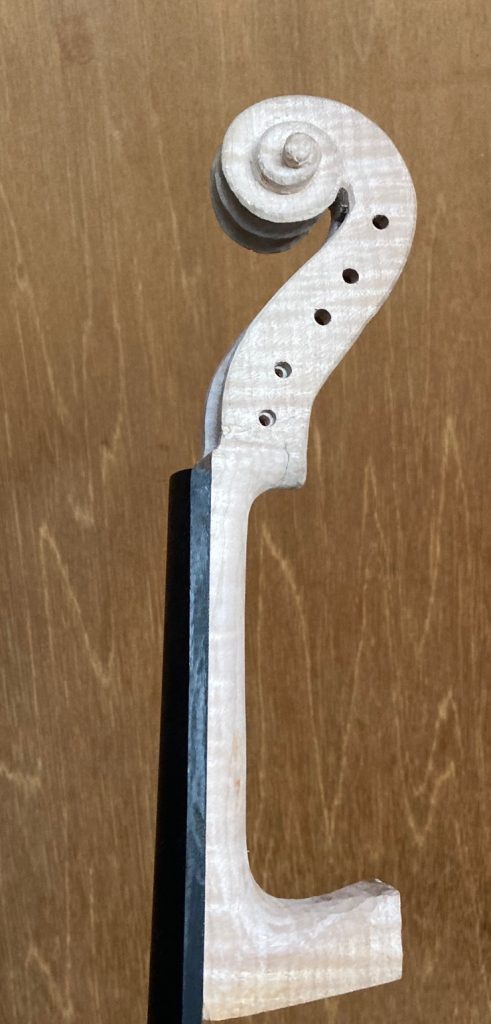
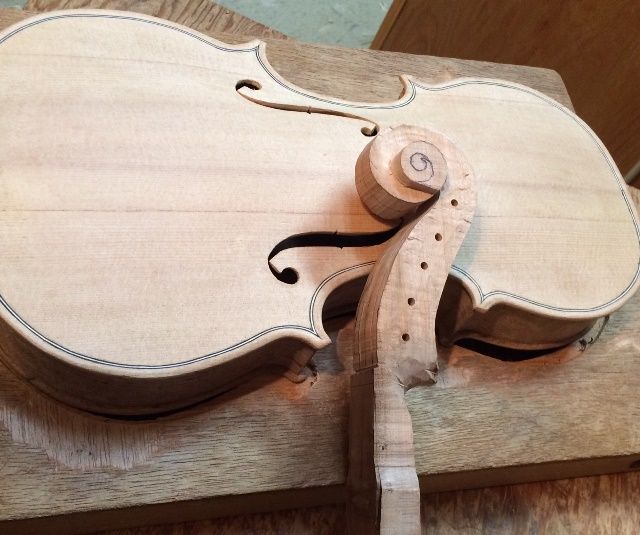
Completed corpus with partially carved scroll and neck.
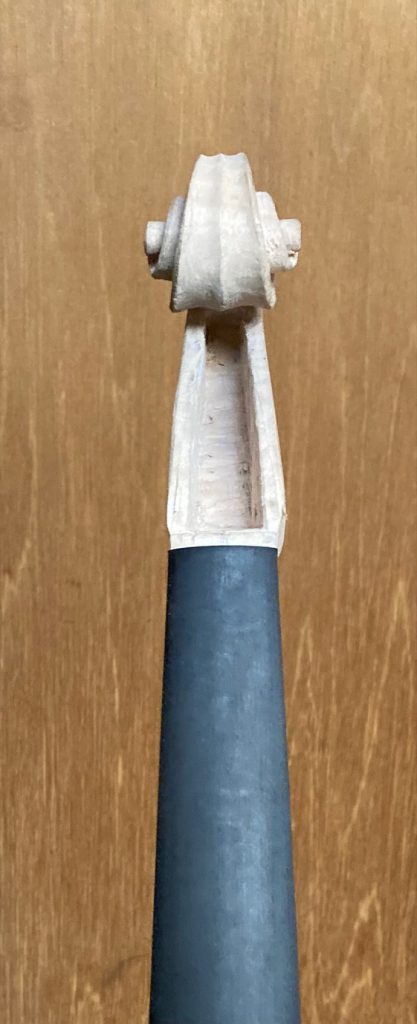
Nearly-completed scroll joined to fingerboard, for final shaping as a unit.
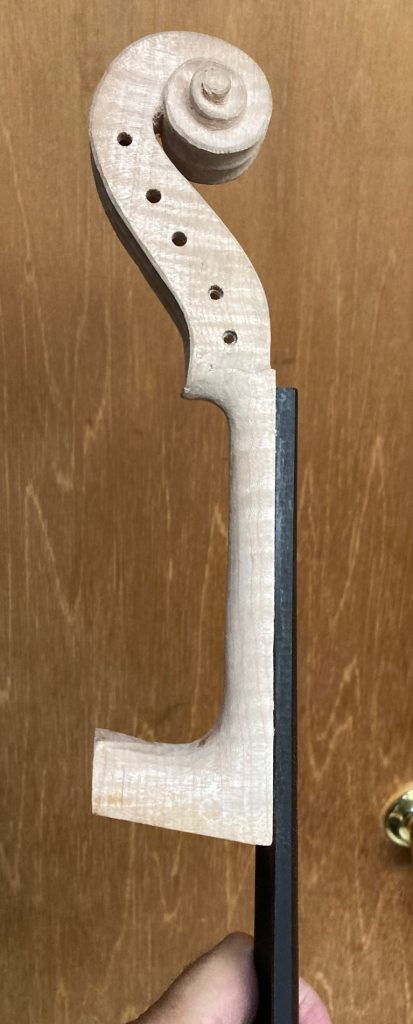
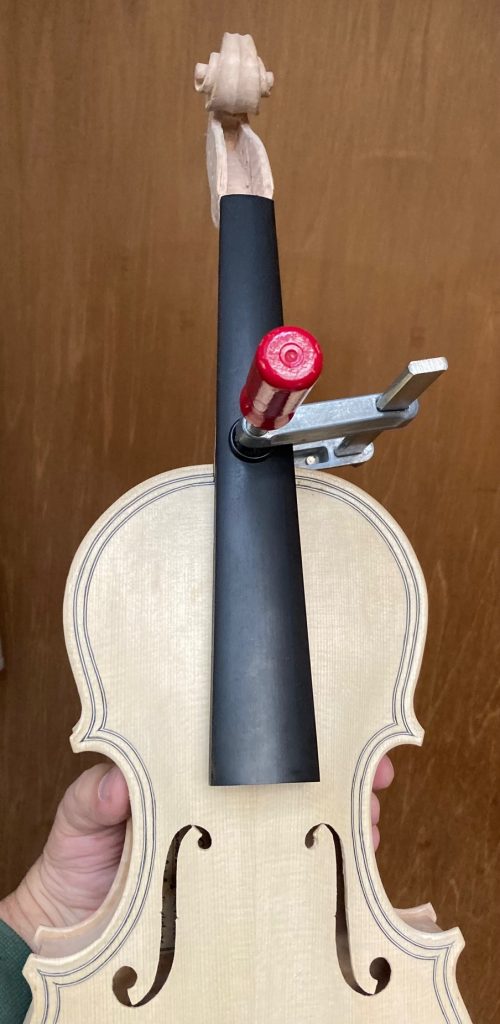
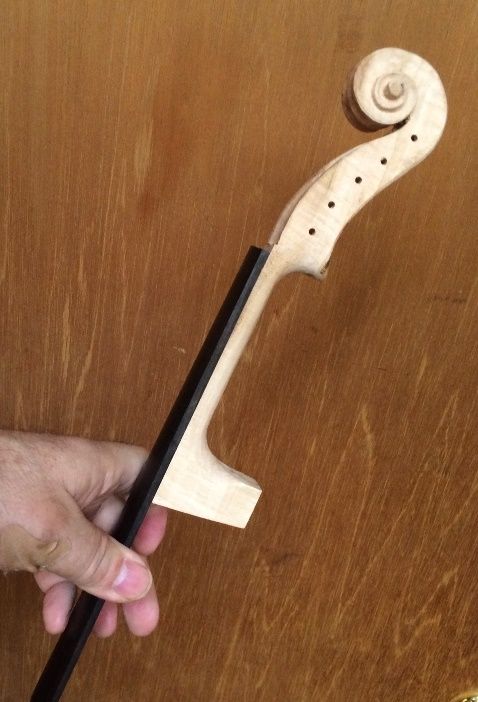
Completed neck assembly, ready for “neck-set.”
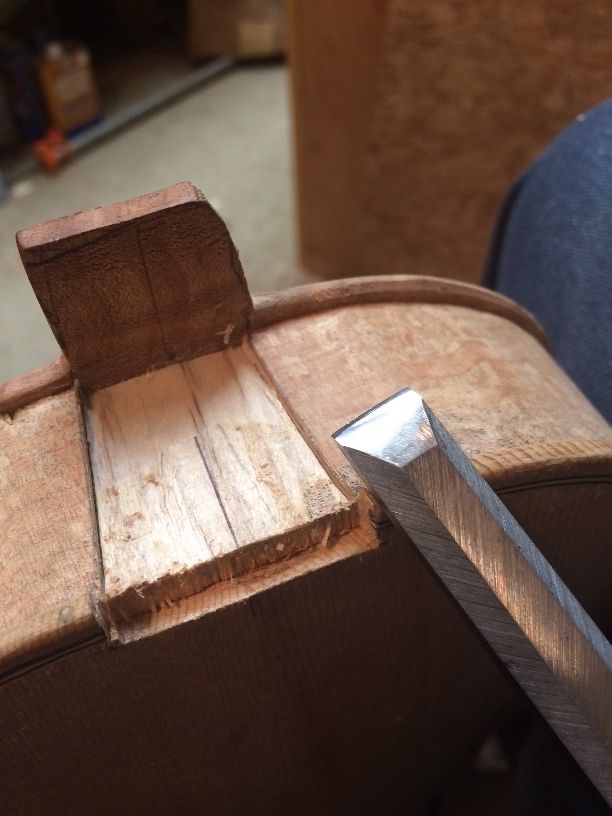
Then it was time to set the neck. This is one of the most exacting steps in building a violin: everything has to be correct, or it will be impossible to correctly set the instrument up for playing.
Beginning the neck-mortise into which the neck heel will be set.
Final Assembly
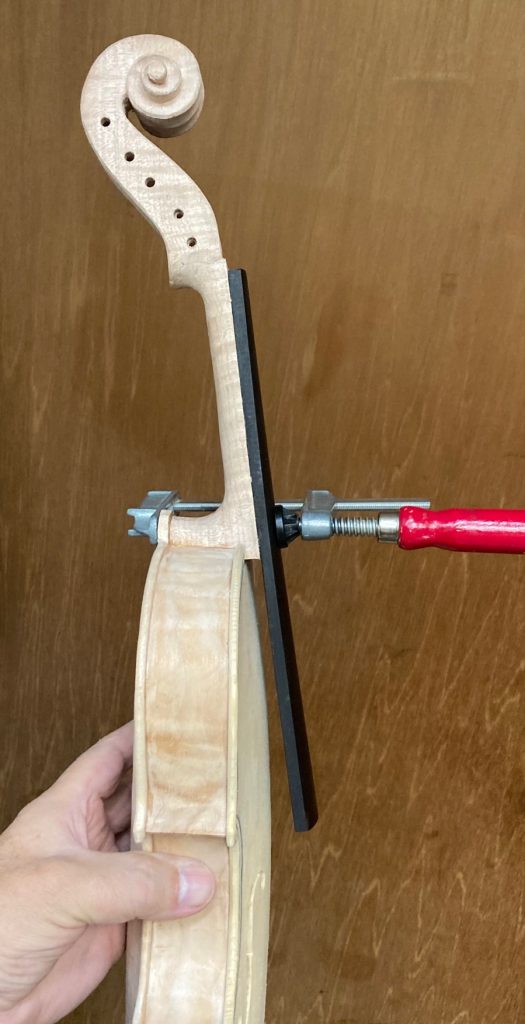
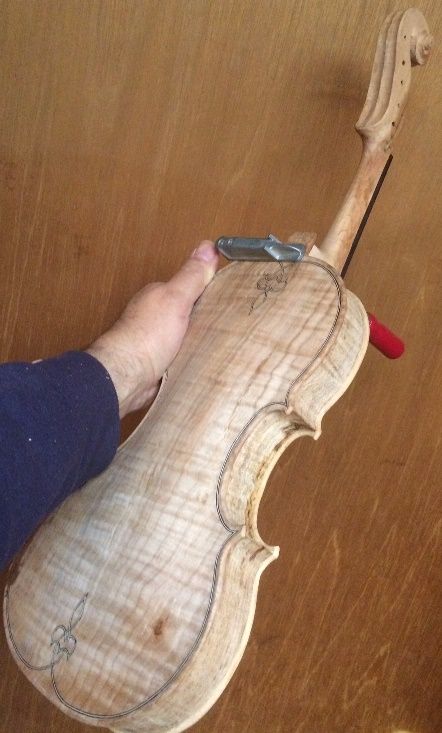
After the neck mortise is completed, so that the neck fits perfectly and all angles and dimensions are exactly right, I liberally coat the mortise and neck-heel with hot hide-glue, and then I quickly ram the neck into place. Then, I checked all measurements one last time and clamped it with a single clamp at the heel.
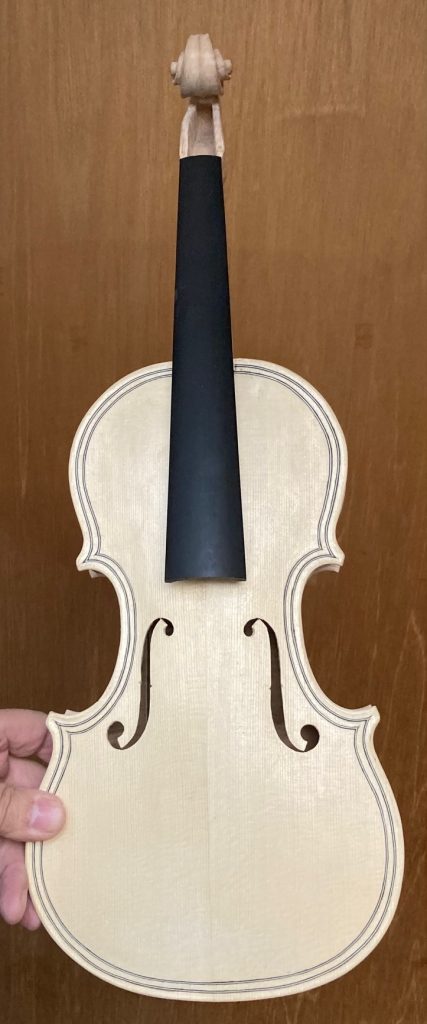
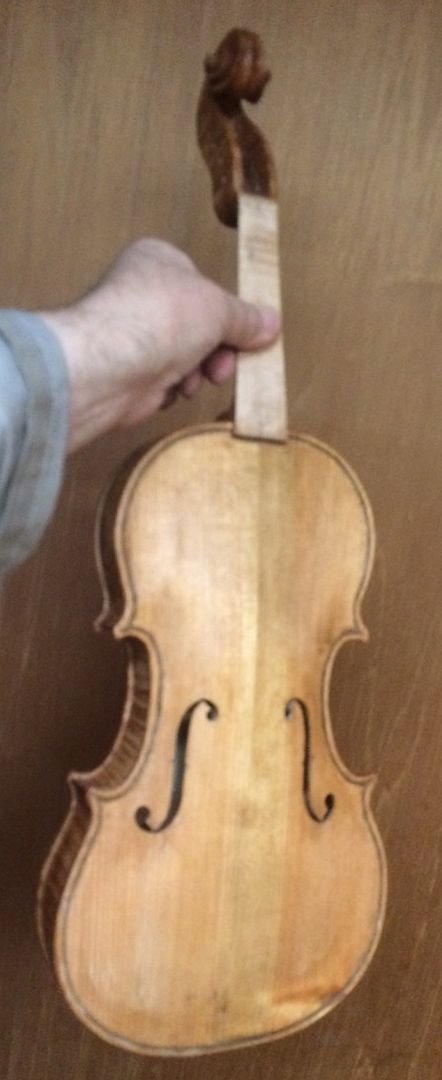
Successful Neck-Set! (The button and heel still need to be trimmed…)
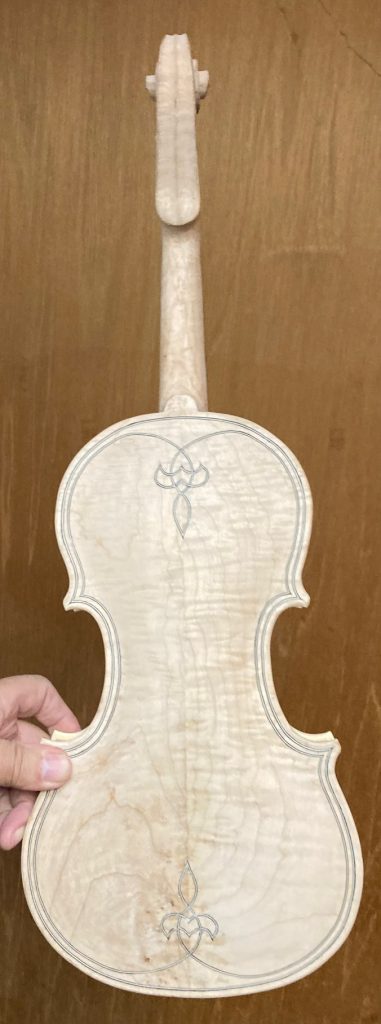
Back view
After all the woodwork was completed, I varnished the instrument: The first coats are quite yellow, to provide a “golden glow” from under the color coats.
First coat of (yellow) varnish. The Spruce shows the yellow strongly.
Back view: the Maple was darker to begin with, so the yellow is not as obvious.
Final Set-up
Finally, the instrument was fully varnished and set-up:
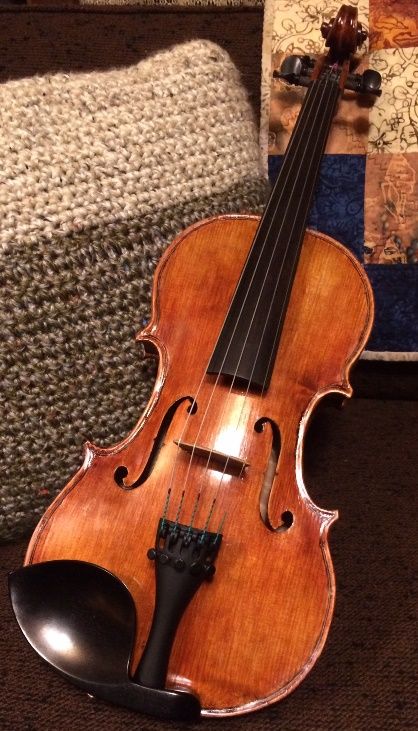
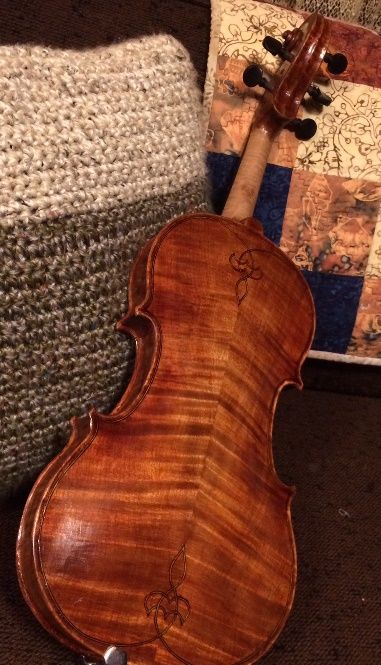
Front View of the completed instrument.
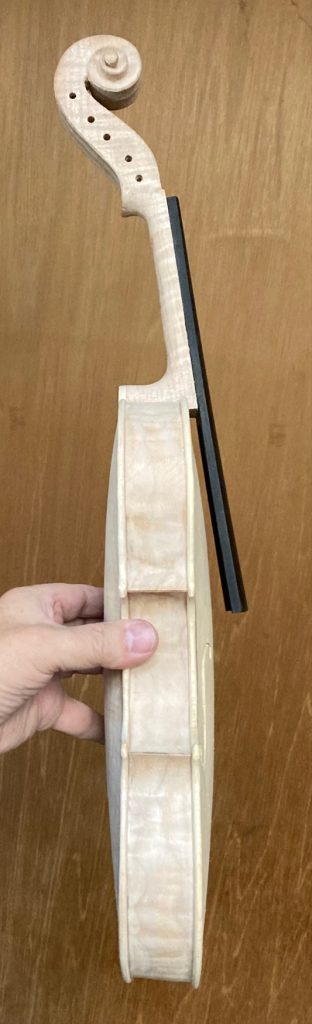
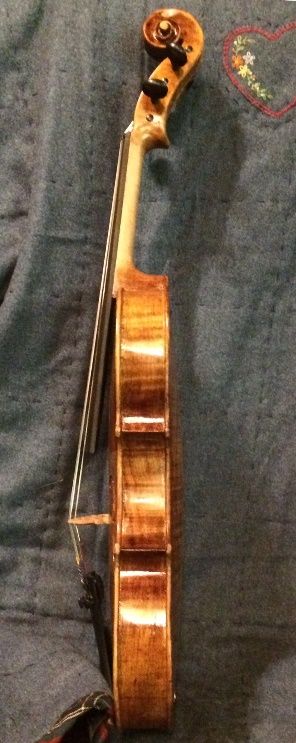
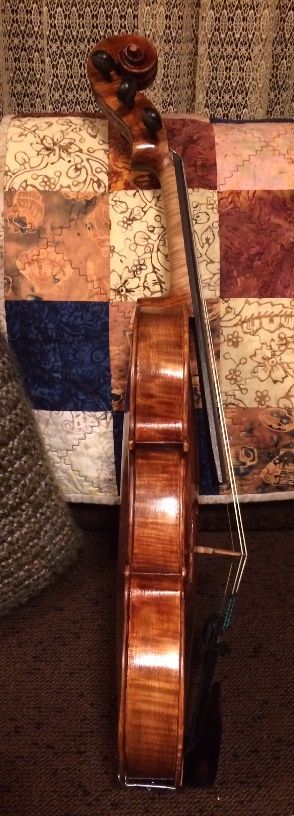
Side View:
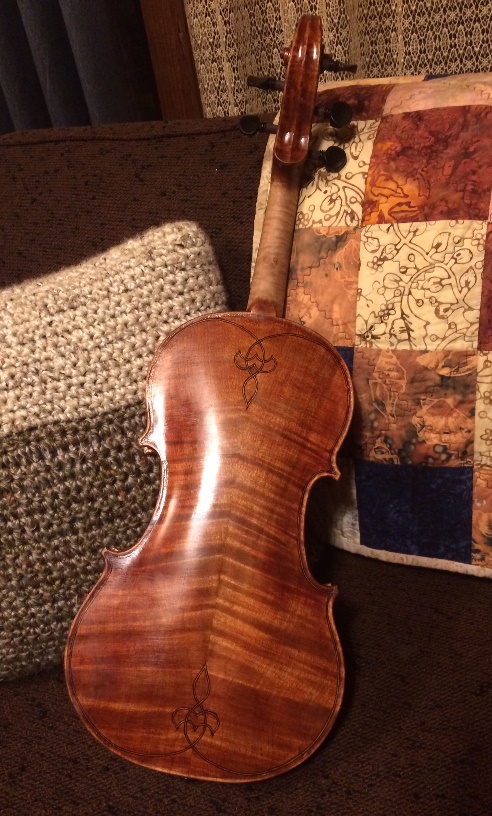
Back view. (I love that grain!)
The Verdict:
The sound on this fiddle is very strong and clear: it has a well-focused C-string and is well-balanced across all five strings. I think this is possibly my best instrument so far.
This and several other of my instruments are all from a log given me by the late Terry Howell. I have made one cello, one bass and several five-string fiddles from the wood of that log, and I still have a lifetime supply, thanks to Terry’s generosity. (see that story, here)
Front Plate
The front plate, however, is a first for me: Douglas Fir! This is unusual, but not unheard of: there are a number of professional instruments by Otto Erdesz out there being played whose front plates were made of Douglas fir. Will I always use it? Nope! But this turned out very well indeed! I am more confortable using spruce, and probably will continue to mostly use spruce, but it was quite an eye-opening experience to try the Douglas Fir.
The sound is very big, with a very clear, deep C-String, and perfect balance across all five strings. This fiddle will “cut through the mix” in a band, but can also play pianissimo when needed.
Overall, I am very well satisfied with the final result on this fiddle. I am confident that a buyer will find it a thrill to play.
Front is made of Oregon Douglas Fir: this is unusual, but not a first. Otto Erdesz used to use Douglas fir for front plates.
Sides and neck are made from Oregon Big Leaf Maple. I have the entire log they came from.
Just an update: This week was a hard one, in terms of getting things done. Unfortunately, I had some repairs to do; but I did complete the varnish prep work on the most recent five-string violin. Then I rubbed into it the mineral ground I use to fill the wood pores and prevent excessive varnish saturation.
The mineral ground (a suspension of fine particles of Gypsum, in coffee) dried rapidly. This allowed me to accomplish the final rubdown before varnishing began. Consequently, this evening, I applied the sealer, (a solution of rosin in turpentine) which is designed to soak in, and lock the mineral in place. After the solvent evaporates, leaving only the resin in the wood, I can begin varnishing. I rubbed off the excess with a rag and alcohol to make sure no unwanted residue was drying on the surface.
Next Step: Varnish!
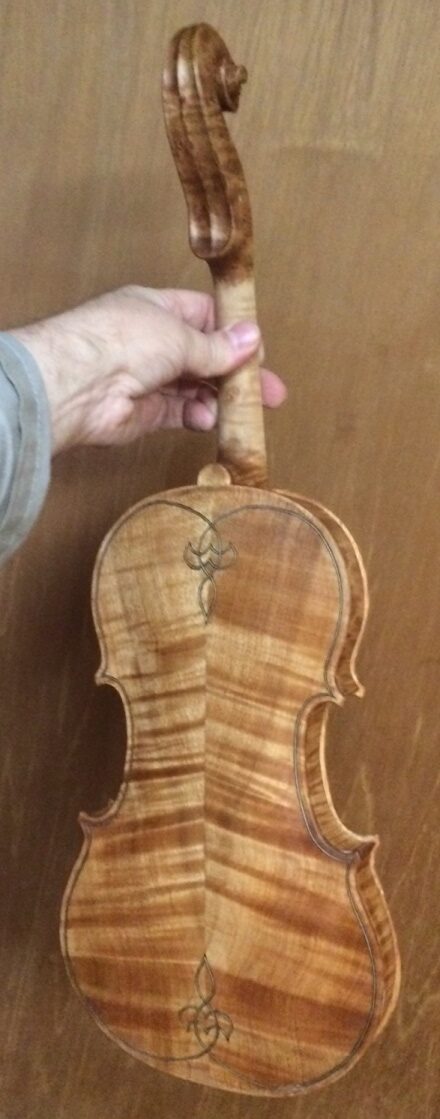
So, here is how it looks today. From here on out, it will be varnish and set-up: It promises to be a great fiddle! (And, it did!) I will post varnish progress soon.
This is the “sister instrument” to the earlier one I made of off-cuts from the Five-string Double bass I had made. This one is from the other side of that Bass back plate.
Front view with sealer. I must have moved just a little, as I see it is blurred a little. But the color is accurate.
Treble side, with sealer. I think those ribs are going to be beautiful!
Bass side, with sealer. Looks even nicer on this side!
Back view, with sealer. I like this best of all.
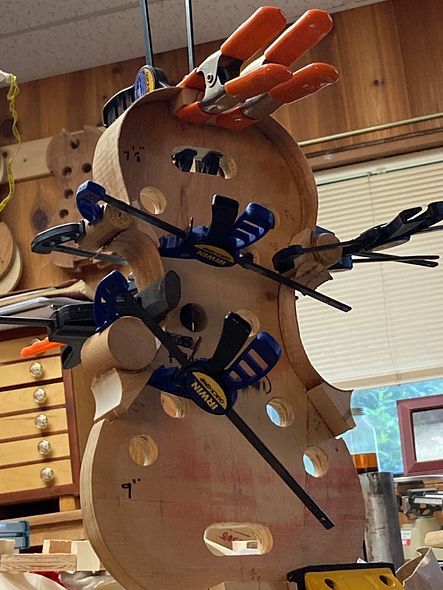
Drying Time
I always hang the fiddles in the dining room to dry, since we heat with wood, and that is where the woodstove is. The room stays warm, especially up near the ceiling. It really pays to allow sufficient time between coats, for the varnish to get dry.
Hanging in the dining room to allow the sealer to dry.
This is a pretty accurate view of the color, so far: I intend to use yellow varnish as my base coat(s) to produce a golden glow from within the color-coats.
Otto Erdesz, 1917-2000 often made top plates for violas and violins out of Douglas Fir. Professional players bought and played his instruments. They are still playing them today, although many classical players insist that European spruce is the only “proper wood” for an instrument soundboard.
Frankly, I usually agree: all my experience with Douglas Fir has seemed to indicate that it would not be a very good choice. (I believed this, even though I have played one of his instruments, and it was excellent.) So, I simply didn’t try it, until this instrument.
Game-Changer!
Earlier this winter, a friend gave me a load of clean, dry Douglas Fir firewood. I use wood heat, and we had all been told it would be a bad winter (it wasn’t.) So I felt truly grateful for the gift. Later, as I split some of it, I noticed that, unlike most Douglas Fir, it had no twist at all, and it split easily and cleanly. I picked up a chunk and tapped it, and it gave a very clear, bell-like ring. (Hah! That spells “time to try some Douglas Fir!”)
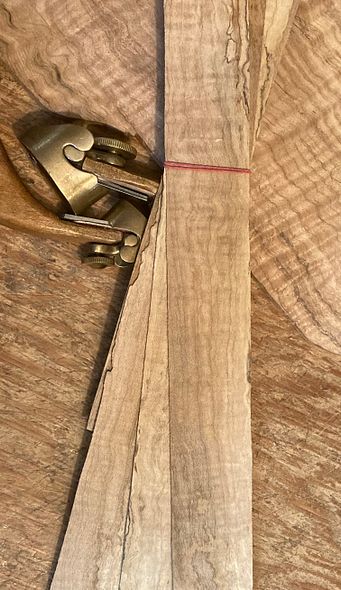
So, I searched through the pile, and found one of the few pieces long enough to use. Then I carefully split it into useable billets. Next, I sawed along the center-line to book-match a plate.
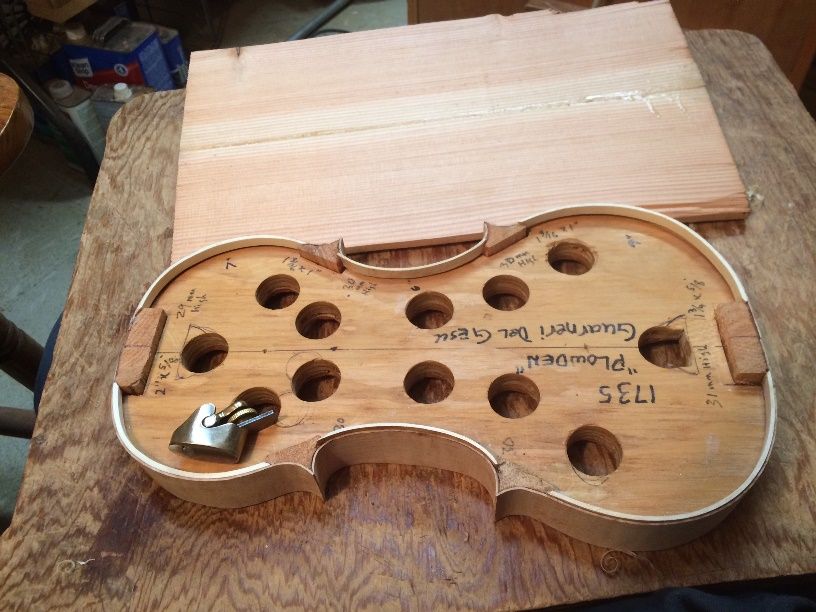
Douglas Fir billet with Guarneri Rib Garland
I frequently use a pattern modeled after the 1735 “Plowden” Guarneri del Gesu. And…I like it, so I installed blocks in the mold, bent the ribs, and got going!
I had one more piece of “scrap” of Oregon Big Leaf Maple. Happily, I had saved it, too, from the 5-string Double bass I built last year. Understandably, I was looking forward to making a fiddle out of it. I had already made one 5-string fiddle from scrap from the other side of the bass-back, (which I sold to a bluegrass fiddle player in Ohio.) It had turned out very well, so I was anxious to get the “sister” instrument made.
Back Plate Arching Nearly Complete:
Back arching nearly complete
And, the Neck
I obtained the neck billet from a tree on my wife’s parent’s place. Every time I looked at it, I found the wood very attractive, so I got started on it, as well:
Neck billet in progress.
First. I began to carve the scroll and pegbox. I find that this task requires a lot of saw-cuts, to outline the actual curl of the scroll, and then to remove the waste wood. Alternately, I can use either a saw or a gouge, but I find that the saw saves a lot of effort. Here, I use the saw.
Beginning the scroll cuts
Continuing the scroll cuts.
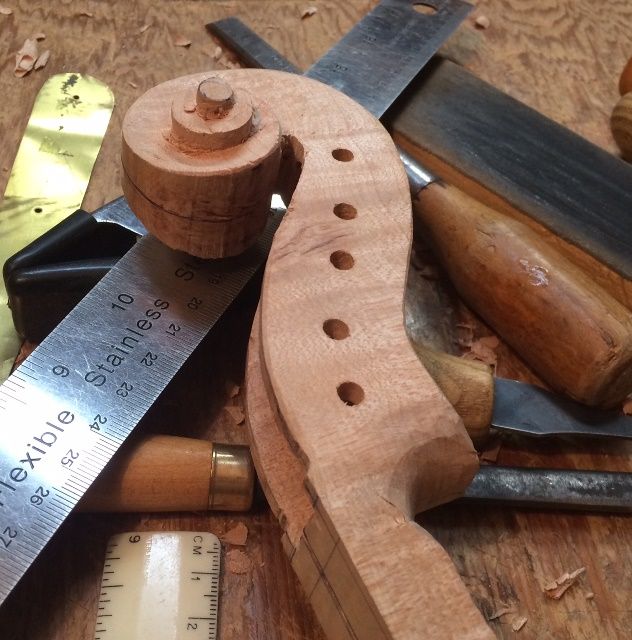
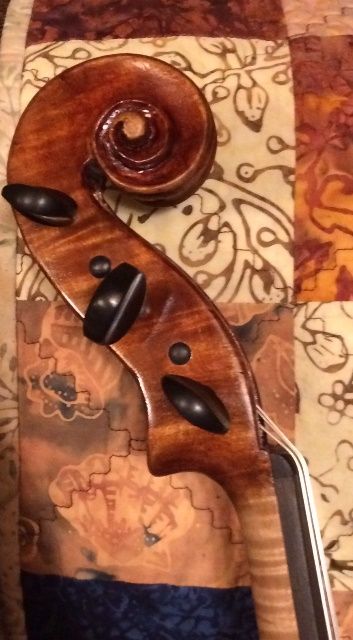
Then, I used various gouges and chisels to complete the scroll and the inside of the pegbox.
Scroll and pegbox nearing completion.
I prepare and attach the fingerboard after the scroll and pegbox are very close to complete. Then I can carve and shape the two as a unit. That hasn’t happened, yet, so the handle portion of the neck is still rough and untouched.
Scroll ready for fingerboard; Arching complete on back plate: ready for Graduations.
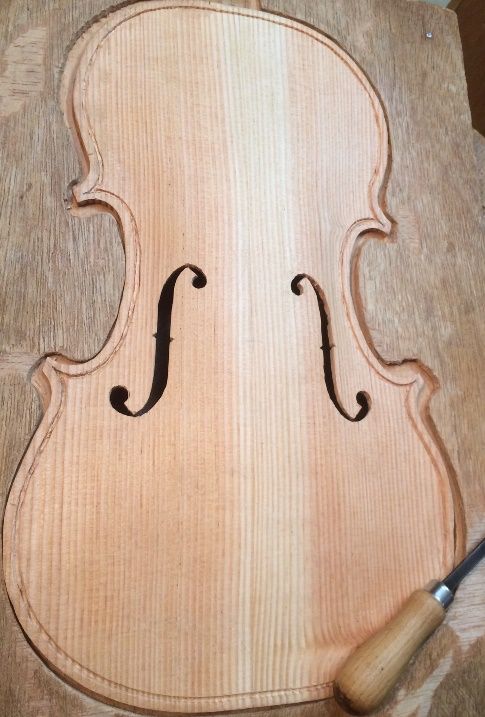
Completing the Front Plate
Meanwhile, I completed the carving of the front plate. Then, I laid out and cut the f-holes and began the purfling. Cutting the purfling slots by hand on Douglas Fir is quite difficult, because the winter reeds are exceedingly hard, compared to the softer summer reeds. The knife just “pops” over them so that it feels as though it is running over corrugated roofing.
As a result, I took much longer to purfle this plate than I usually do for a spruce plate. (Ah, well!Perhaps that is one reason so few luthiers are willing to use it!) But, I still have high hopes for the power and tone of the resulting instrument. This plate has exceptionally strong and clear tap-tones.
Purfling the front plate.
Garland leveled and Front Plate installed!
(Unfortunately, I neglected to get photos of the bass-bar process. I made it also of Douglas Fir, from the same billet. I hope to show it after I remove the mold…sorry.)
Front plate installed and waiting for glue to dry.
Well…I’m tired. I nearly completed the graduations for the back plate, but today was a long day. So, I will simply have to finish them tomorrow. However, the progress stands here, for tonight:
Completed front plate on garland, with nearly completed back plate.
Tomorrow! (yeah, tomorrow!)
I hope to get the back plate completed tomorrow, except for the purfling, which will have to wait until after I install the plate. Then, I will prepare the fingerboard and get it glued onto the neck, and I will feel as though I am “On the Home-stretch!” (But it won’t really be true: there still will be a great deal of work left to do, before it is anywhere close to completed.)
It has been a frustrating series of weeks: all the usual responsibilities, house guests, etc., plus a few unexpected items. The lawn tractor suddenly quit mowing, though it ran fine. We narrowed it down to being a bad PTO clutch, so that is just another thing to take apart and replace. Guess that’s what happens when you use 30-year-old equipment. 🙂
Then, two days ago, my beloved better half, Ann, discovered that the side porch steps are in advanced stages of rot…so, today, we went and bought all the pressure-treated lumber to replace them. They, too, have been in place for over 30 years, so, I guess, they have served well.
Progress on the 5-String Fiddles
I did manage to make a little progress on some of the acoustic five-string fiddles I had begun, however:
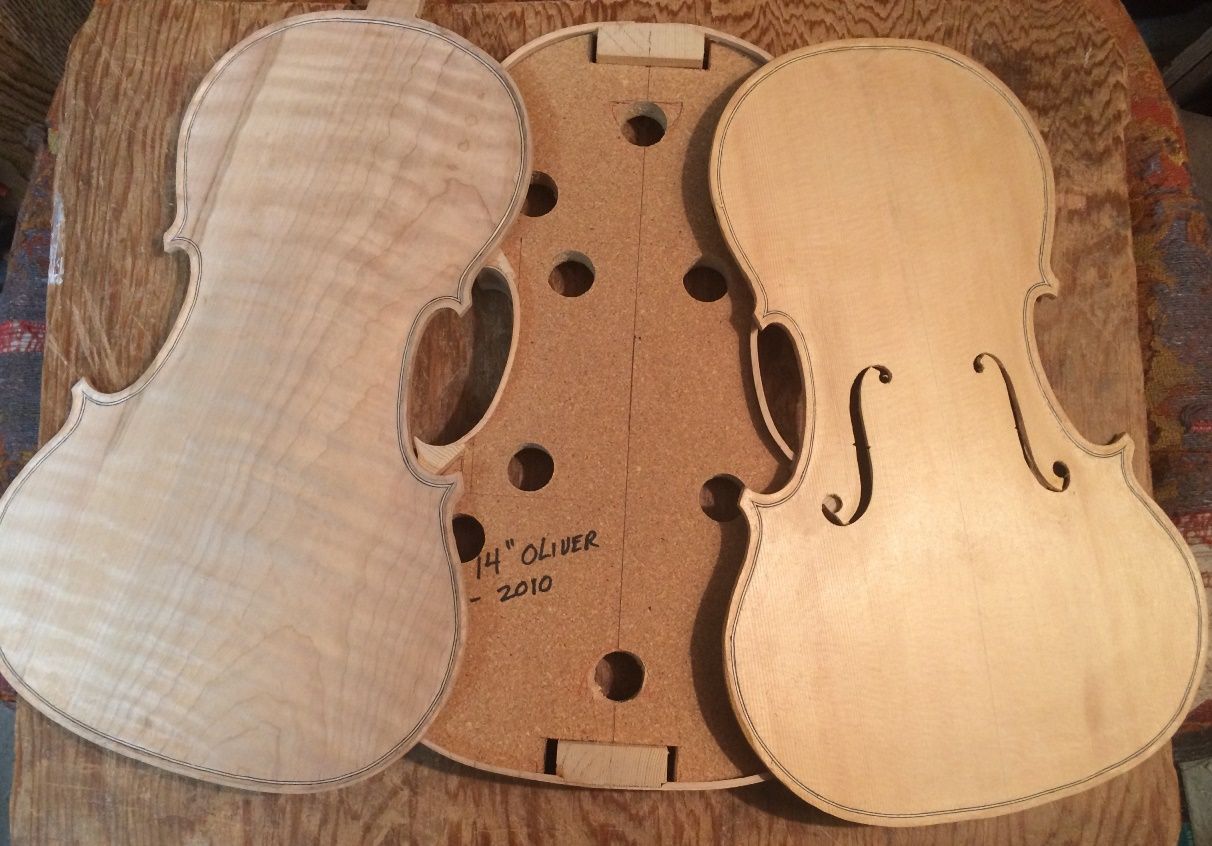
All the linings are in place for two of the instruments (violin and the 14-7/8″ viola.)
The front and back plates are traced and cut out for both of those instruments.
The front plate graduations are complete for the 14″ viola, and
The f-holes are cut out on the 14″ viola, but not refined.
So, this is where things stand, at the moment:
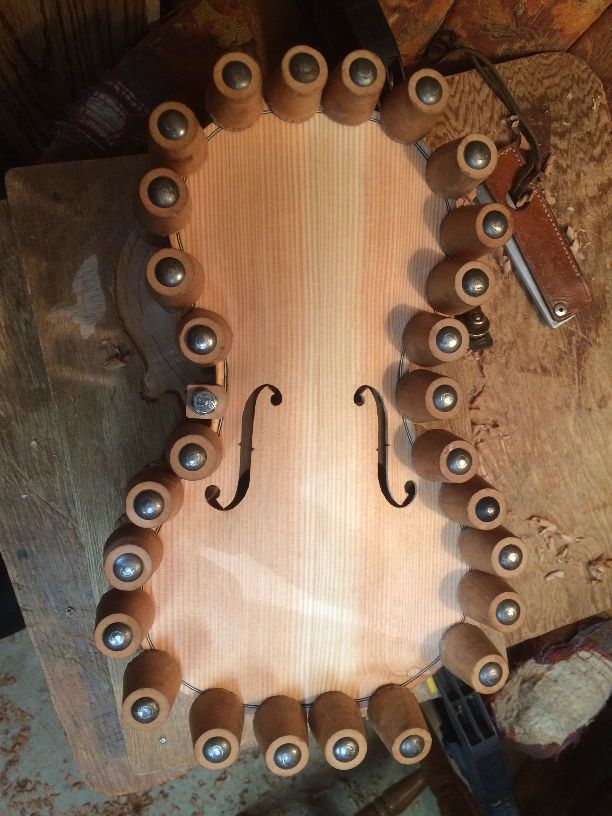
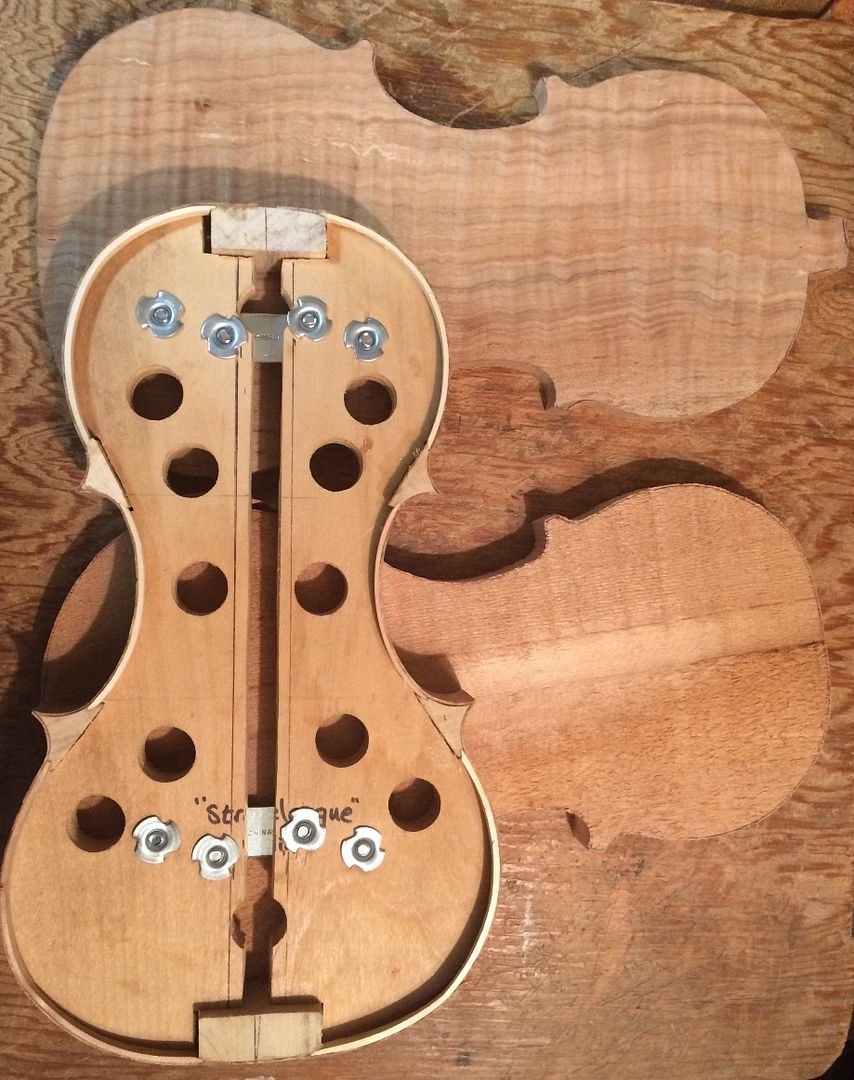
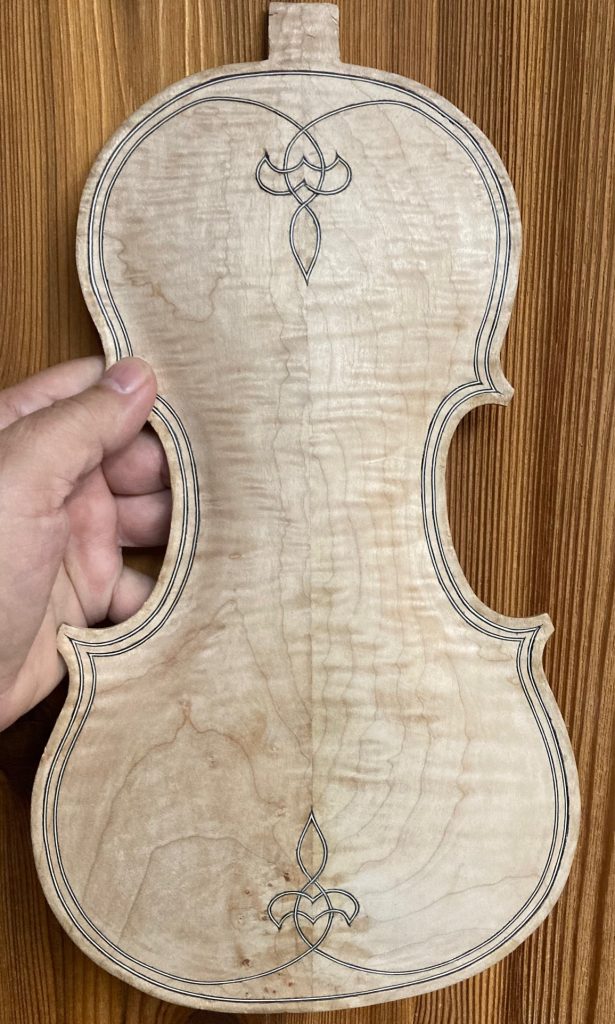
Here is the “Strobelesque” garland with its front and back plates:
Rib Garland and rough-cut plates for the “Strobelesque” fiddle.
No carving at all has been done on the plates, and the Sitka Spruce front plate is still nearly an inch thick. I will plane it down before I begin arching, of course. I do like the look of the spalted maple back and ribs. This maple was from an old Big Leaf Maple tree on the property where Ann grew up. It had begun to show signs of decay, and was removed for safety’s sake. Too bad for the loss of the tree, but it is nice wood.
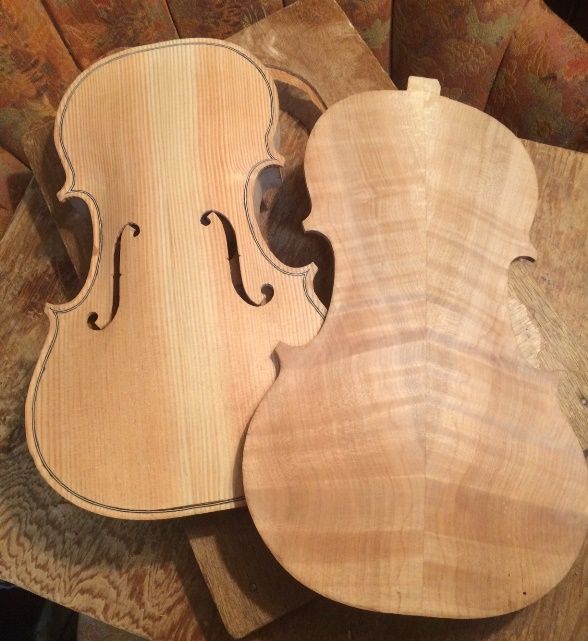
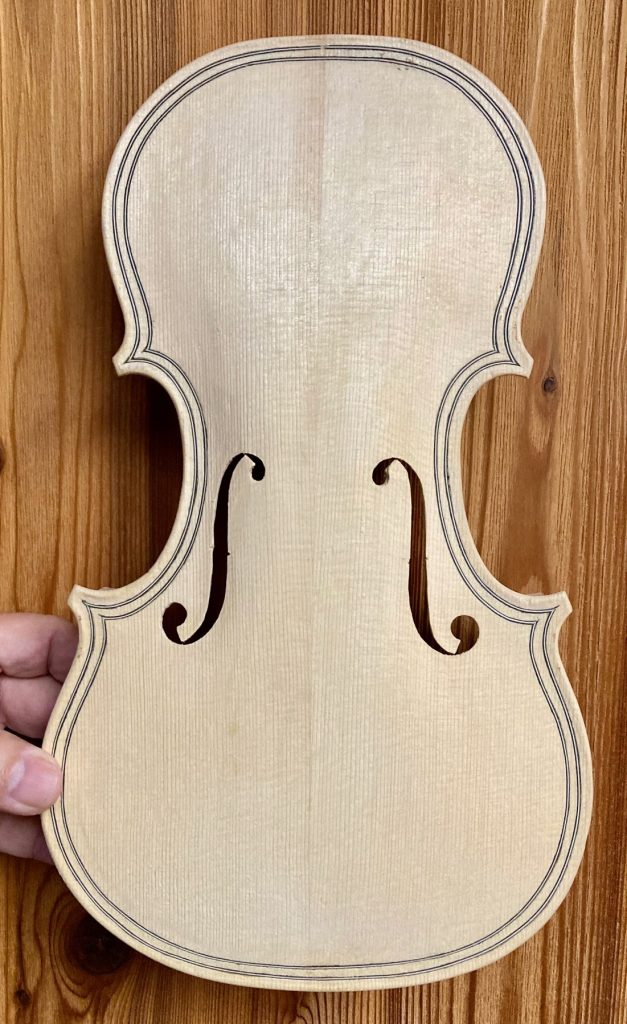
Here is the 14-7/8″ Viola garland with its front and back plates.
Rib garland with front and back plates for a 14-7/8″ 5-string viola.
This one is my own design. In fact, it was the very first form I ever made, thinking I was just going to make a viola for my youngest son (whose name is on the form, along with the date: 1999.) As it happened, I discovered that lutherie is addictive, and I have been building instruments ever since. 🙂
The center-lines on both plates are ink, not a glue-line: this instrument boasts both a one-piece Spalted (Big-Leaf) Maple back plate (also from the tree at Ann’s childhood home) and a one-piece Sitka Spruce front plate.
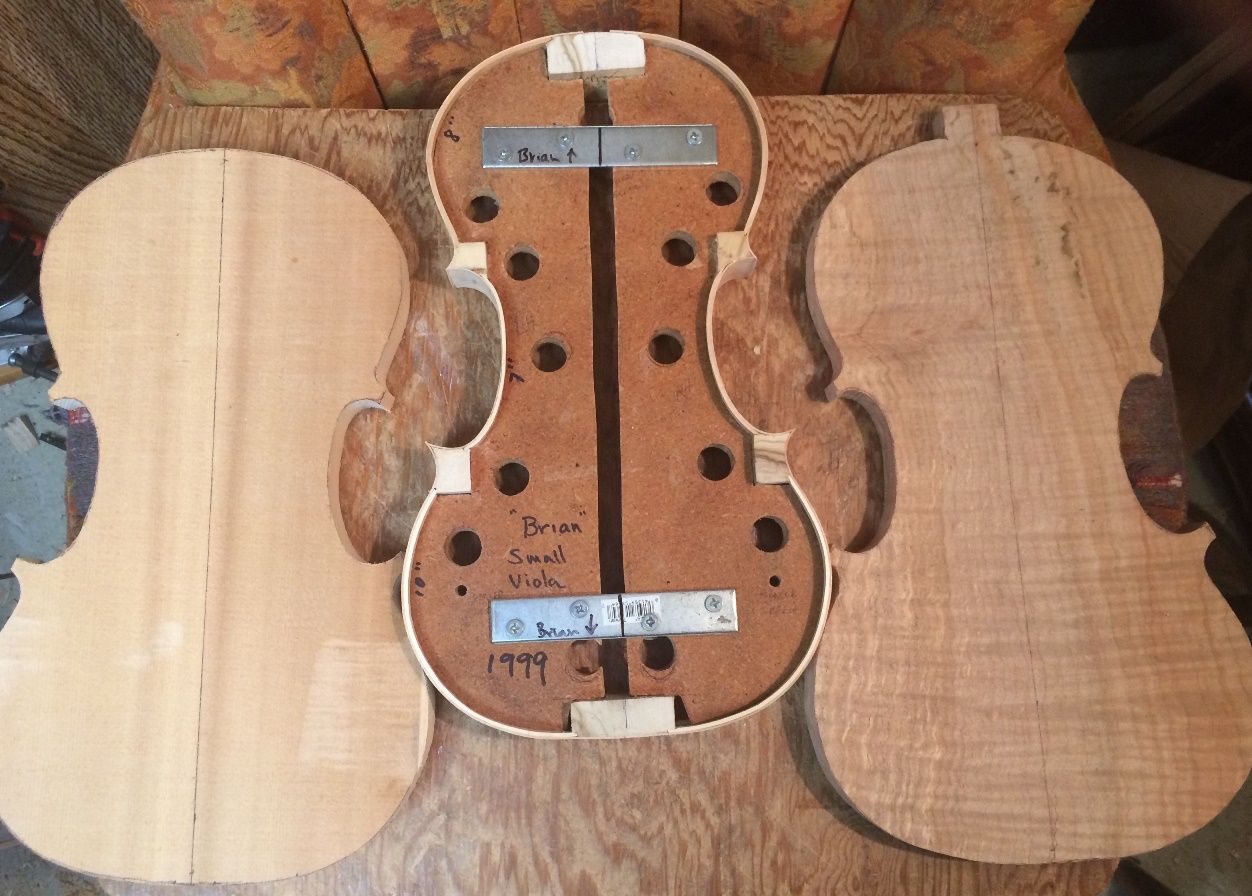
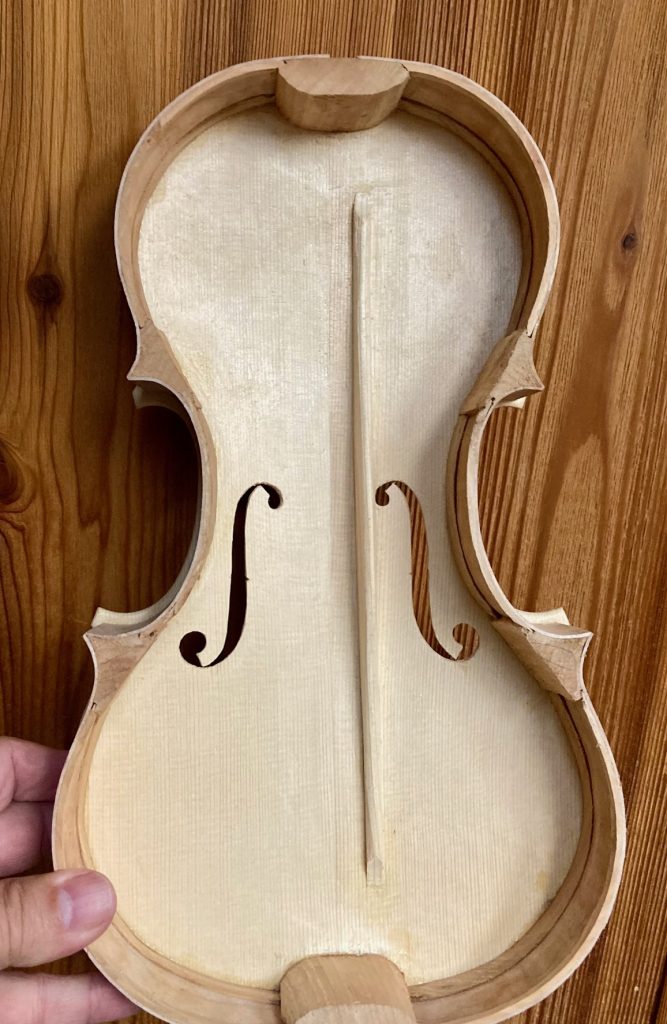
Here is the progress on the 14″ Viola:
Rib garland and nearly completed plates for a 14″ five-string viola.
This one is my own design, too: it is the same length as a standard violin, but much wider in the lower bouts, and deeper in the ribs. It will be interesting to see how it works as a five-string fiddle. (This is a first.) This one has an Englemann Spruce front plate and a one-piece Big Leaf Maple back from a log I was given by Terry Howell, years ago.
I will post more reports as the work takes place. Feel free to contact me if you have questions.

_rib_installed.jpg?width=590&height=590&fit=bounds)
.jpg)
.jpg)

.jpg)
.jpg)
.jpg)
.jpg)

.JPG)