I just began a new website for teaching-related articles, photographs, and videos. The Layman’s Institute will be at http://laymansinstitute.com and will have lots of teaching articles: whether math lessons, violin-making, or anything else.
No content is there, just yet: I will begin adding content in the next few days, I hope.
Fit and install the End Pin. (Already done on this instrument.)
Fit and install the Saddle. (Already done on this instrument)
Fit and install the Tuners (in the case of a double bass, that means “tuning machines.” Already done on this instrument.)
Fit and install the Soundpost. (already done on this instrument.)
Fit and install the Nut, file the string slots to the correct depth in the correct places.
Establish the correct length for the Tail-gut (or tail-wire in this case) and install it.
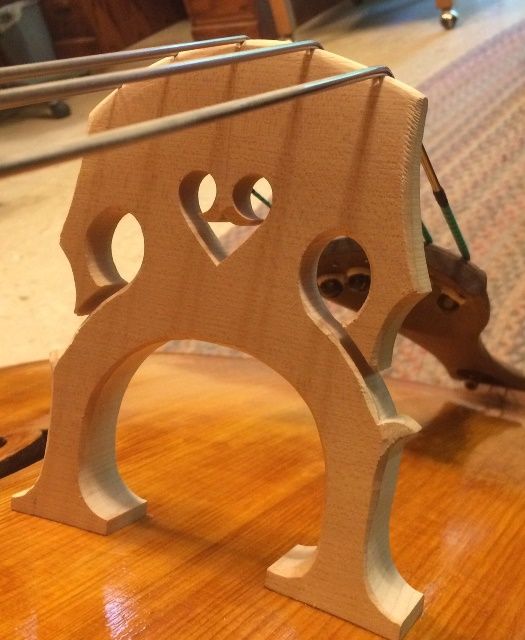
Fit and install the Bridge, filing the string-slots once the height is correct.
Install the Strings.
Play for sound adjustment, string clearance adjustment, etc.
End-Pin
On violins and violas, the end-pin (usually called the end-button) only serves as an anchor-point for the tail-gut. But, in cellos and double basses, it also must serve as a height-adjustment, so that the instrument will rest at the correct height for the particular player. In this case, I had chosen an Indian Rosewood plug with a tubular steel end-pin fully adjustable and locked by a thumb-screw on the bass side. I installed it earlier, so here it is, without details about shaping the plug or reaming the hole:
Endpin assembly installed.
Saddle
I cut my saddles with a large radius on each of the upper corners, where the saddle is cut into the front plate. There is a strong likelihood, historically, that cracks will eventually develop, emanating from the corners of the saddle. They are so common that they have a name: “saddle-cracks.” There are two ways to try to avoid such cracks:
The first is to make the mortise for the saddle (the part cut out of the front plate) a little wider than the actual saddle, by maybe a millimeter or so, so that, when (not if) the front plate shrinks during dry weather, it will not find itself up against the unmoveable saddle, and be forced to crack, to allow for the shrinkage. This is a good practice, and I try to follow it.
The second is to make the saddle with sound corners so that there is no “notch” in the plate at the “corners” of the mortise, but rather a smooth rounded curve, which eliminates the stress-riser and minimizes the chance of a saddle crack in the first place. (Round discontinuities essentially do not cause stress risers, hence, do not cause cracks.) I always do this, (since about my sixth instrument) and will continue to do so.
I already explained all this, including the purpose of the saddle, in a previous post. Suffice it to say that this part is already completed.
Saddle with round corners, to prevent saddle cracks.
Tuning Machines
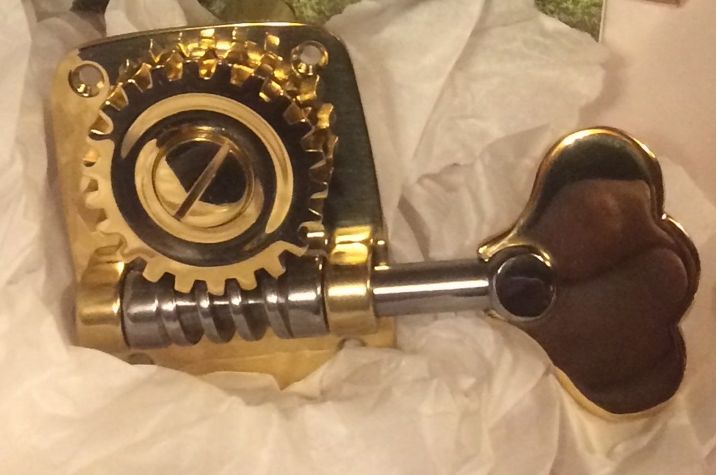
There is a wide variety of choices for tuning machines for a double bass. Some are better than others, some fairly plain, but fully functional and reliable, others beautifully engraved or ornate in some other way, and understandably far more costly. Someone had to spend the time and money to do all that “pretty stuff,” so, if you want that, you gotta pay. I chose plain but functional. (They are pretty, too, but not fancy.)
Rubner tuning machine (one of five.)
At any rate, they are already installed on this instrument, as of my last post:
Tuning machines installed on five-string double bass.
Soundpost
The soundpost is a “dowel,” usually of fine-grained spruce, that spans the gap between the inside of the front plate and the inside of the back plate, just south of the treble bridge-foot. My understanding is that it transfers the vibration from the front plate to the back plate, and “couples” the two plates so that they work together to make the sound from the vibrations created at the strings (whether by bowing or plucking.)
There may be (probably is) more to this function: It is an important enough part of the set-up that in some languages, the soundpost is referred to as the “soul” of the instrument, and it is definitely one of the most important adjustments that can be made. It is held in place simply by the compressive force transferred through the bridge by the tensile stress on the strings. Adjusting the position of the soundpost has a profound effect on the character of the sound the instrument can produce.
I already installed the soundpost, but I fully anticipate that I will continue to adjust it as the instrument settles in, in an attempt to produce the best tone, volume and balance that I can achieve in the sound of the instrument.
Soundpost installed, in preliminary position. Adjustments will be made from here.
Nut
The nut is the transverse piece of hardwood (usually Ebony, but in this case Ipé, ) across which all the strings are resting, directly above the fingerboard. It serves as a positive stop for all five strings, so that the strings are not in actual contact with the fingerboard when the player is not fingering a note, but are suspended about 0.5 mm above the surface of the fingerboard. the idea is that an easy touch from the player’s finger should put the string in contact with the fingerboard at the correct position for the desired note. The nut is glued to the neck and fingerboard, usually, but in reality, it is held in place by string tension, and the glue is “just a formality.” (I glue them so that they can’t fall off and get lost, during transport or a string change.)
I carefully laid out the string locations, so that they are spaced equidistant, center-to-center, and then cut the slots for the strings using first a small razor-saw, and then a round file of the appropriate diameter for the string in question.
Nut installed and slots filed for a 5-string Double Bass. The corners will be rounded later.
Tailpiece and Tail-wire
I chose to make the tailpiece of Ipé wood, to match the fingerboard, nut and saddle. The tailpiece fret (transverse bar forming a positive “stop” for all five strings) is also Ipé, and after being heated and bent, it resisted being glued. I eventually took it off entirely, scraped off all the failed glue-layers, washed it down with acetone to remove the oils in the wood, and reglued with epoxy. But this time, I anchored it with six small brass rivets. It is permanent, now! (Besides, I like the look of the shiny little brass rivets!)
I also attached the tail-wire; a 1/8″ diameter stainless-steel aircraft cable. I established the length so that the distance between the nut and bridge would be as close as possible to being in a 6:1 ratio with the distance between the bridge and the tailpiece fret.
Completed tailpiece assembly for a five-string double bass.
Bridge
I chose a bridge blank that was tall enough to serve with the projection angle I had already established, and wide enough to comfortably accommodate five strings.
I fitted the bridge feet to the surface of the bass front-plate, so that it would have an airtight fit when placed between the inner “notches” on the f-holes, and centered over the centerline of the plate.
Once the fit of the feet was established, I marked the bridge for the approximate height, hoping to achieve a string clearance of about 11 mm above the end of the fingerboard, but erring on the side of “too high.” (I can’t very well “put it back,” if I remove too much wood.) I then marked the locations of the strings, giving them 25mm from center to center. I filed the string slots, so that the strings would stay put when installed, and I went ahead and installed the strings.
Bridge for 5-string double bass.
As it happened, I ended up with about 14mm under the B-string, ranging to 12 mm under the G-string…way too high. No problem: I simply re-marked the bridge, this time having a better idea of where things would line up, re-cut the top of the bridge, re-filed the string slots, and tried again. This time I had 11mm under the B-string, and 6mm under the G-string, with the strings in the middle at about 8mm. That is acceptable, so I finished trimming excess wood from the bridge, tuned up the strings, and I was ready for the final adjustments for sound.
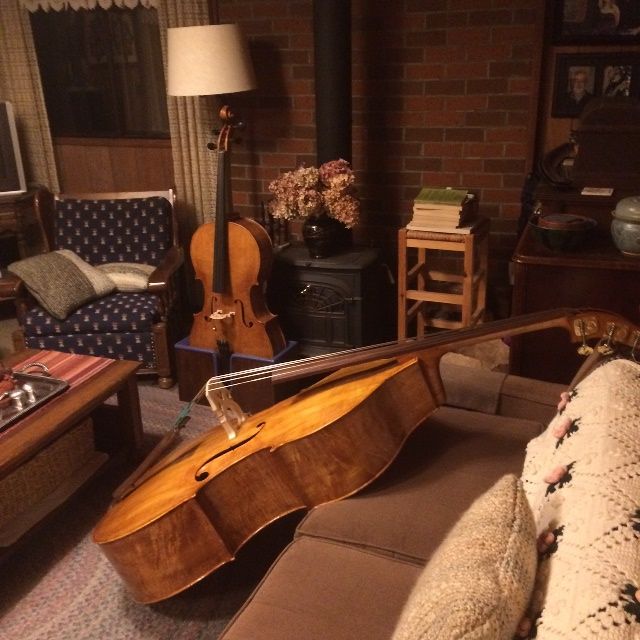
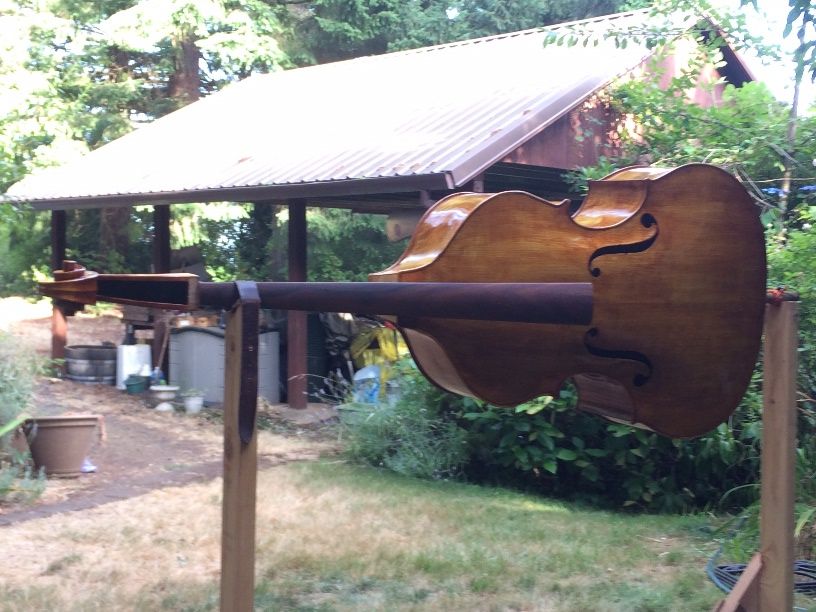
Five-string double bass set-up and ready for final adjustments.
It is quite a relief to me to finally have this instrument nearly complete. It was actually begun several years ago; but it was set aside for a variety of reasons, and only resurrected as a project, this Spring.
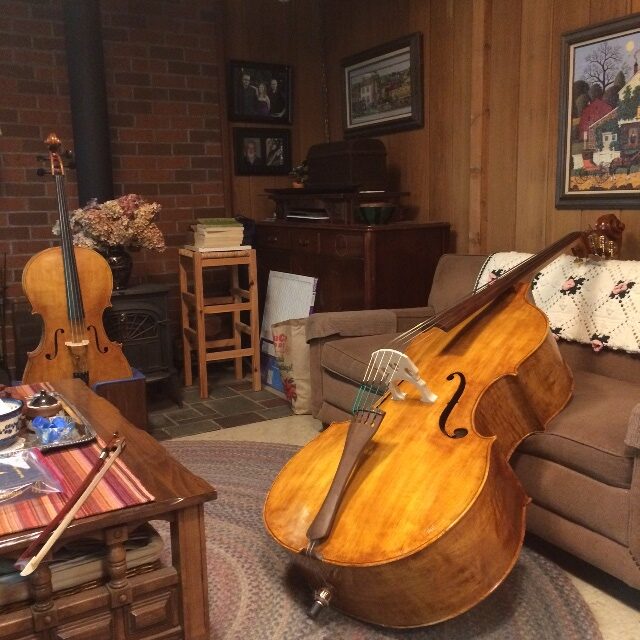
The sound, at first set-up, is satisfactory, but I hope to achieve a better balance, more volume, and better clarity as the instrument “settles in’ a bit, and with subsequent adjustments of the soundpost. But for now, I’m happy with it. It looks good and sounds good. For a brand-new instrument, that is a good start.
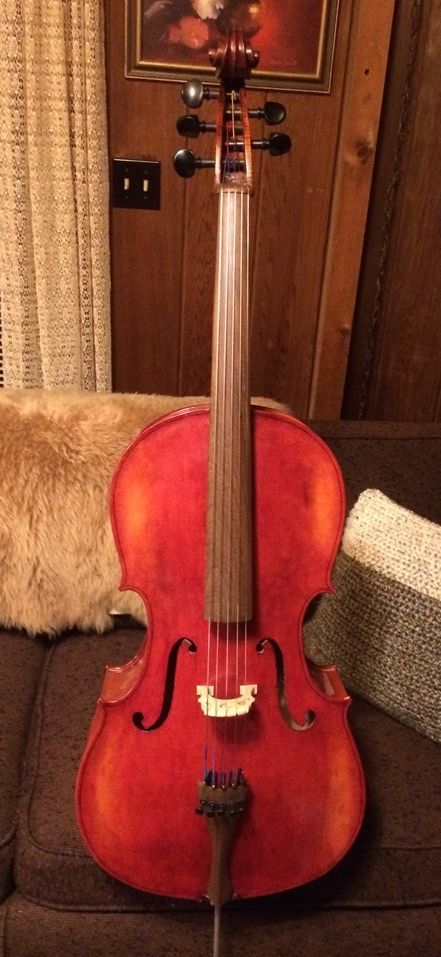
Completed 5-string double bass with cello in the background.
So, for now, that is it! There are a few “finishing touches” and re-touch of varnish, etc, as well as the aforementioned sound adjustments, but the bass is essentially complete!
I hope to make all the necessary adjustments, and then find a player or two to “test-drive” it for me, since I am not a player, and can’t do it justice.
I will post the “verdicts” from those players when they happen.
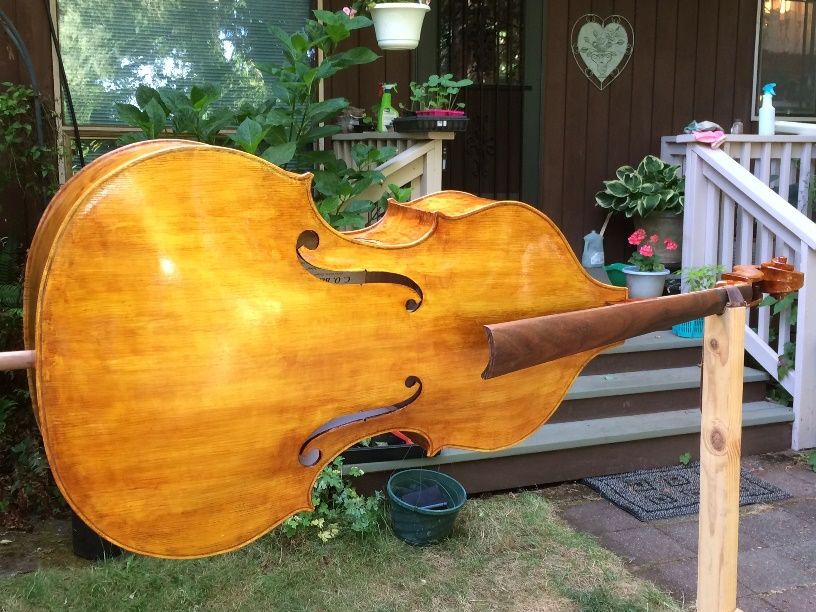
The color varnish, as you might imagine, gets the instrument looking the way we want, but the clear coats keep it that way…we hope.
So, after the color coats were mostly complete, I waited a few days for the varnish to cure a bit and then added two clear coats as a protection for the color coats, so that they will not experience undue wear.
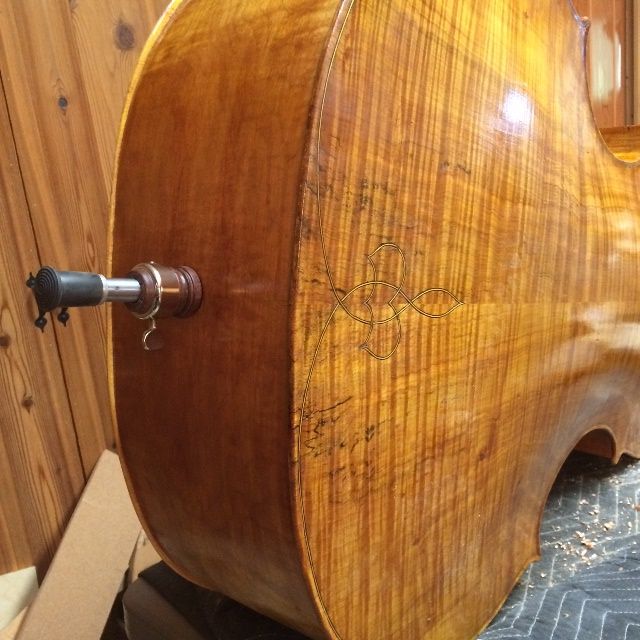
Final clear coats of varnish on five-string double bass in sunlight.
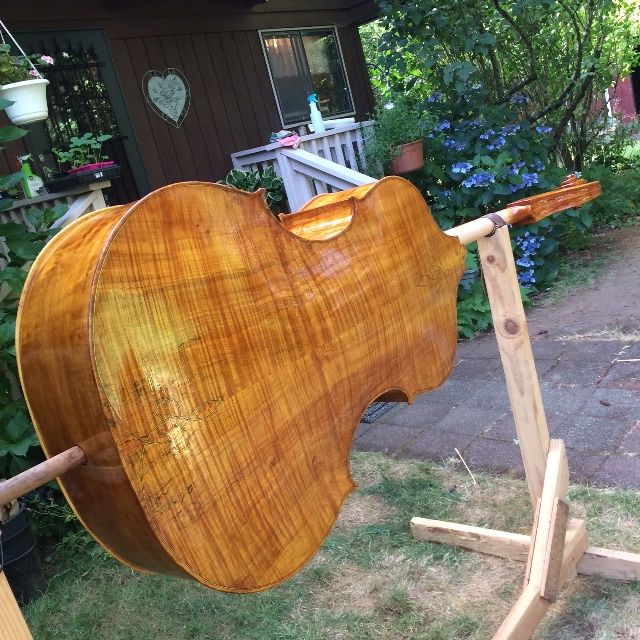
Final clear coat; Back view in sunlight.
Final clear coats in the shade.
There is still a lot of work left to do at this point: There will be endless “re-touch” of spots in the varnish that I wasn’t quite satisfied with, but they can wait until after the set-up is under way.
Saddle
I usually wait until the varnish is complete, before installing the saddle. The saddle is the transverse piece of hardwood upon which the tail gut rests, as it crosses the edge of the front plate. (Ebony, frequently, but, as I had opted for an Ipé fingerboard, Ipé seemed the right choice for the saddle as well.)
I make my saddles with radiused ends, to avoid saddle-cracks. To some extent, saddle cracks are caused by the shrinking and swelling of the spruce plate against an essentially unmoveable ebony (or Ipé) saddle. However, the other factor (possibly more important) is that, for hundreds of years, luthiers have cut the saddle with sharp-cornered, square ends, requiring a sharp-cornered square-ended mortise in the spruce…which inevitably inclined itself toward eventual cracks. Sharp corners are extreme stress risers.
Round discontinuities (holes, for example) do not cause stress risers, and are far less likely to cause cracks. I try to leave the ends just a little loose, as do most luthiers, but the fact is, the sharp notch is the primary cause of the cracks. So I make round corners.
Saddle with round-cornered ends.
Tuning Machines
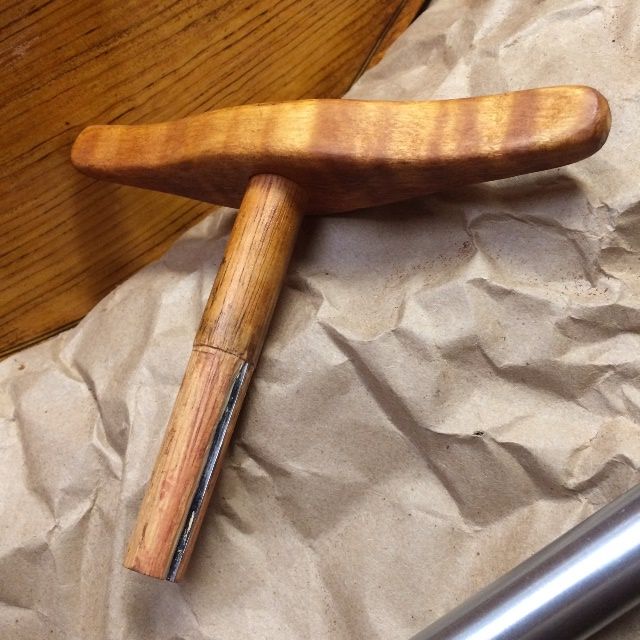
The next task was the tuning machines. There are many possibilities to choose from: I chose these tuning machines partly based on looks, partly on cost, but primarily because, with the curvy pegbox, I wasn’t completely sure that any other style could be made to work. (There are some multi-piece tuning machines, which, I would imagine, could be made to fit nearly any configuration, but I have no experience with those, so I opted for something I knew about.)
Anyway, I knew that this type of tuning machine has a tapered spindle, which is not designed to go all the way through the pegbox, so I designed and built a small reamer, all wood, except for the blade, which is spring steel (just because that is what I had available.) It works well, but I have to be gentle with it, and stop periodically to clean the chips from the reamer.
Handmade reamer for fitting double bass tuning machines.
I made a template, laying out the hole locations with the hope that I could avoid the strings from the G and D tuners rubbing on the tuners below them in the pegbox. I used the template to lay out the holes on the pegbox, then drilled to appropriate depths and used the reamer to taper the holes to match the spindles of the tuning machines.
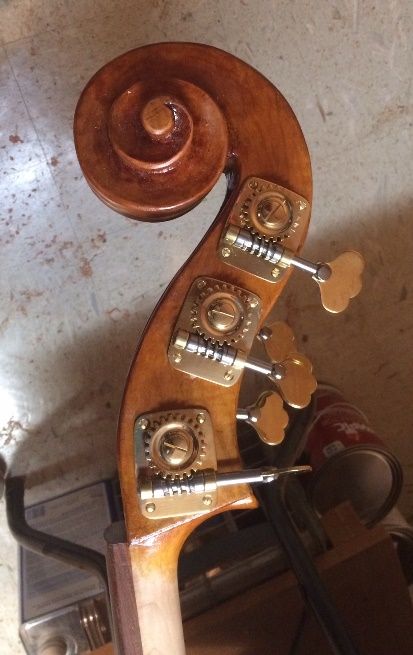
Finally, I installed the machines and secured them with screws.
Tuning machines installed on five-string double bass.
It was amazing to see how much weight the tuning machines added. The bass no longer easily balances on the two bouts: it wants to rock down and put its head on the floor!
Ready for set-up!
I installed the nut at this point, as well, so the bass was really complete.
Five-string Double Bass, ready for set-up!
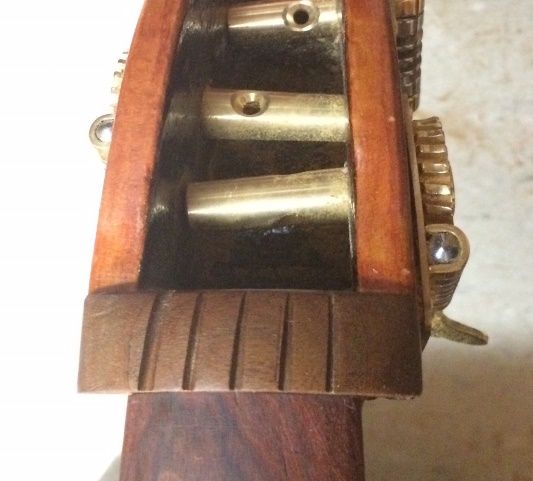
If you have sharp eyes, you will probably notice the hole above the tuning machines on the bass side. The pegbox was narrow enough there, that I actually went through the second side by accident, and was forced to create a plug for the hole, from some leftover rib material. I cut it to exactly fit the hole, and glued it in place, pressing it home, so that it was nearly exactly flush, then scraped the wood of the plug to exactly match the wood of the pegbox, and was ready to begin varnishing to complete the repair.
Repairs in progress for pegbox damage. When complete, the repair will be virtually invisible.
Anyway… that is as far as I wanted to go today. Some of you may have known from other forums’ content, that I had also had trouble getting the tailpiece fret to “stay glued” in its slot. So I eventually gave up, removed the fret, scraped all the layers of glue down to clean wood, and washed the Ipé with acetone. Then I reglued with epoxy, but this time I drilled and anchored the fret with six brass rivets! (It’s permanent, this time!)
Completed tailpiece.
Next time, I hope to complete the set-up of the bass and have it ready to play!
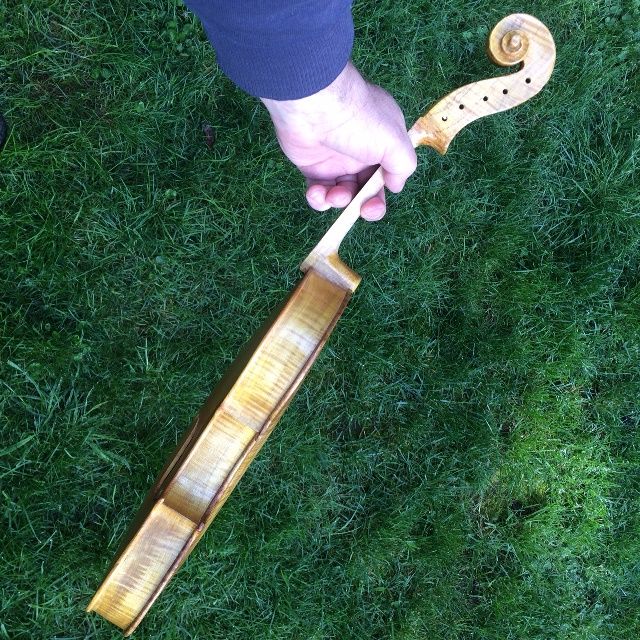
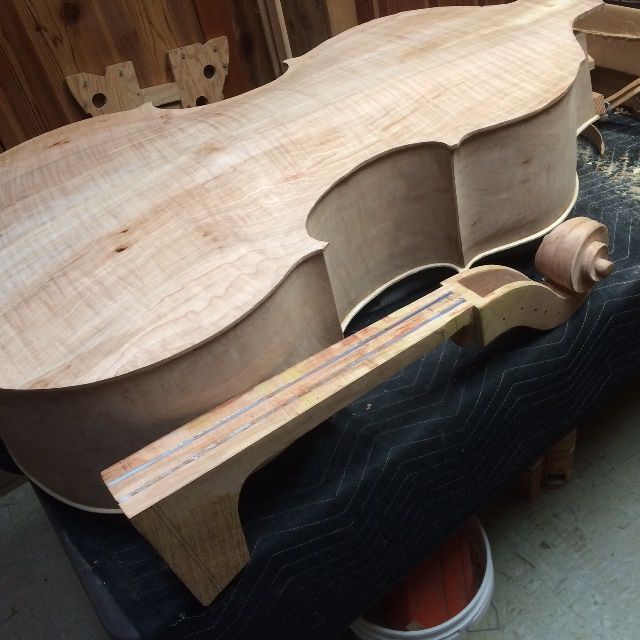
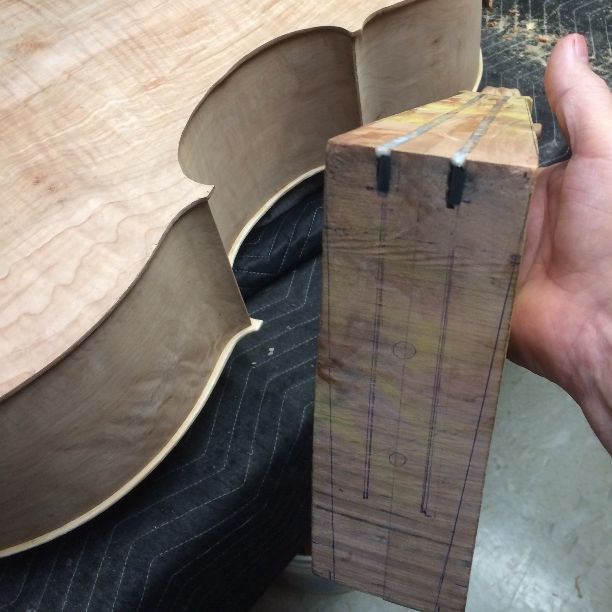
When I last posted, I showed the garland with the Sitka Spruce front plate installed, and the completed Oregon Big Leaf maple back plate sitting on it (because I wanted to see it that way) with the neck block (also Oregon Big Leaf Maple) beside it. You can see in that photo that I had already installed carbon fiber reinforcement rods, bedded in epoxy, to stiffen the neck. But I didn’t say how they got there.
See the reinforcements in the neck?
The problem with maple is that it is fairly flexible. Usually, that is not a concern, because the instrument necks also have a fingerboard added on (usually of ebony) which is very stiff, so that the flexibility of the maple is not much of an issue. But, when the fingerboards become thin, after years of being used, re-surfaced, and used again, the frequent “re-dressing” of the fingerboards thins them to the point they are no longer stiff enough to bear the stress of the string tension, and the neck begins to bow forward, under string tension.
Carbon fiber is very light and extremely stiff, so it makes an ideal material for reinforcement. Carbon fiber rods are available in a variety of shapes and sizes. I chose 1/8″ x 1/2″, and they arrived in two-foot lengths from the “Dragonplate” company.
I do not have a router table, nor even a table saw, so I used my hand-held circular cut-off saw (commonly called a “skill-saw” as “Skilsaw” was an early brand of this sort of tool.) I set the blade on the saw to 5/8″ deep, and, having already drawn the lines where the cuts should go, I clamped the neck block in the vise, with a block beside it to guide the saw, and simply sawed slots into which to fit the carbon rods. The slots did not fit well, as the blade was not wide enough, so I attempted to use a hand-held router to widen the slots, but I did not have the correct bit for the router, and they were very expensive at the local hardware store, so I carved out the remaining wood, using my knife and a small chisel.
Once the slots were satisfactory, I mixed my epoxy, filled the slots, and pressed home the carbon rods. The epoxy I chose to use was advertised as “15-minute” epoxy, but all it meant was that I would have 15 minutes of working time, in which to get the rods in place, the epoxy smoothed over the tops of them, where it had squeezed out, and be done tinkering with it. It turned out to achieve full cure in about 24-hours… by the next day, in other words. No problem: I had plenty of other work to do while I waited.
Neck block with carbon fiber rods bedded in epoxy, waiting to be trimmed.
So, I scraped all the excess epoxy off of the neck joint face, where it would be glued to the fingerboard, and waited until the epoxy had fully cured, before sawing off the excess carbon fiber rods, using a hacksaw.
Neck block with carbon fiber reinforcement rods trimmed to length.
The result is a five-string double bass neck that will never become bowed or warped.
Ipé Fingerboard and Tailpiece
I chose to use Ipé instead of ebony for my fingerboard and other fittings, as it is more readily available, it is not a threatened species, and I like the finished color (dark brown.)
Ipé is an extremely hard, dense, South American hardwood, similar to Ebony, in terms of hardness and durability. It is difficult to work, as are all the extremely hard, dense, tropical woods, but I like the finished product. Here is a fingerboard on a five-string cello I made some time ago:
Ipe fingerboard on five-string violoncello piccolo.
So, I decided on the shape and size of the fingerboard and tailpiece, and then cut them out on my bandsaw. Then I used gouges and planes to shape them appropriately.
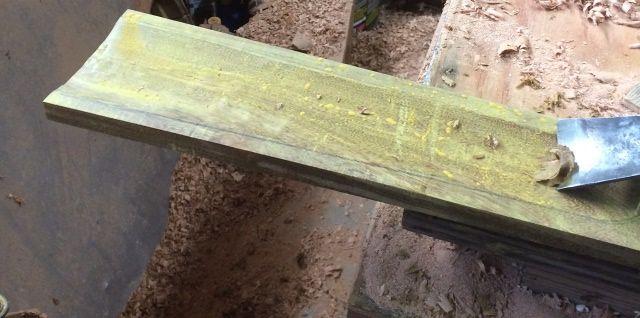
Fingerboard underside being carved of Ipe wood.
The dust from sawing, planing, scraping or sanding Ipé wood is a bright yellow color, and it fills the pores of the wood, giving the wood a greenish-yellow look while it is being worked. But that color disappears entirely when the wood is finished, and the Ipé becomes a dark brown color.
I glued the fingerboard to the neck block when it was nearly complete, and then completed the shaping of the fingerboard with the neck as a unit. The tailpiece, too, is only partially completed.
Fingerboard and tailpiece waiting to be completed. Fingerboard is glued and clamped to the neck.
My wife was a little perplexed about the odd color of the Ipé wood, so, after completing the preliminary dressing of the fingerboard, I used a paper towel, and rubbed the fingerboard down with turpentine, to show the color as it will look when finished. I also rubbed a small portion of the tailpiece, to show the stark contrast between the color of the Ipé when freshly worked, and when finished. (The turpentine is not the finish, obviously, but the color will be very similar, as a light coat of linseed oil rubbed into the wood probably will constitute the finish.)
Fingerboard and tailpiece with turpentine to show the true wood color.
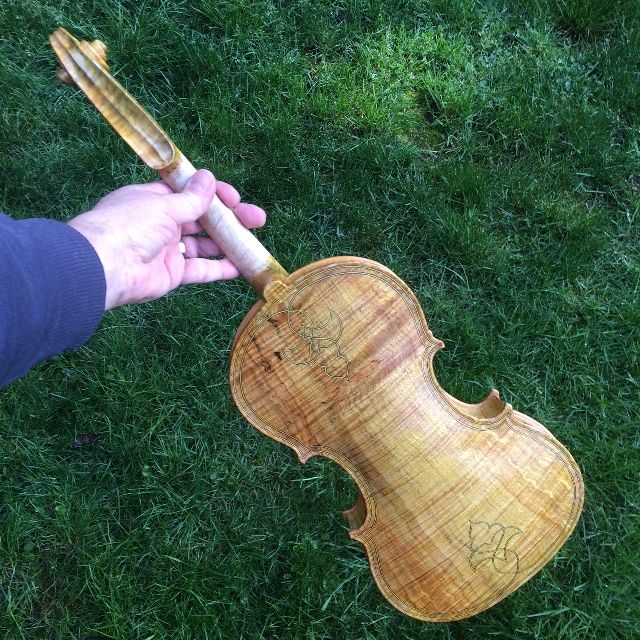
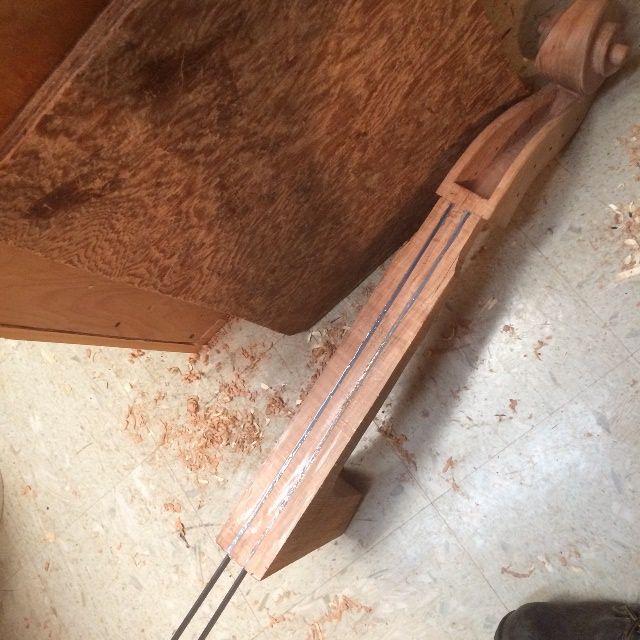
I went ahead and began the shaping of the neck at the same time, so it is beginning to look the way it will be when completed. When the neck shape is correct, I can begin the neck-set procedure. This is the first time I have attempted a removable neck, so I am a little apprehensive about it. All I can do is press on, and see how it works.
Here is how it all looks right now:
Neck and tailpiece for five-string double bass. Notice the “fret” bent and clamped to the tailpiece.
When completed, the tailpiece will accommodate five strings, and have a “fret” inlaid across the upper end, to provide a hard “stop” for all the strings at the same point. The “Fret” is made of Ipé wood, too, bent to shape with heat and pressure, then clamped to the tailpiece to cool in that shape. Next, I will cut the slot in the tailpiece to allow the fret to be inlaid into the tailpiece, and drill the holes for the string-slots and the tailgut wire.
As I was ready to begin the inside carving of the front plate, I realized that the little caliper I use for graduating violins and violas was simply not going to serve. I had a much larger caliper I had built 13 or 14 years ago, when I built my first bass, but it had been hanging in my workshop untouched for all those years and I was afraid that the battery might have corroded and ruined the digital indicator.
I had purchased the electronic tool from Harbor Freight, back in 2006 for about $10 (If I remember correctly,) and built the caliper out of hardware from a local outlet and a scrap of 1″ plywood decking. It was pretty crude, but it worked and was quite accurate.
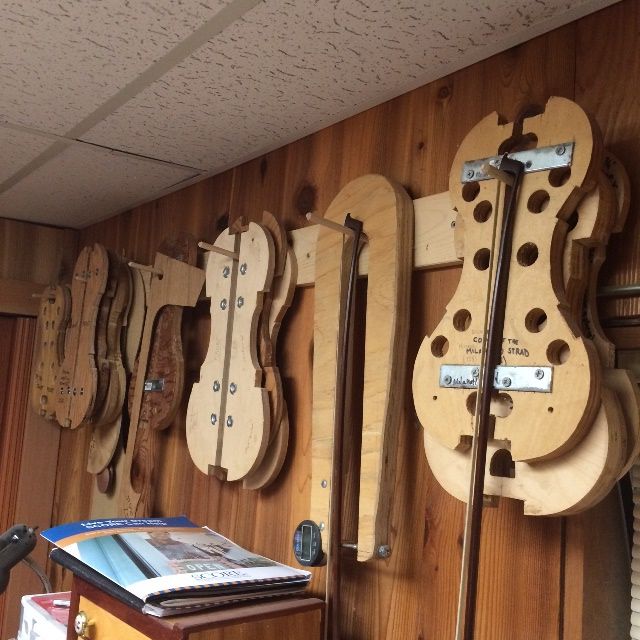
Bass caliper, hanging amongst molds and templates.
I took out the little “battery-tray” thing, to see if my fears were justified, and it seemed as though the battery had not leaked, but was simply dead. So I went and bought a new battery, inserted it, and “Hey! It works!”
Bass Caliper with large display.
One of the things I like about the tool is that I can actually read the display. My small caliper has such a tiny display that I have difficulty reading it. Notice that it is reading .03 mm when it is not in use. The plywood flexes that much, under the weight of the lower jaw, so I hold the instrument upright and level, and press the “zero” function. Then it reads “zero” when it is held upright, and .03 mm when it is lying flat on its side.
So that was the first tool I was concerned about. The next concern was that I really did not want to gouge out the interior with mallet and gouges, as I had done the exterior. I was fearful of cutting too deep. So, in my mind, a “scrub-plane” with a curved sole was in order.
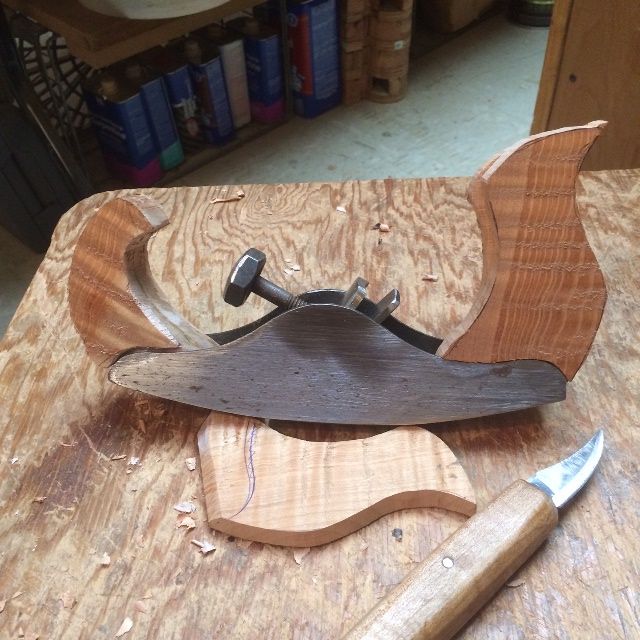
Curved-sole Scrub-plane
This also was one I began years ago, but did not complete soon enough to use it on the bass, nor even the cellos I made later, so the pieces languished in my toolbox drawer, waiting for me to finish the job.
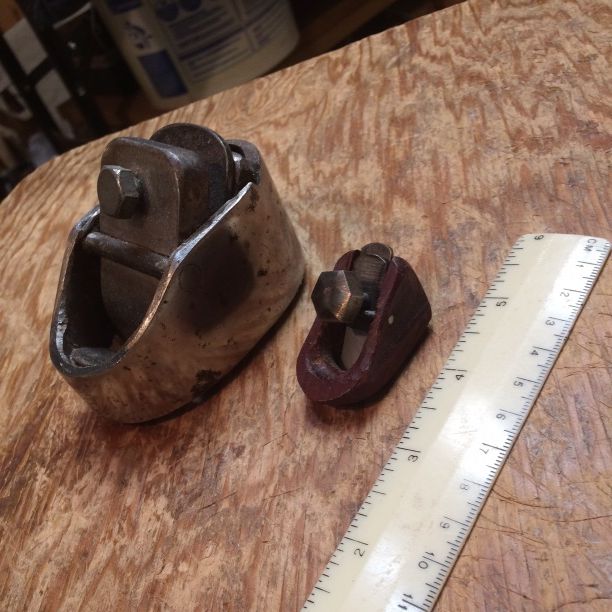
I had made the body by welding together a slice of scrap stainless steel pipe, and some mild steel plate, along with a little section of angle iron and a 1/4″ pin. The cap iron was a shorter section of the same slice of stainless pipe, and the blade was (if I remember correctly) a piece of A1 tool steel. I had even gone so far as to cut sections of curly maple for handles, but had stopped there, and all the pieces were together in the toolbox. So– the time had come!
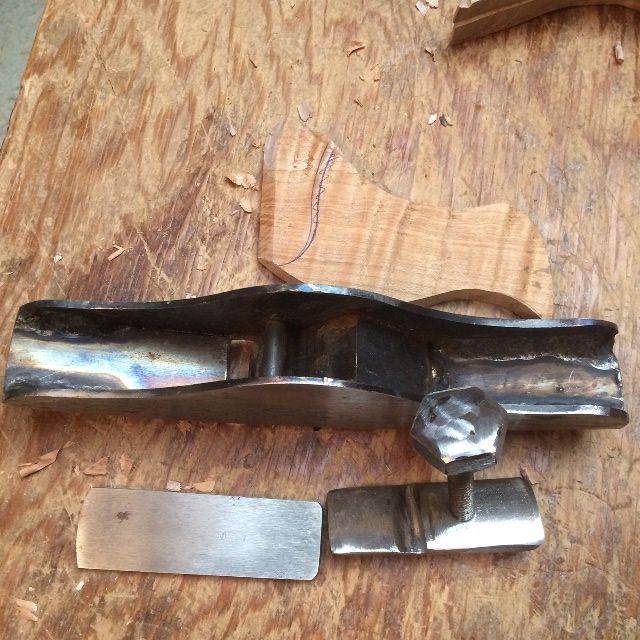
Pieces of the curved-sole scrub-plane.
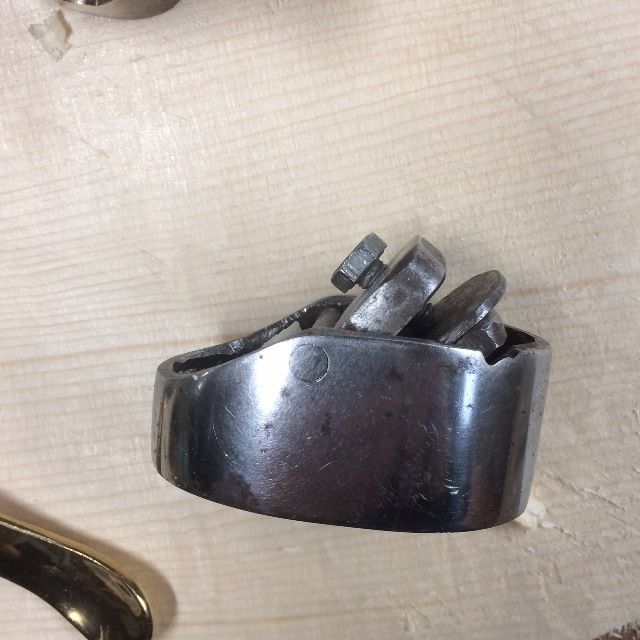
Bottom view of Curved-sole Scrub-plane.
Partially assembled plane.
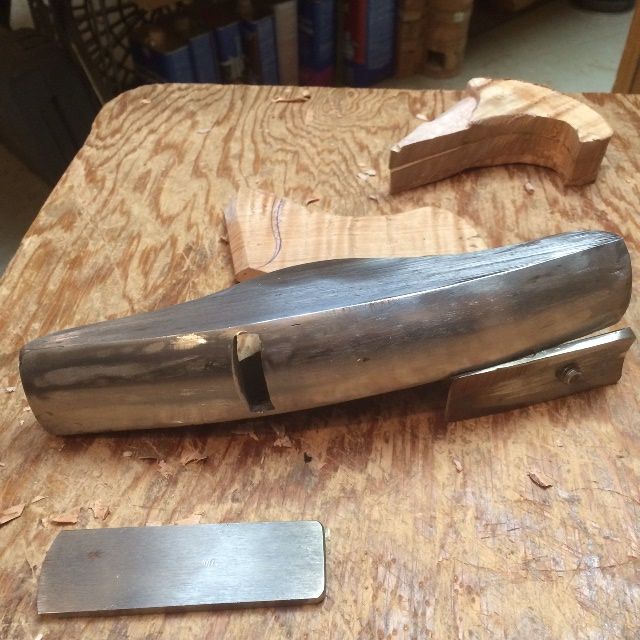
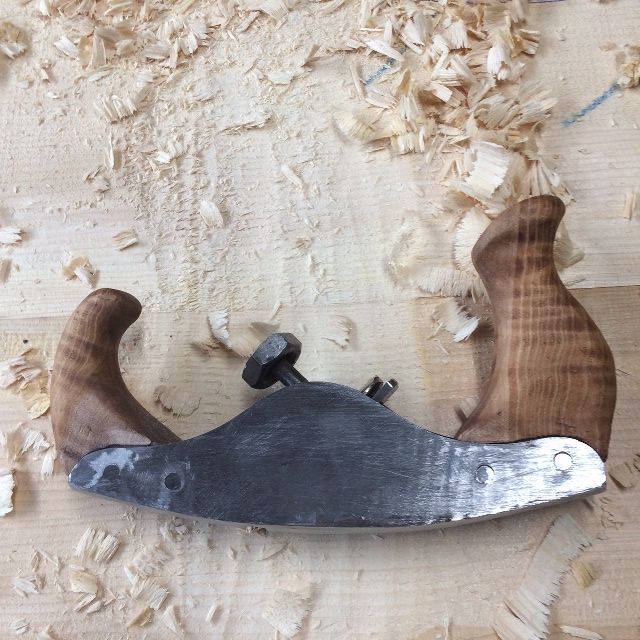
Completed Curved-Sole Scrub-Plane.
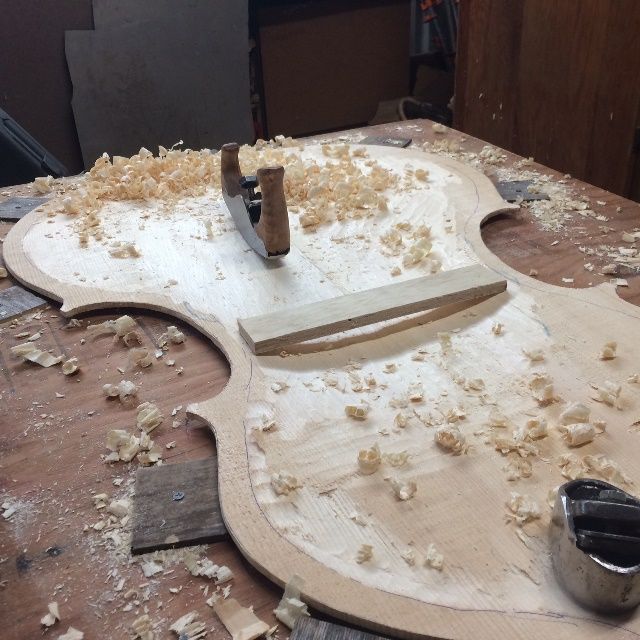
The completed plane, after a little adjusting, worked very well, and fit my hands comfortably, so the task of carving the inside of the bass front plate went very well.
Carving the inside of the Double Bass front plate using the Curved-sole Scrub-plane.
The only fault in the scrub-plane, because of the deeply curved sole, is that it tends to leave a rather un-smooth surface– like ruts in a dirt road. So, as I got closer to the desired thickness of the plate I was going to need a plane with a much less aggressive curved sole, and broader, as well, to produce a smooth surface.
Palm Plane
Fortunately, this one, I had built during my first bass-build, though it had not seen much use, as I never really got it adjusted right, and was busy enough that I just set it aside and completed the first bass using other tools. I got it back out and carefully sharpened the blade and adjusted the depth of the cut, and it turned out to work splendidly, though it took a little practice to get the angle in my grip just right.
Steel Palm Plane.
Steel Palm plane with a wooden finger plane.
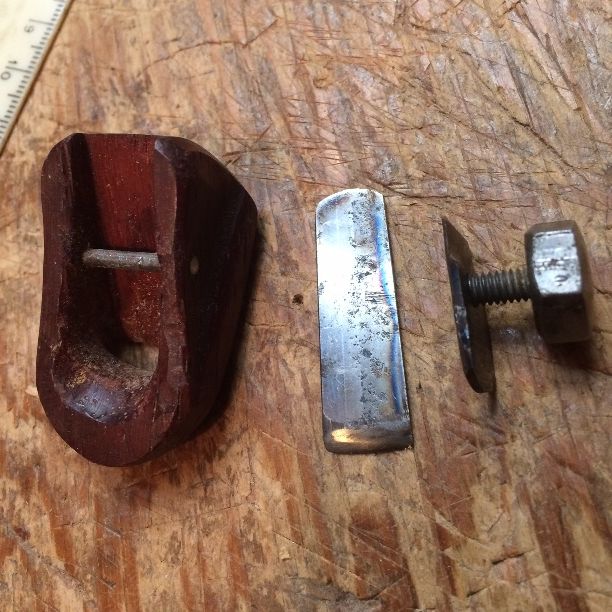
All of the planes I have built work on the same principle: a blade is fixed at a given angle, and clamped in place by means of a cap-iron that slides under a transverse pin, and a screw that wedges the cap-iron between the pin and the blade. The principle is very old, and works well. It is used in many commercial planes, and predates all the companies that use it.
This little wooden plane was the first one I ever made. It is made of Padauk wood and is pretty crude, but it works well. (Ibex planes work better, but at the time I made it I had no money for an Ibex plane.)
Wooden plane disassembled. The thin end of the cap iron slides under the pin.
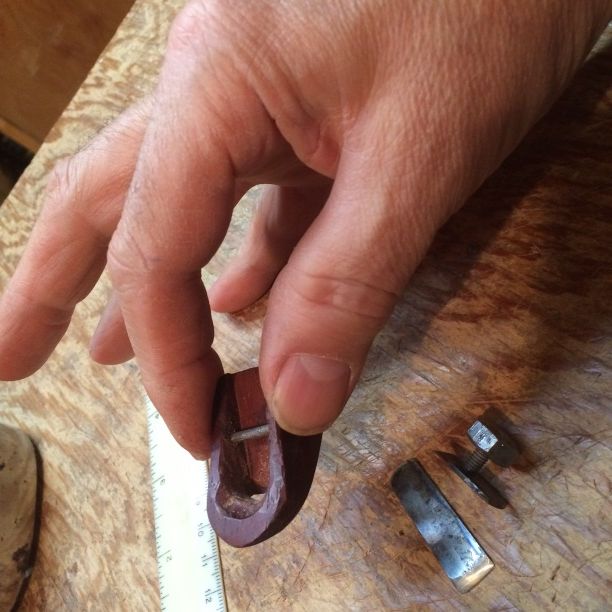
It is not a really tiny plane, but it fits my thumb and forefinger pretty comfortably. The blade was a section of scraper blade, and, while it works, I think I could improve it with a better choice of steel.
Wooden plane showing interior and relative size.
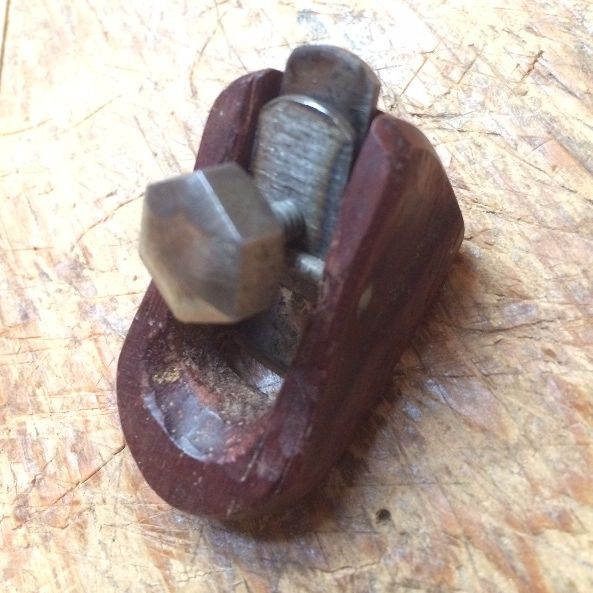
Assembled Padauk-wood plane.
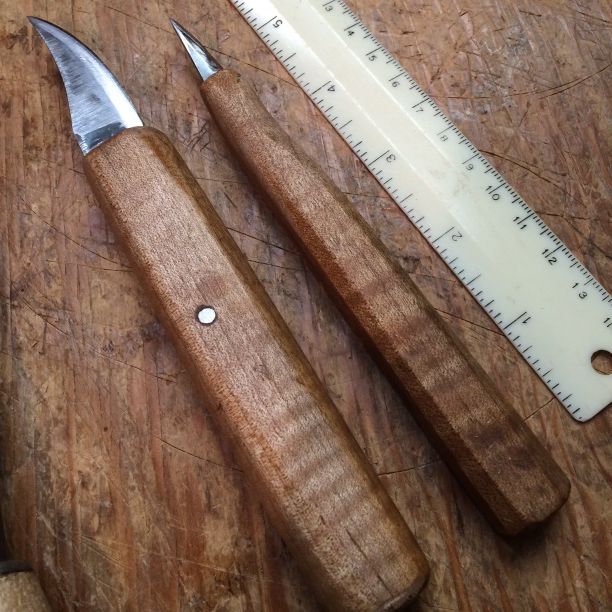
Other Tools
The other tools (below) I had made years ago, and have been using regularly.
Homemade knives from an old sawzall blade.
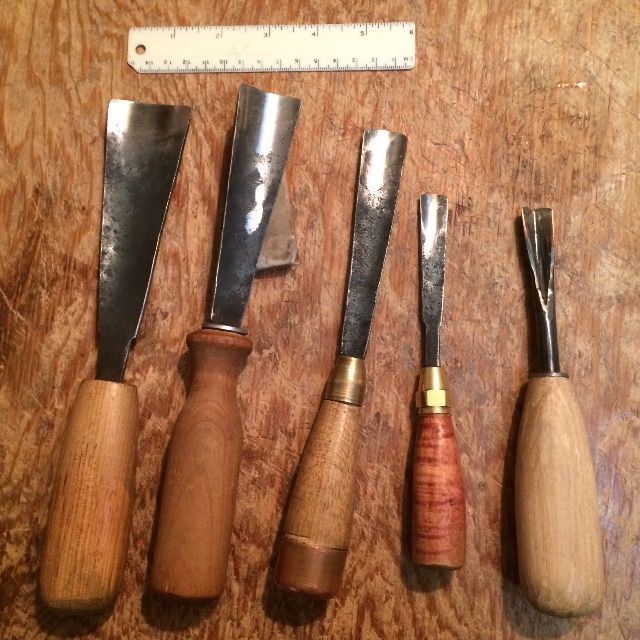
Homemade gouges, forged from plow-steel or drill rod.
Many of my other tools are homemade, too– spool-clamps, scrapers, work cradles, templates and molds are all hand-made originals, as well as my workbench (which is usually buried in tools and materials…sorry).
So…that’s how I acquire tools! 🙂
Rationale
You might ask, “Why would you go to all that trouble when you can buy professional-level tools for reasonable prices?” The answer is two-fold:
In the first place, I really enjoy making tools! And then, there is a special joy in finding that the tools I make usually work very well, so I then have the pleasant experience of making musical instruments using the tools I made.
But the second reason is financial in nature: I simply did not have the extra money to buy every tool I needed when I began building instruments. But one does not haveto expend a great deal of cash, to get started in a craft, if one is willing to think, read, and learn the skills to make tools.
The time I spend building a tool is repaid many times over, by the pleasure I get in using the tool and the fact that all these tools will be used for many years to come, as I continue to build instruments. Are there sometimes failures? Once in a while an idea doesn’t work as well as I expected, but usually I find it very rewarding to make my own tools.
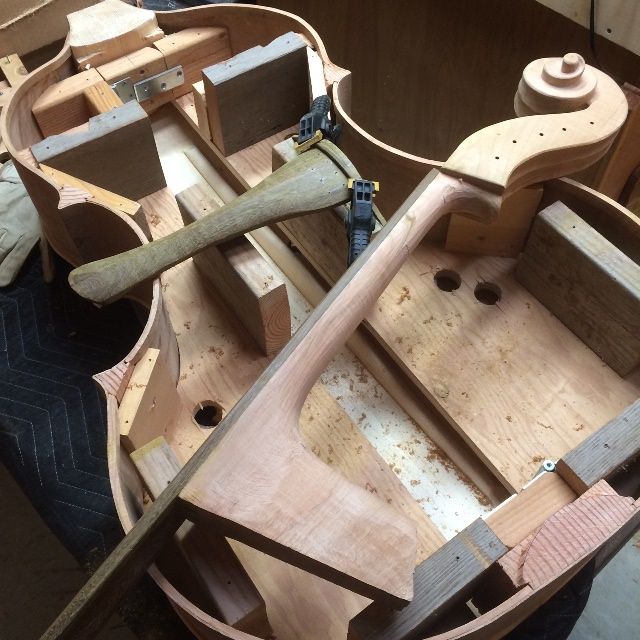
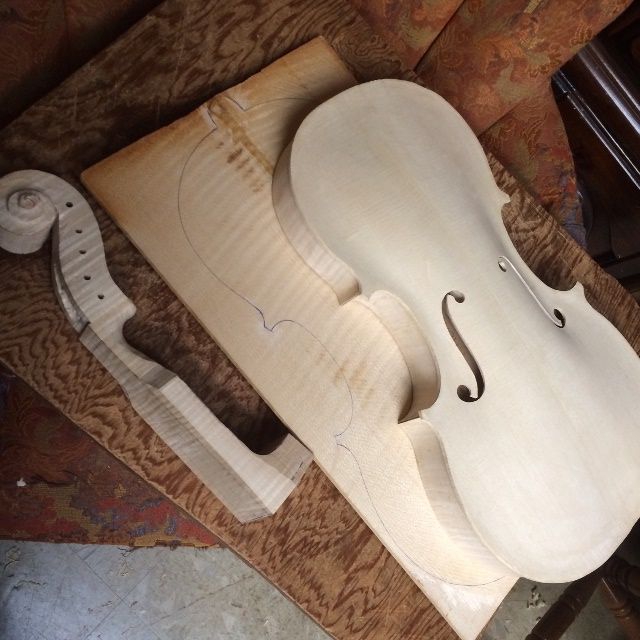
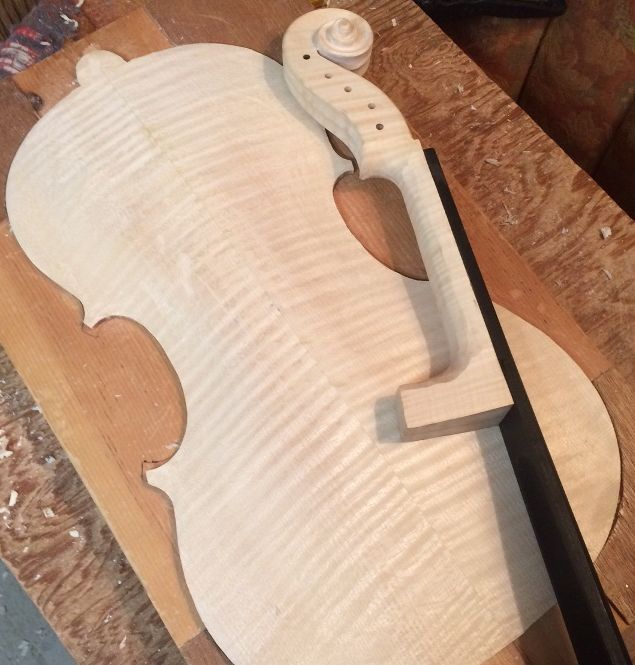
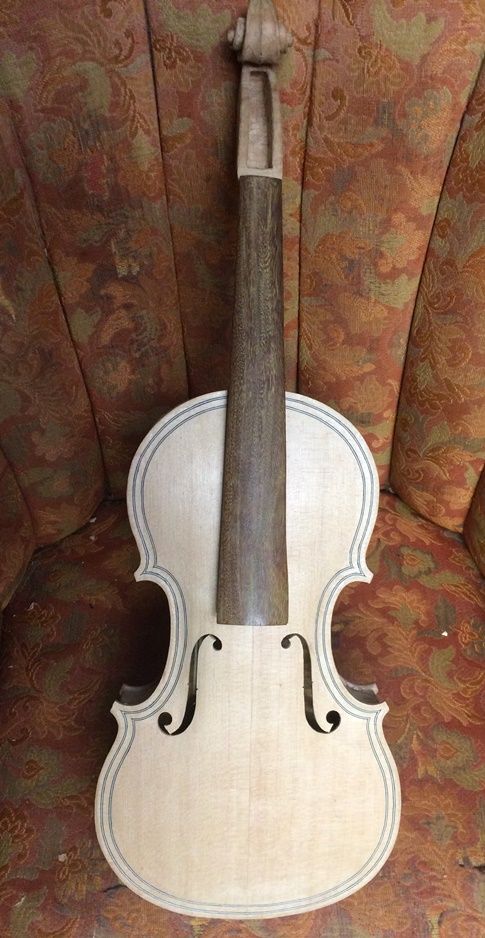
I had installed the European Spruce front plate on the garland, and showed the partially assembled corpus in spool-clamps. So, here is the partially completed corpus, out of the clamps and stacked with the rest of the parts:
Garland with top plate installed, back plate traced, and scroll begun.
Scroll Work
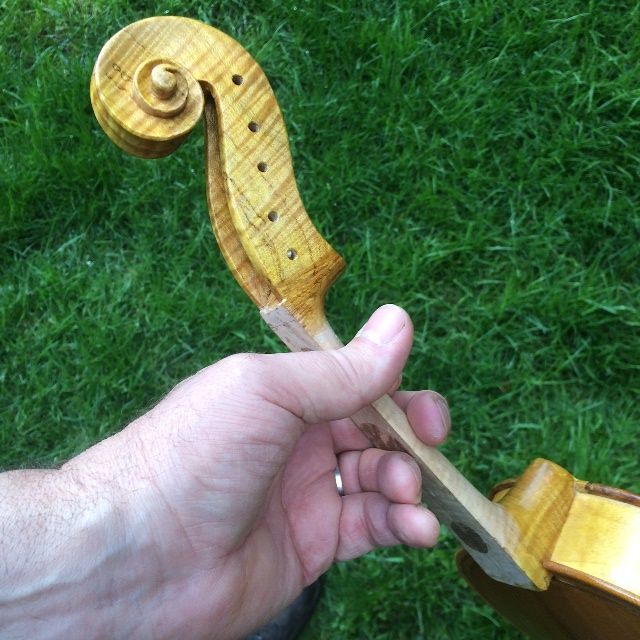
So, I took a break from working on the plates, and worked on the scroll. It is made of highly flamed European Maple.
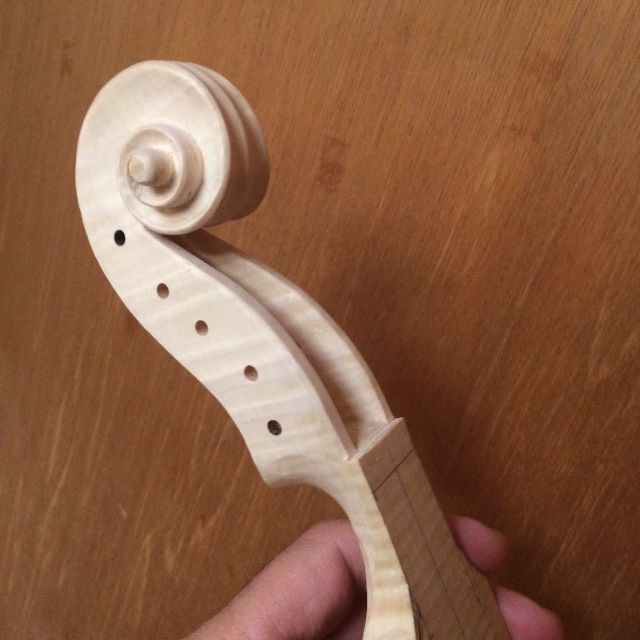
I completed the carving of the turns of the volute, and cleared it up until it was nearly complete, including the chamfers around the edges. I used an assortment of small gouges to carve the undercuts, and completed the work using scrapers.
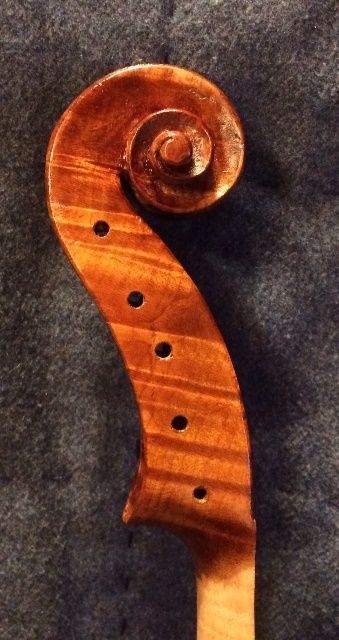
Scroll and pegbox essentially complete. Ready to temporarily attach the fingerboard.
Back Plate Beginning
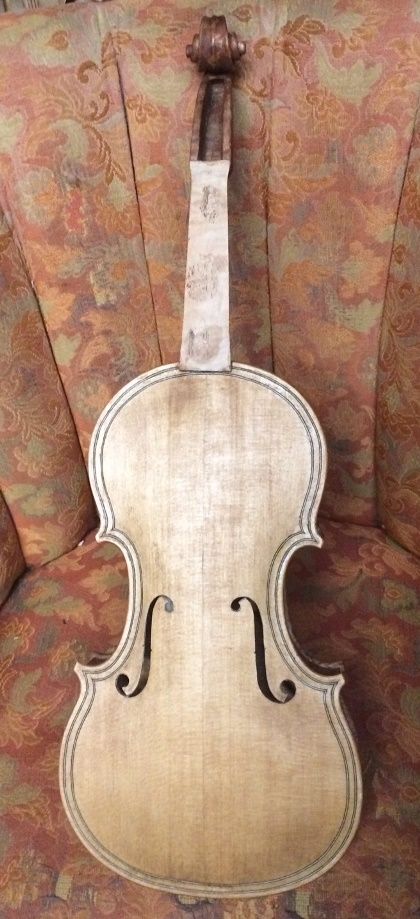
Then I decided I had better get the European Maple back plate caught up to everything else, so I cut out the traced shape on my small bandsaw, and cleaned and smoothed the perimeter on the oscillating spindle-sander. I began the outside arching, using a toothed-blade finger-plane, and then switching to a smooth-blade finger plane, stopping only because I was getting tired.
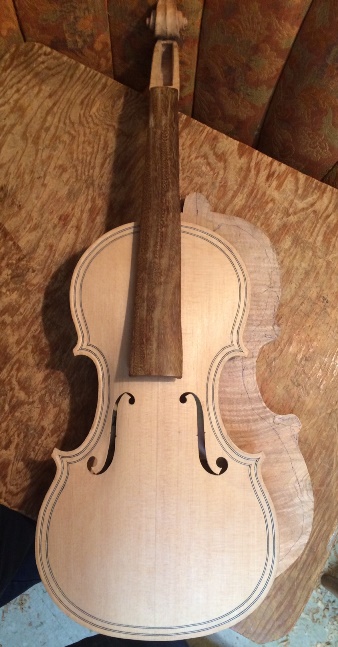
I will still have a great deal of careful shaping and scraping before the back arching is truly complete. But before I stopped for the evening, I temporarily glued and clamped the ebony fingerboard to the neck, knowing that I will remove it after setting the neck and before varnishing. So, here is where the instrument sits tonight:
Back arching nearly complete, neck and fingerboard joined.
You will notice that I also began shaping the “handle” portion of the neck. I shape it along with the fingerboard, dressing the fingerboard to get the curvature perfect, and shaping the “handle” part of the neck for optimum playability and feel.
But, when the arching is complete, I can sweep straight on into graduation, because, of course, the back plate has no f-holes, let alone a bass bar. (I do have to remember to install the label before I close the corpus. I don’t enjoy trying to install a label with tweezers, through an f-hole.)
Next Steps
The next things on my agenda will be to complete the arching, complete the graduation, and get going on purfling the front plate.
Many makers install the purfling before they begin graduation, but I always had a problem with the overhang being uneven when I did that, so I switched to purfling after the plate is installed on the garland, and the overhang has been satisfactorily established.
I also usually set the neck before removing the mold, so that, when I go to install the back plate, the neck heel is already perfectly flush with the back of the garland, and the back plate fits flush and tight, all the way around. Everyone has their preferences and idiosyncrasies, I guess.
My expectation is that I should have the neck installed by the end of the week…and maybe the back plate, too. But there are always other demands on my time, so it may be next week before either of those is complete.
The raw wood is quite porous, and would soak up varnish like a sponge…which would dampen the viola sound. So we don’t want that to happen! The solution to the problem seems to be to fill the pores of the wood with very fine particles of mineral of some sort. I don’t particularly want something that would form a concretion, as some makers have done, because I think that also changes the sound, but in a different way.
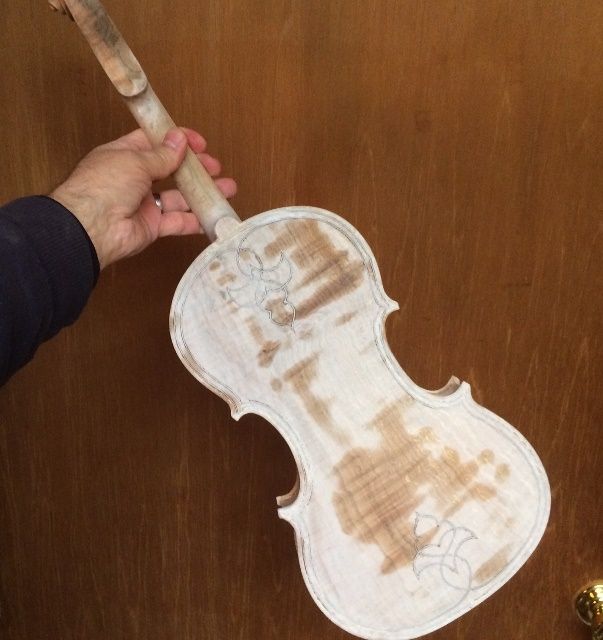
I used Gypsum, ground very fine in a mortar, then suspended in water, and daubed onto the surface; then vigorously rubbed into the pores. After rubbing the mineral into the entire surface (except the “handle” area of the neck) I used a damp cloth to rub all the excess gypsum back off. While it is wet, it just looks like wet wood, but as it dries, it turns chalk-white, assuring me that the surface is truly saturated with the particles.
Partially dry mineral ground, front side.
Partially dry mineral ground, back side.
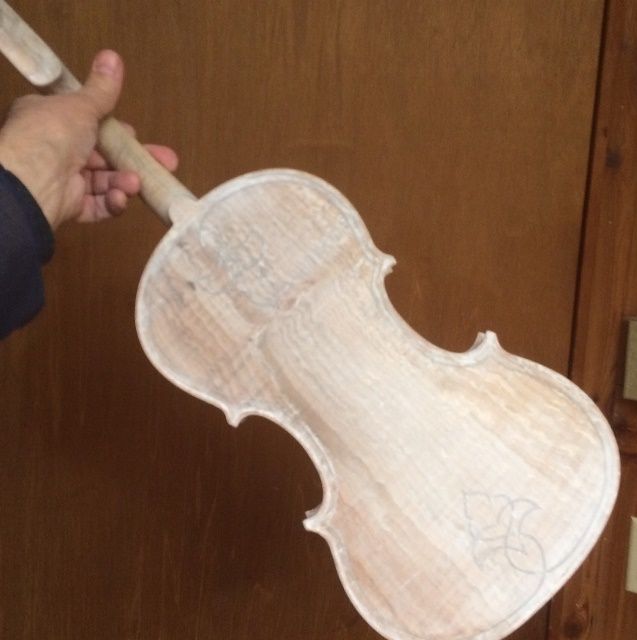
Then, after the gypsum suspension is completely dry, I use fine sandpaper to remove any excess mineral from the surface, so that there are no thick patches of mineral.
Dry Mineral ground, rubbed clean.
Locking the mineral ground in the wood: Sealer
As you can see in the above photograph, the mineral isstill saturating the surface, and obscuring the grain. However, when I apply the sealer (in this case, a mixture of rosin, turpentine, and alcohol) the mineral ground will become completely transparent, and will permanently disappear. The varnish will then be free to show off the grain of the wood.
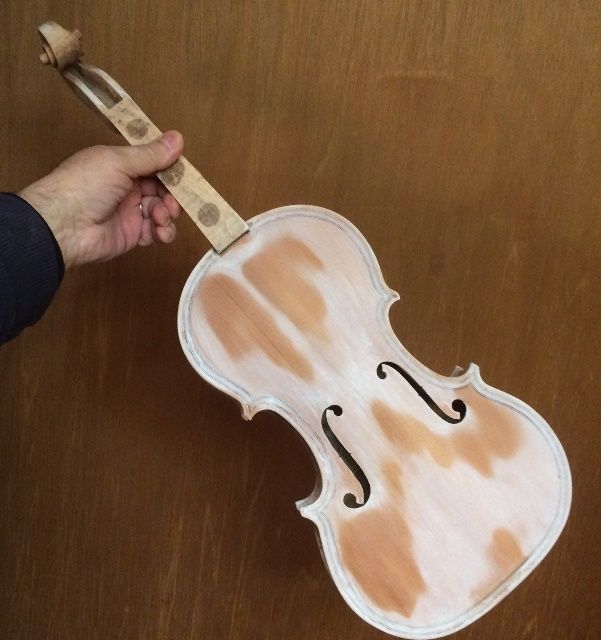
Front side with sealer.
Side with sealer.
Back with sealer.
Making it Shine: Beginning the varnish
It takes a while for the sealer to dry, because of the turpentine content, but as it dries, the alcohol evaporates first, then the turpentine, leaving the rosin in the wood (which is where rosin comes from in the first place, of course) locking the gypsum particles in place. and further sealing the wood against saturation with varnish.
Before proceeding to the varnish, I carefully sanded all over, to clean up any spots that still felt rough or sticky, then wiped the entire instrument down with alcohol to remove any rosin residue from the surface.
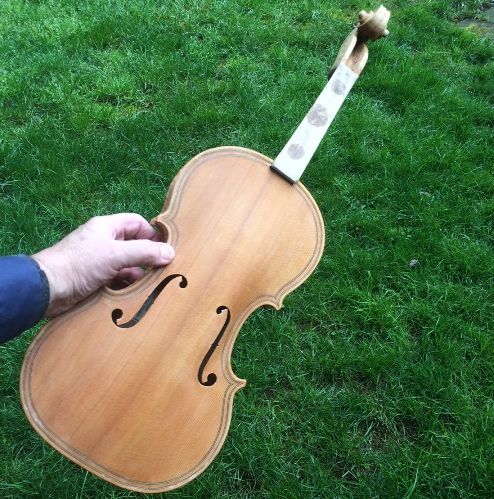
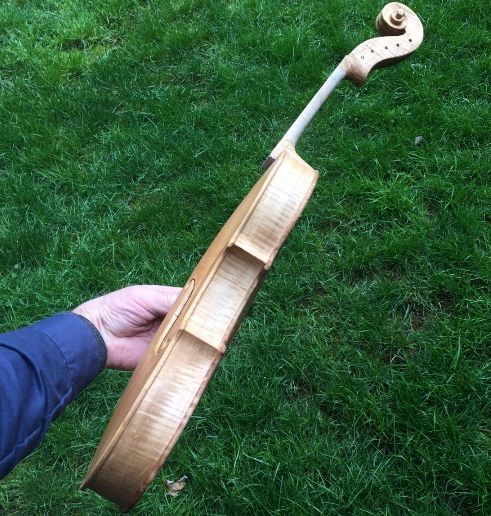
Then I applied a first coat of yellow varnish, as I have noticed that many of the old instruments seem to have something yellow under the darker red or brown varnish. You canespecially see it in the areas where the colored varnish has worn thin, or is completely gone. (Not all of them have this color, but I like it, so that is what I have chosen to do.)
So, here is the base coat of yellow varnish:
Base coat of yellow varnish on front side.
Base coat of yellow varnish on the side.
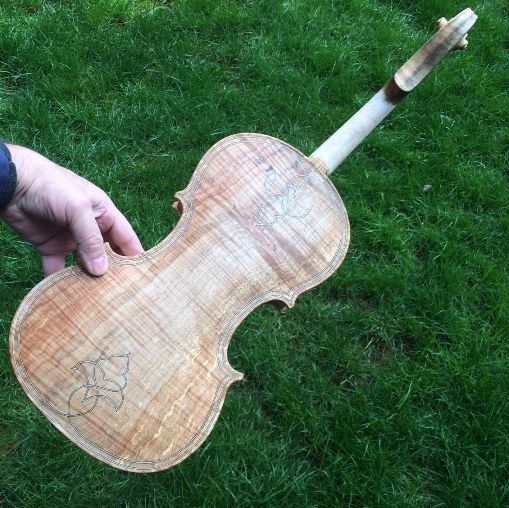
Base coat of yellow varnish on the back side. The grain of the spalted maple is showing better, again.
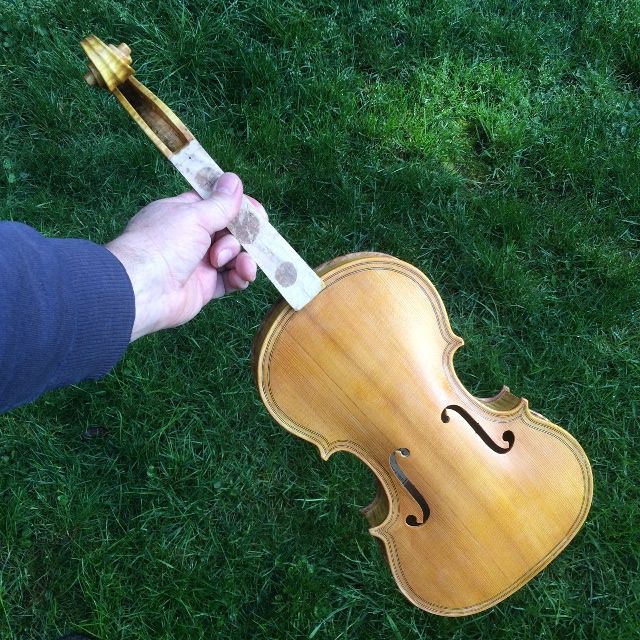
Base coat of yellow varnish on scroll and neck heel.
I do not apply varnish to the “handle” portion of the neck until everything else is completely done. After everything else is done, including set-up, I will rub down the handle area with 400-grit abrasive one last time, and then put about a dime-sized dot of shellac on a rag, on the end of my finger, and vigorously rub it into the wood of the handle area, until it is completely dry. This somewhat seals the wood against sweat and dirt, without leaving a heavy, “slick” coating that would cause drag on a player’s hand.
The rest of the varnish coats will be building color toward the final look of the instrument. I will include them in another post.
Varnish Progress on the Commissioned 5-String Fiddle
Varnish Procedure for All my Instruments:
Complete all scraping, shaping and smoothing: varnish preparation.
Wet the instrument down to raise the grain, then
Lightly sand with fine-grit abrasive, to remove rough bits of raised wood.
Rub in a mineral ground, then use a rag to remove excess.
After the ground dries, sand lightly again, to remove any rough excess mineral.
Seal using turpentine and rosin.
After the sealer is dry, begin adding coats of varnish.
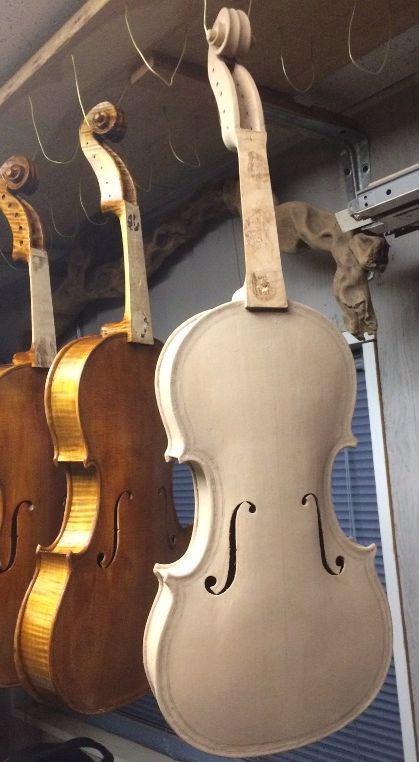
Following the above format, here are the results:
Dried Mineral Ground, compared with varnished instruments.
Front view with sealer…mineral has disappeared.
Side view with sealer…the grain is visible; the ground is transparent.
Back with sealer; the grain is very visible, the ground has disappeared.
Now the varnishing begins!
The mineral ground was intended to close all the open pores in the wood so that the varnish will not saturate the wood. Then the sealer locks the mineral ground in place and causes it to become transparent. (Think “wet t-shirt material.” White stuff becomes transparent when wet, as a rule.)
So, now the varnish further seals the wood and begins to add gloss and protection from moisture, dirt, etc. And, if we do it correctly, it will add the color we want, as well, without losing transparency.
I have used both oil varnishes and spirit varnishes. I believe the old masters used oil varnish, but currently, I have moved to spirit varnish. Perhaps one day I will use oil varnishes again
Spirit varnish dries so rapidly that I can usually apply four coats of varnish the first day. So here is the fiddle with four coats of spirit varnish:
Front, with four coats varnish…still pretty yellow.
Bass side with four coats of varnish: Too much contrast between side and front plate.
Back plate with four coats of varnish… looking pretty nice!
Leveling the varnish
So, then, after the first few coats have dried hard, we sand lightly to remove brush marks, sags, drips, etc. and begin to add color coats. Usually, I have a pattern of shading I use, to emulate light “wear” patterns. This one has very little of that.
Final color front plate…the light patch on the upper left is a reflection.
Final color treble side: notice that the front and side match nicely, now.
Final color bass side.
Final color back plate.
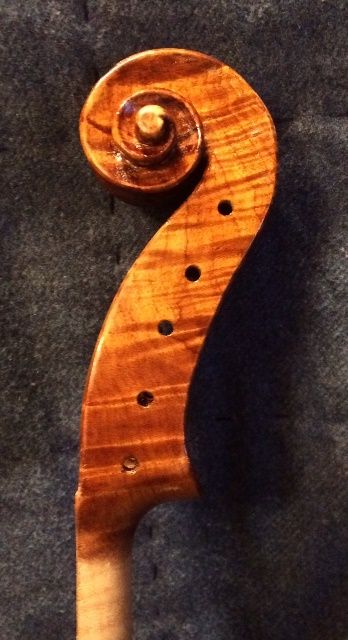
Final color bass side scroll.
Final color treble side scroll.
Final Finish Work
So, now we will let the varnish thoroughly dry, and harden; after which there may be retouching and minor changes to make, but the main focus will become set-up after that. (In case anyone is interested, the customer has been kept abreast of every step in the build, and is getting quite anxious to take possession.) 🙂
Back in December, I received a commission for a new 5-string “Bluegrass” fiddle. It was to be made on the same form as one of my earlier instruments but have a two-piece, straight-grained Sitka spruce top and a very wild-grained Oregon Big Leaf maple back, sides and neck. The customer specifically requested Ipe for the Fingerboard, saddle and nut. Ipe is extremely hard, dense wood, but not threatened or scarce, as ebony is becoming. It has an odd color when under the knife, and leaves a bright yellow dust when it is scraped or sawn, but it finishes to a nice dark brown and darkens further with age.
Wild Grain Makes for Tough Carving
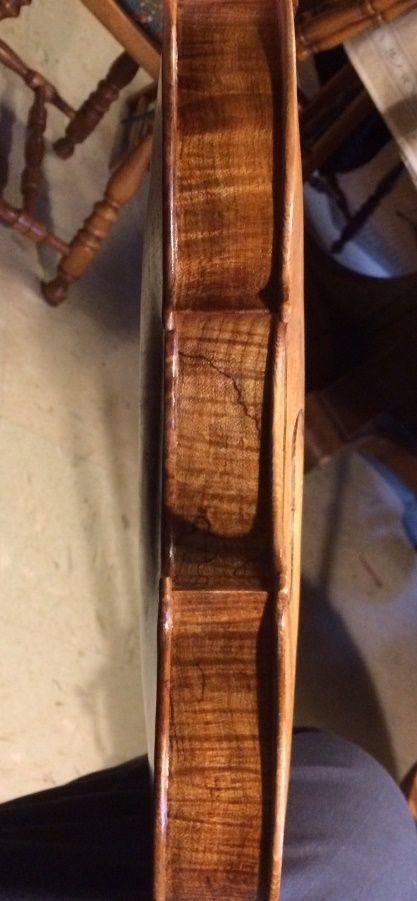
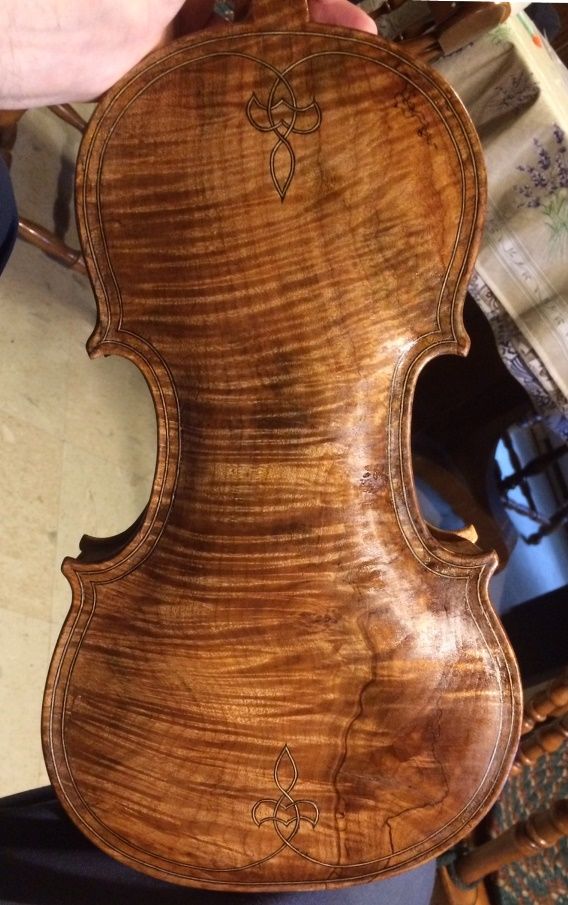
The last time I posted, I was just beginning the back plate arching. It was tough carving, as it is extremely “wild” flame, and the Big Leaf Maple grain is anything but straight. The result, of course, is some very beautiful wood. But it is hard work, regardless. The blades must be kept razor-sharp, and cuts must be kept shallow in depth.
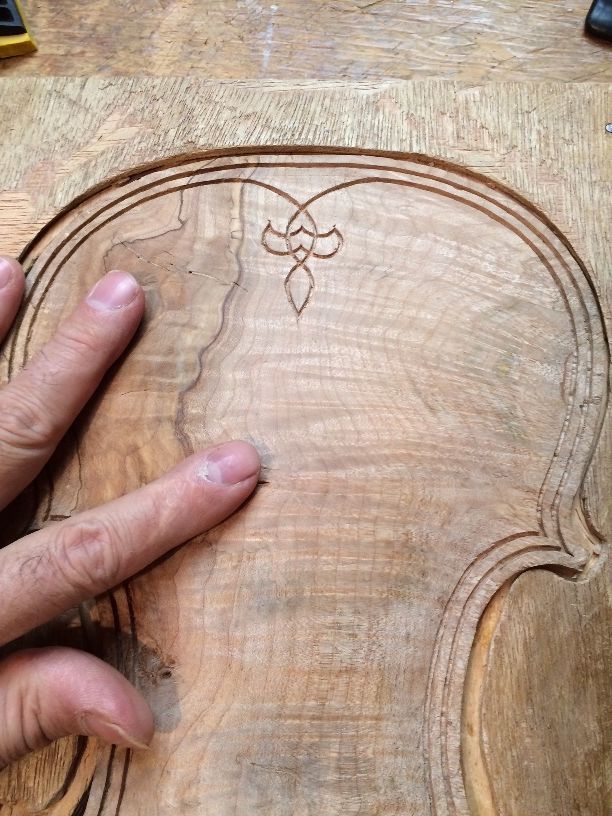
The purfling requested was not only double purfling (favored by a few of the early masters, especially those of Brescia) but was to include a purfling weave, as well, in the form of a modified “fleur-de-lis.” This is a design I came up with on my first five-string fiddle, and have continued to use, in a variety of forms, ever since.
Working on the back purfling slots.
I like the look of the double-purfling and the weave, but it is pretty hard on my hands, as I still do all my purfling inlays by hand. I know a lot of makers use a Dremel-tool, or something similar. Perhaps I eventually will succumb to that “new-fangled” tool as well.
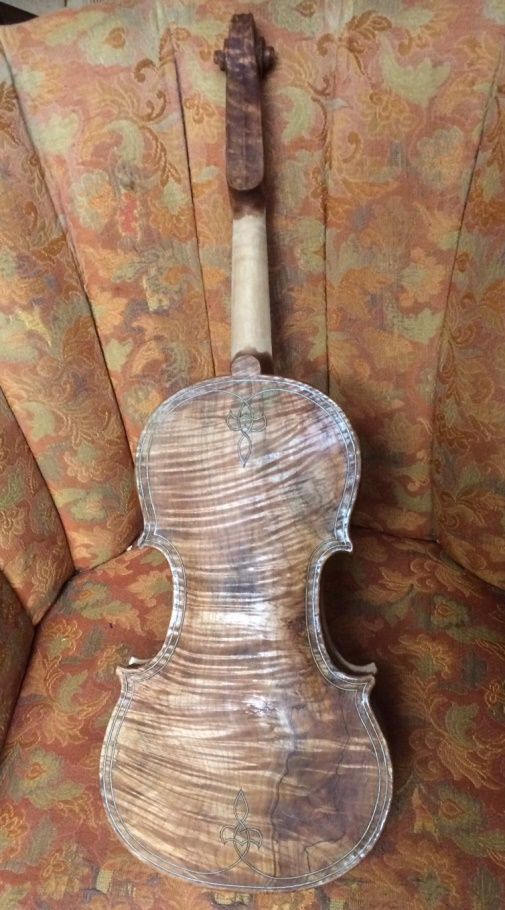
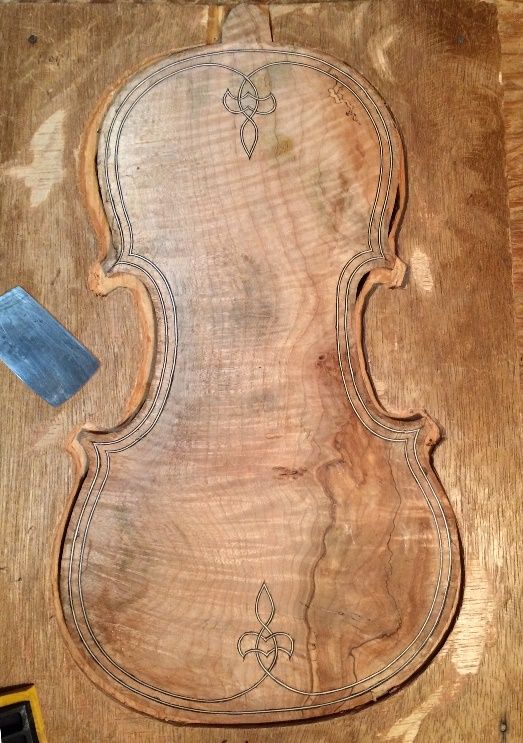
At any rate, here is the back plate, with the purfling complete:
Back plate complete, ready for final scraping and graduation.
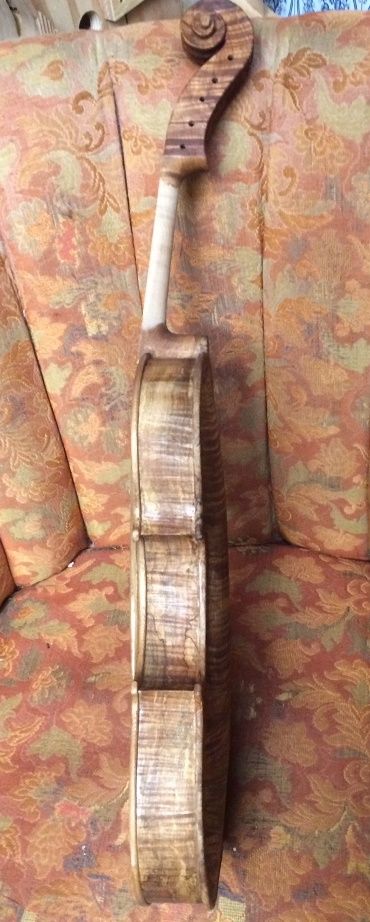
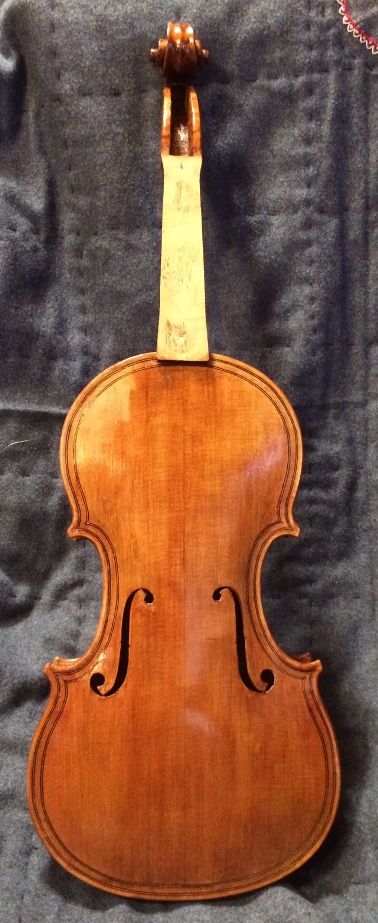
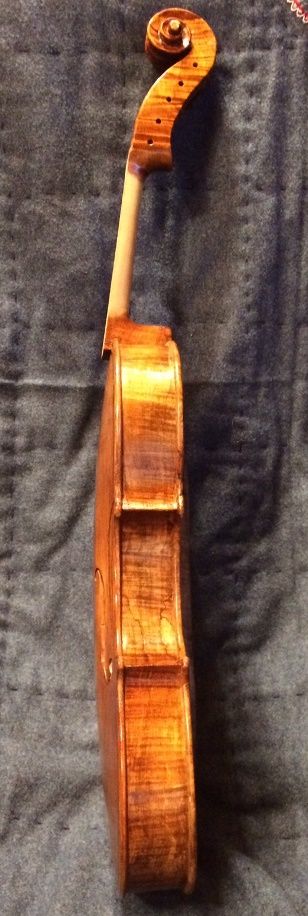
Closing up the “Corpus”
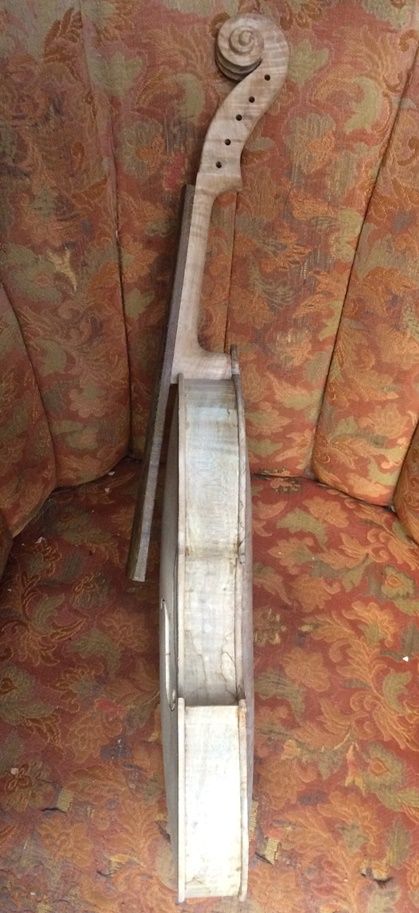
I closed up the corpus a few nights ago: all that is left to do before varnishing is to complete the final carving of the neck heel, and all the final edgework, so that the wood is “varnish-ready.”
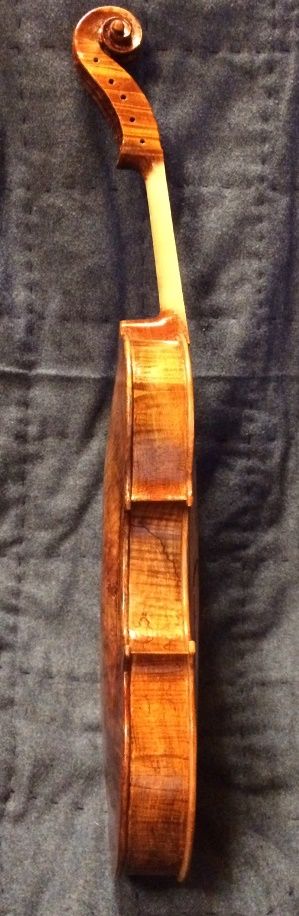
Closed corpus, side view. (Note the heel yet to be carved; edgework incomplete.)
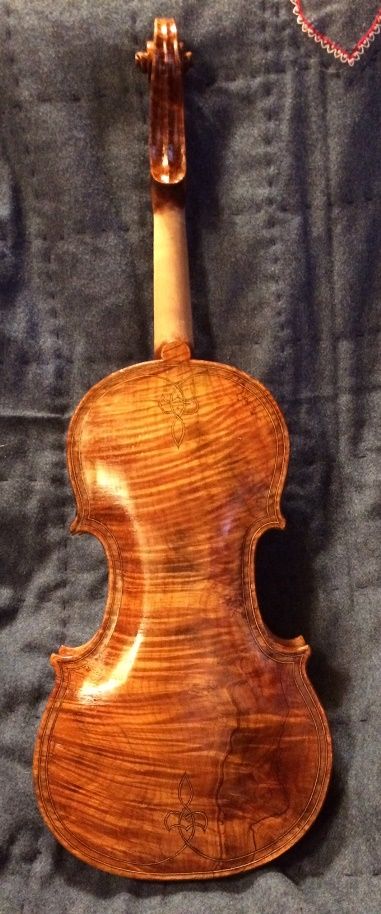
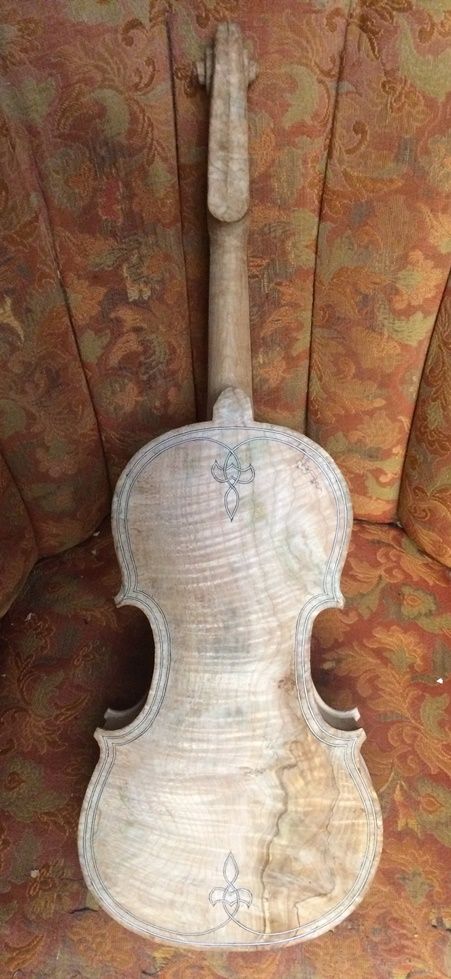
Closed Corpus, back view…button still too long; heel uncarved.
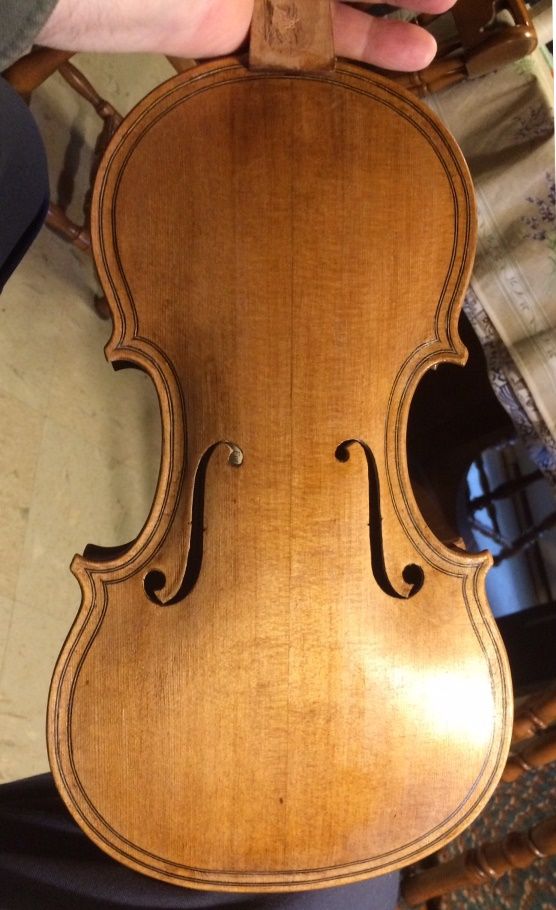
Closed Corpus, Front view. Corners and edgework still not done.
I will show one more progress report during the varnishing process, and the last for set-up and playing.
(Further progress on building a custom-made 5-string bluegrass fiddle.)
Neck Set
The neck was ready to set into the neck-block, late last night, but I had reached my physical limit. So, today, I prepared both the neck and the garland, by ascertaining that all angles and dimensions were correct, and then laying out the shape of the neck mortise on the neck block of the garland. This is a critical step in violin-making and always raises my blood pressure a little, as I know that, if I make a mistake, it will require serious rework to get back to a usable status.
However, this time, the job went pretty smoothly, and I was able to set the neck in a fairly short time. One thing I do a little differently than I was originally taught, is that I set the neck before installing the maple back plate. This allows me to achieve a good fit with the rib garland and neck block, and not have to worry about the fit against the back plate button. Then I saw off the stub of the neck heel, and plane and file it flush with the rib garland. After I remove the mold and add the back linings, I will level the back of the garland, and be ready to trace the back plate shape.
Neck Set Complete: still have to remove the neck-heel stub.
Here is the completed corpus (Sitka Spruce top plate and Big Leaf maple ribs still on the mold) with the wild-grain Big-leaf maple back plate billet.
Completed Corpus with Back Plate Billet.
Mold Removal
So, the next step was to remove the plywood mold. This is another stressful step because it involves literally using a hammer and chisel, to break the glue-bond between the blocks and the mold, so as to release the garland from the mold. I used to have a difficult time doing this, because occasionally a drop of hide glue had seeped between the rib and the mold, and anchored the fragile rib material to the very solid mold. The likelihood of breaking a rib at that point became nearly 100%. Eventually, however, I learned to liberally coat all the non-gluing surfaces of the mold with candle-wax (paraffin,) by vigorously rubbing a candle over all the areas I felt were likely to get a drop of glue on them.
The result today was that, when I removed the mold, it went smoothly, and I could see a place where glue had definitely intruded but it had dried with zero adhesion to the waxy mold. (What a relief!)
Mold removed, ready for back linings.
Installing the Back Linings
The linings are important for two reasons: they strengthen the fragile rib-edges, and they triple the gluing surfaces between the rib-garland and the front and back plates.
So, I cut the mortices in both sides of each of the six blocks to receive the lining strips, and then inserted the linings dry, to get a perfect fit.
Afterward, I removed each lining, one by one, coated them liberally with hot hide-glue, and re-inserted them, clamping immediately with small spring-clamps.
Back linings installed, glued and clamped.
Shaping Blocks and Linings
If you look closely you can also see, in the above photos, that I had trimmed the blocks on the front side, before removing the mold. After the glue is dry on the back linings, I will also trim the back side of the blocks, to achieve a smooth, curved surface on the interior of all the blocks. At that same time, I will taper the linings so that they are very thin on the edge toward the middle of each rib, but still 2 mm thick at the edge where they will contact the back and front plates.
After that, it will be time to level the back surface of the entire corpus (garland and neck-heel) so as to fit tightly against the back plate billet. Then I can trace the final shape of the back plate, cut it to shape, and get going on completing the back plate.
For now, I am satisfied to allow the glue to dry, and take the rest of the evening off.

.jpg)


.jpg)
.JPG)
.JPG)