More Progress on the first two of Six Fiddles. (8/9/21)

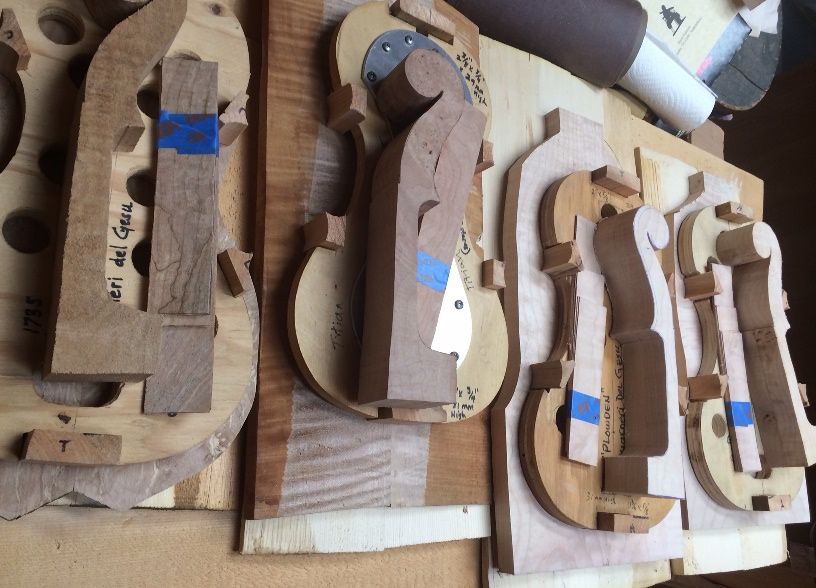
Build Progress for a couple of new “5-string Bluegrass fiddles:”

Last time:

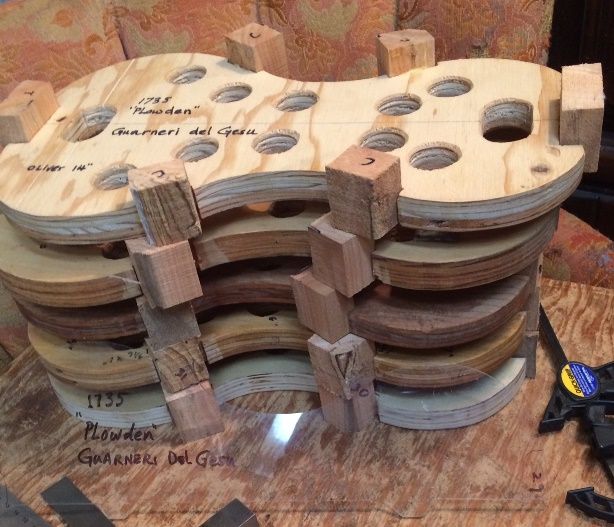
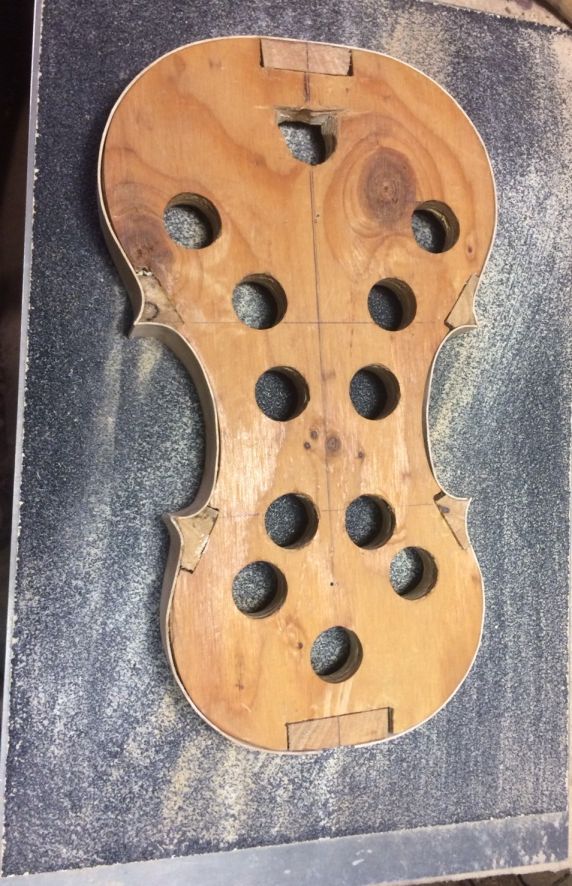
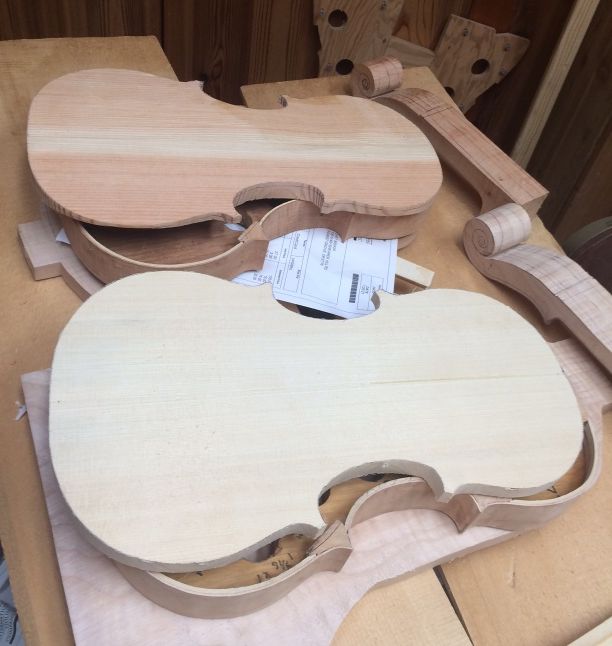
Last post showed the garlands complete, and ready to be leveled:

garlands for two five string fiddles made in Oregon by Chet Bishop
Garlands with linings installed, ready for leveling.


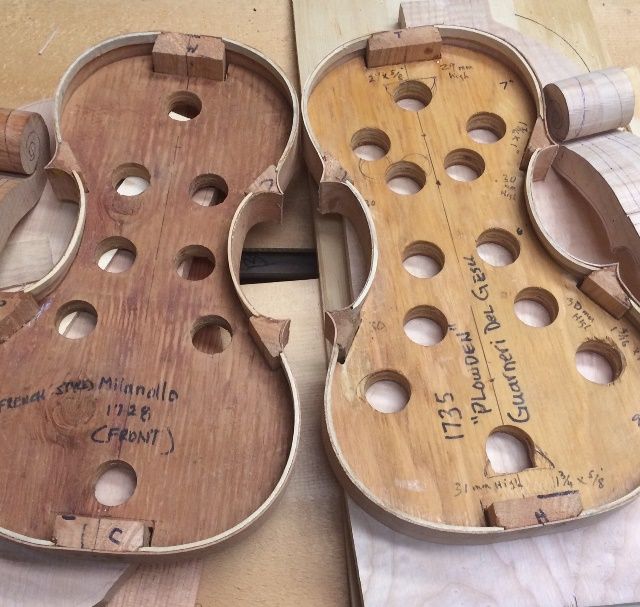
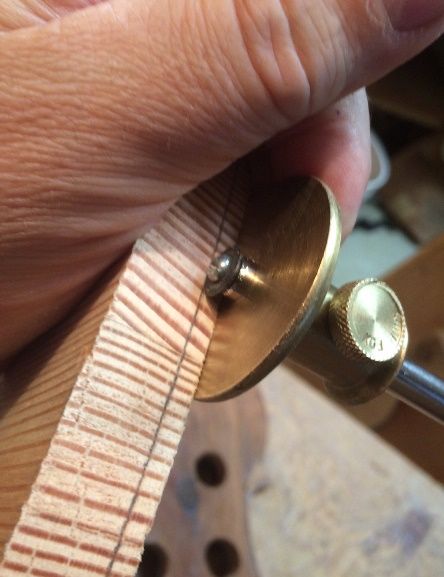
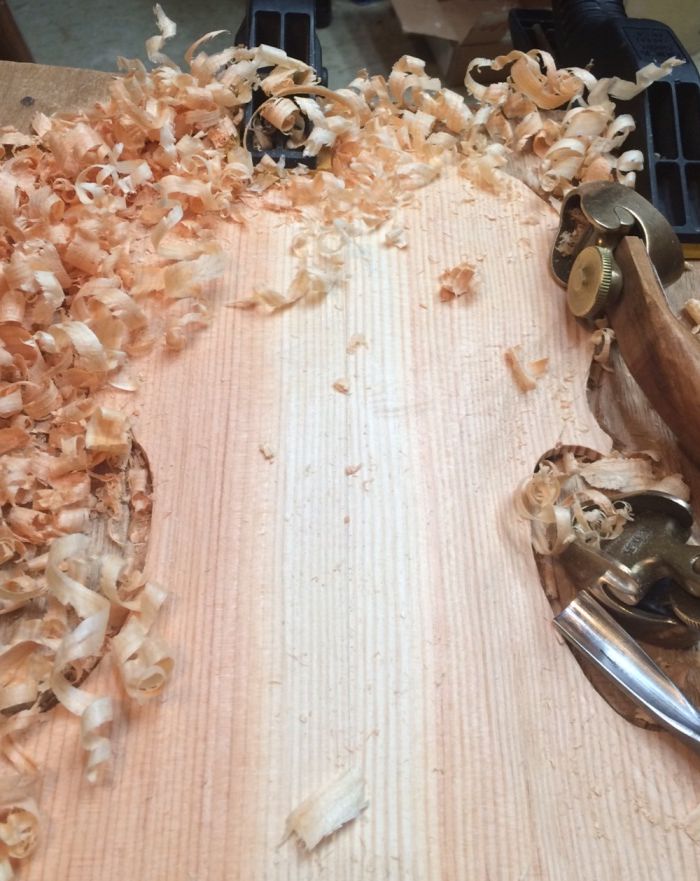
I began the leveling process using a file and a finger plane, until the fragile rib-edges were level with the linings.

garland for five string fiddle made in Oregon by Chet Bishop
Beginning the levelling process.


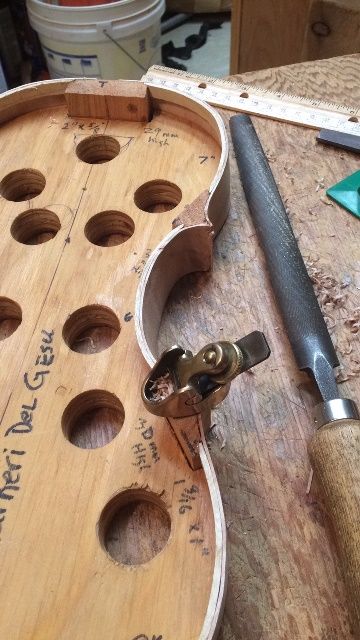
Then I completed the leveling by rubbing the garland on a sanding board.
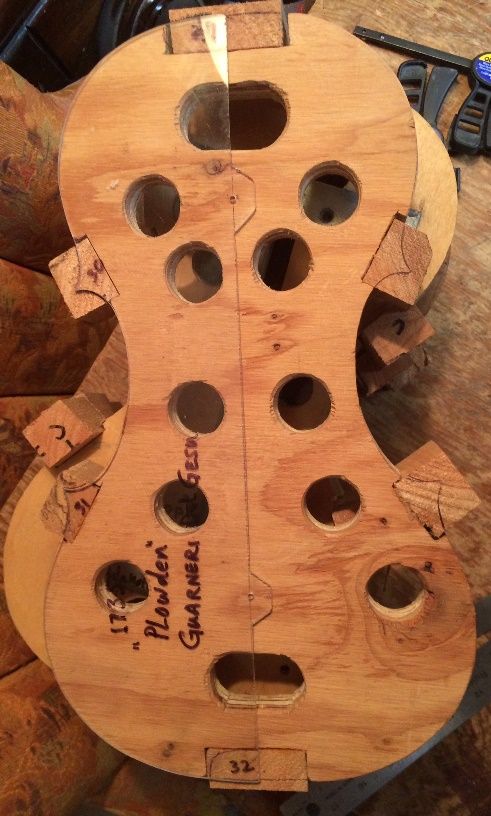
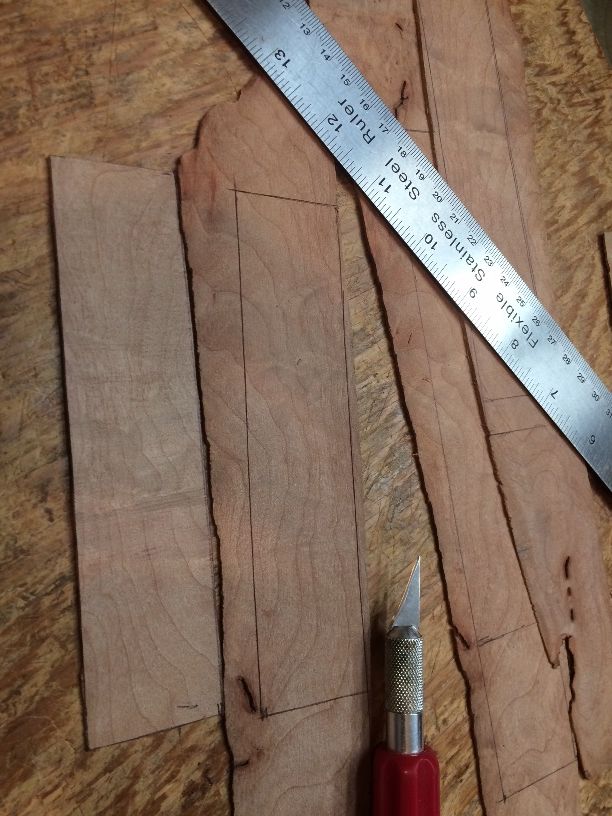
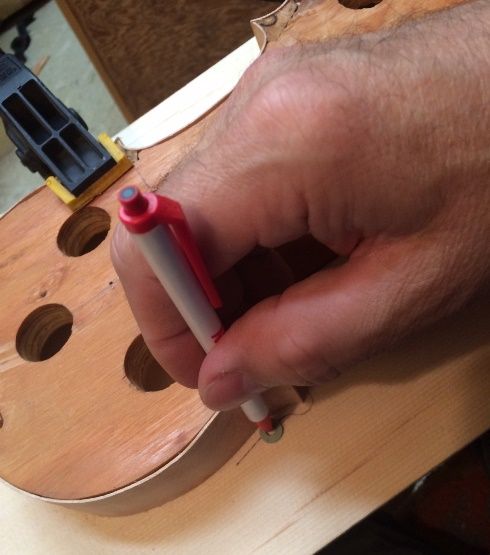
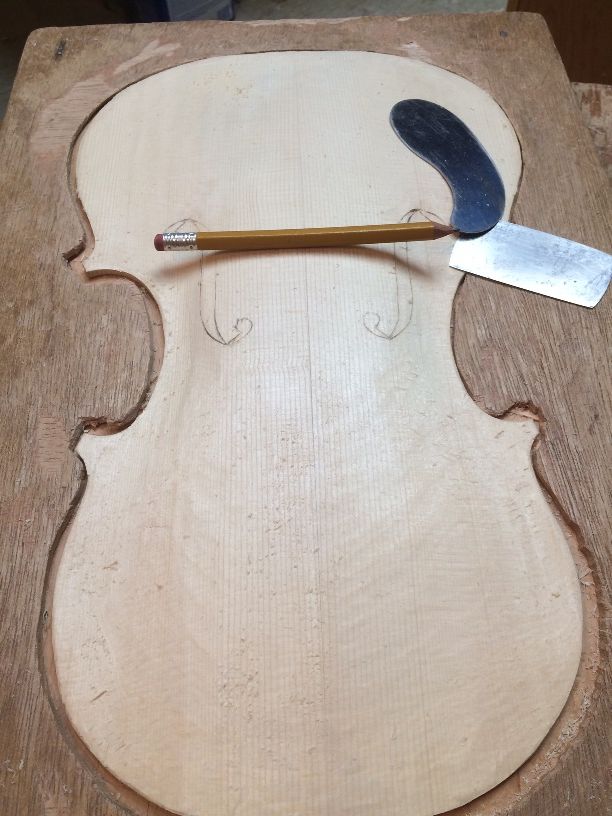
five string fiddle in the making
Flattening the garland on a sanding board.


Tracing the plates

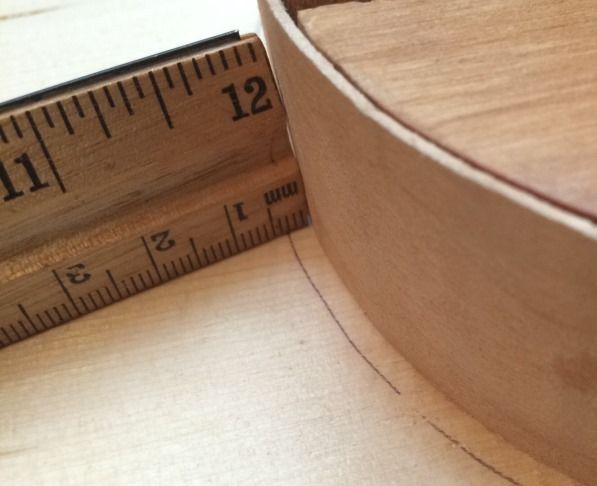
Once the garlands were flat, I could use them to trace the outline of the plates: I used a small washer as a tracing tool– as a spacer, to give me the overhang distance I want (3mm.)

tracing the front plate for a 5-string bluegrass fiddle handmade in Oregon by Chet Bishop
Tracing the outline of the plate, using a washer and a ballpoint pen.


five string fiddle in the making.
The washer has to be the right size to put the ink line 3mm away from the rib.


overhang for five string fiddle handmade by Chet Bishop In Oregon
Pretty close, I’d say!


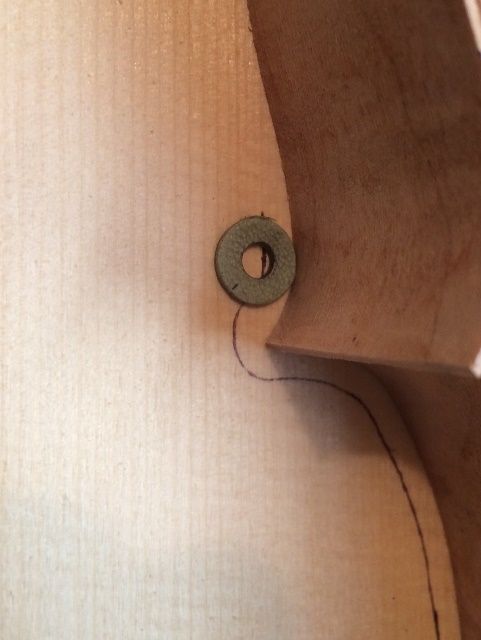
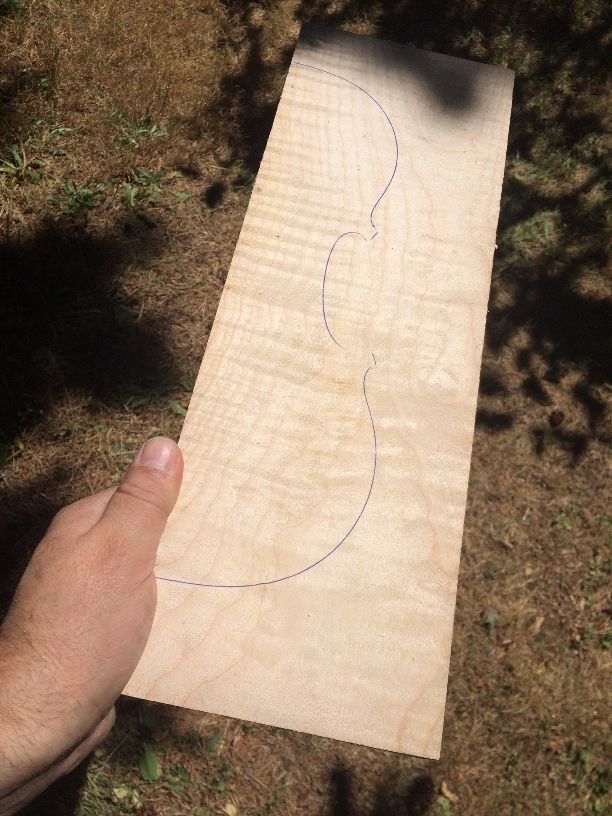
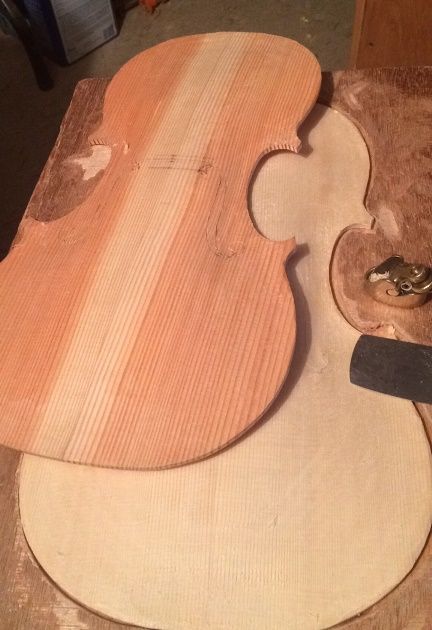
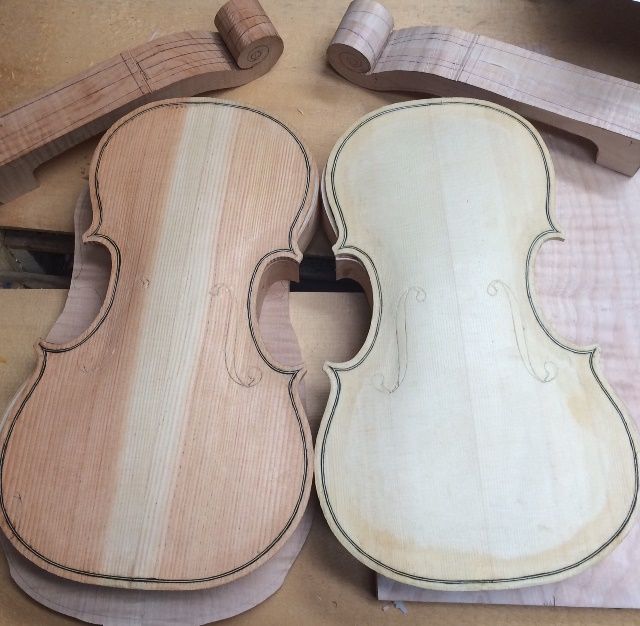
Correcting the corners and cutting out the plates

I really don’t want the “round corners ” produced by the washer, but they do give me a starting point from which to correct the corners before cutting out the plates:
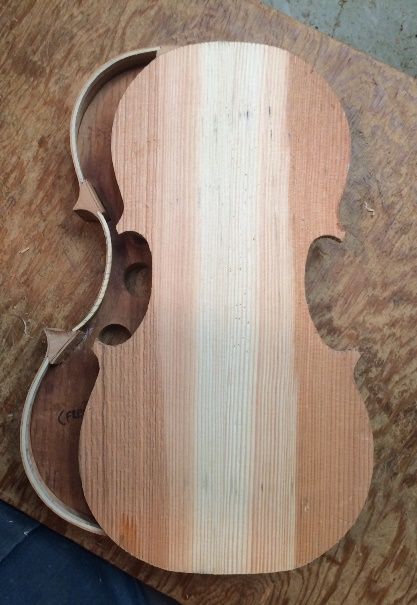
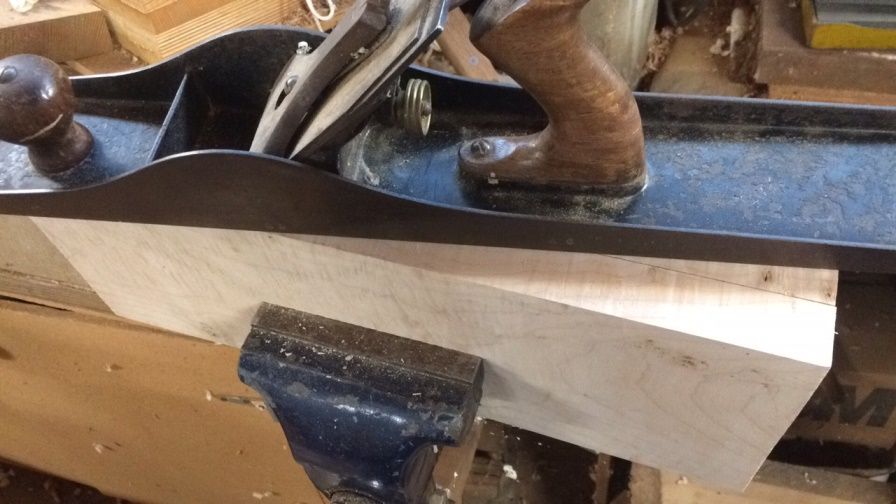
corner shapes for 5-string fiddles handmade in Oregon by Chet Bishop
Corrected corner shapes laid out, on Englemann Spruce, using a straightedge and a circle template.


Douglas fir front plate cut out for 5-string bluegrass fiddle handmade in Oregon by Chet Bishop
Douglas Fir Front plate cut out and ready for arching. Uncommon wood, but good!


two plates for five string fiddles handmade in Oregon by Chet Bishop
Both plates are ready for arching. I enjoy using Oregon woods when I can.


Arching the plates:

Arching the plates is a critical step, because the arching pretty much controls the tone quality. In fact, it may be the single most inportant factor in achieving good tone. I begin by scribing the edge-thickness of the plates and then I  begin removing waste wood to complete the rough arching:

Scribing the edge thickness for a 5-string fiddle handmade in Oregon by Chet Bishop
Scribing the edge thickness for the Douglas Fir front plate.


planing a front plate for a 5-string fiddle handmade in Oregon by Chet Bishop
Rough-arching the Douglas Fir plate, using planes and gouges.


I use arching templates to establish the shape of the arching, and then fair-in the parts in between the templates. (The templates for the back plate are slightly different, but all of these things matter: I have to use them correctly. And, although I can get the arching “close” without the templates, quite honestly, “close” isn’t good enough.)

arching templated for 5-string bluegrass fiddle handmade in Oregon by Chet Bishop
This top is from the previous fiddle, but I used the same templates, so here they are!

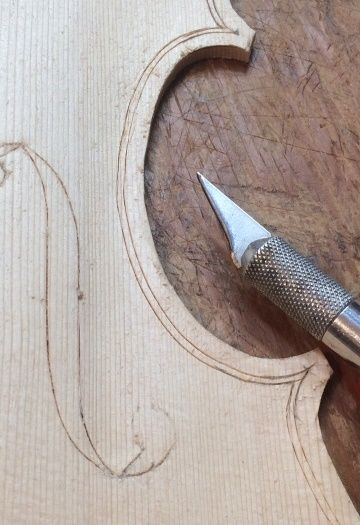
Laying out F-holes, and incising them.

After the arching shape is very close to correct, I use templates to lay out the f-hole shapes and locations, and then use a knife to incise the lines deeply, so that I can’t accidentally remove the lines through further shaping.

f-hole layout for five-string fiddles handmade in Oregon by Chet Bishop
F-holes laid out and incised on both front plates.


Then I refine the arching, using gouges, planes and scrapers, until the shape is exactly what I want.
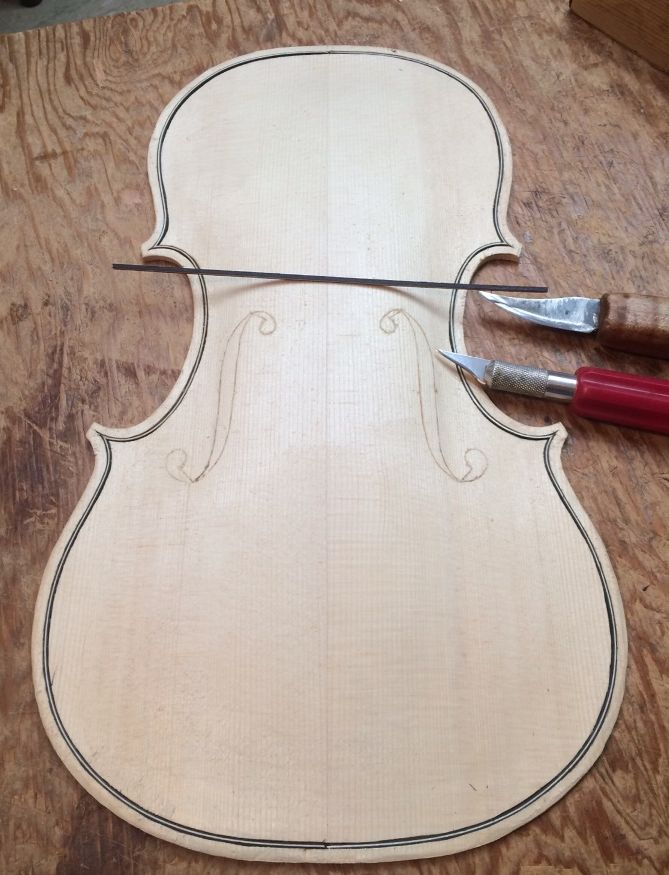
refining the arching on a 5-string bluegrass fiddle handmade in Oregon by Chet Bishop
Refining the arching on the Englemann Spruce plate.


two plated for 5-string bluegrass fiddles handmade in Oregon by Chet Bishop
Both front plates ready to begin purfling.

Purfling:

The word “purfling” evidently comes from the old Italian “por filo” meaning edging.  It supposedly helps strengthen the edge, and it certainly helps “define” the edge, and…it looks nice. Though there are examples of old intruments without purfling, all of the better “Old Master” makers used it, and I will never make an instrument without it. (Besides…I like it.)

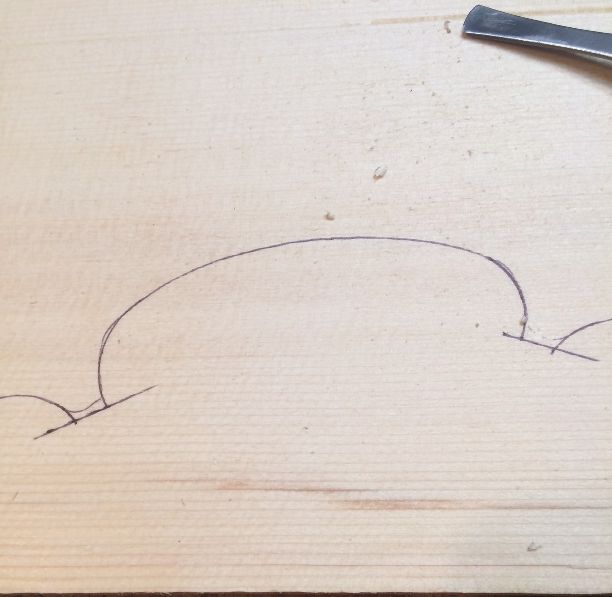
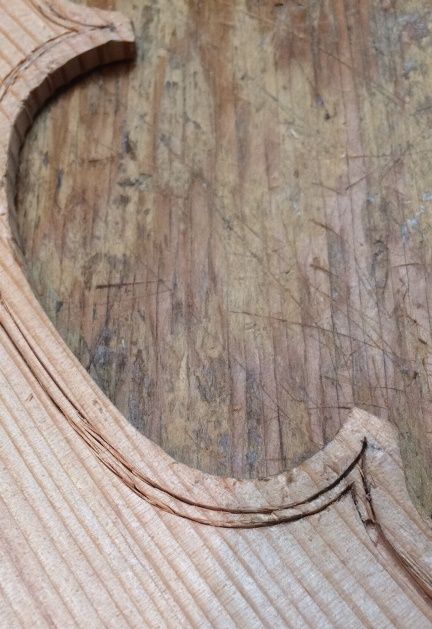
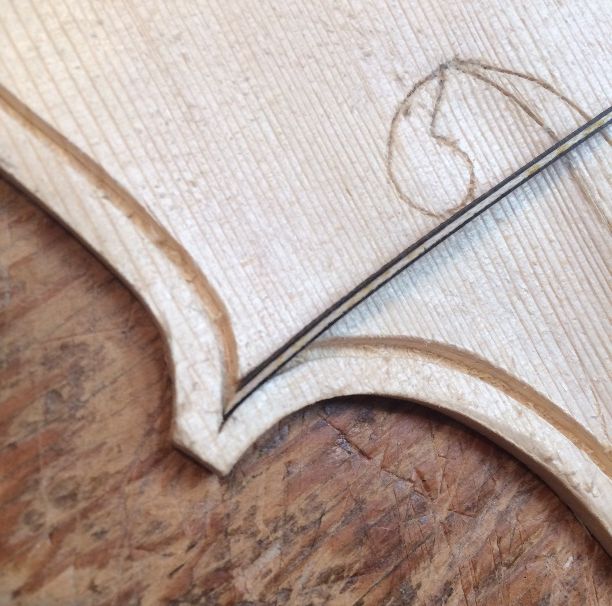
I position the purfling beginning at 4mm inside the outer rim of the plates, and mark the location of both sides of the slot, using a purfling marker (sometimes called a purfling cutter.) The marker won’t work for the corners, so I have to lay them out using a pencil.

Then I use a knife to incise those lines deeply enough to receive the actual purfling strips.

purfling laid out for 5-string bluegrass fiddle handmade in Oregon by Chet Bishop
Beginning purfling slot in Englemann Spruce front plate.
Douglas Fir is much more difficult to incise, because the winter growth rings are very hard.


picking waste wood from the purfling slots on a 5-string fiddle handmade in Oregon by Chet Bishop
Picking waste wood from the purfling slots.


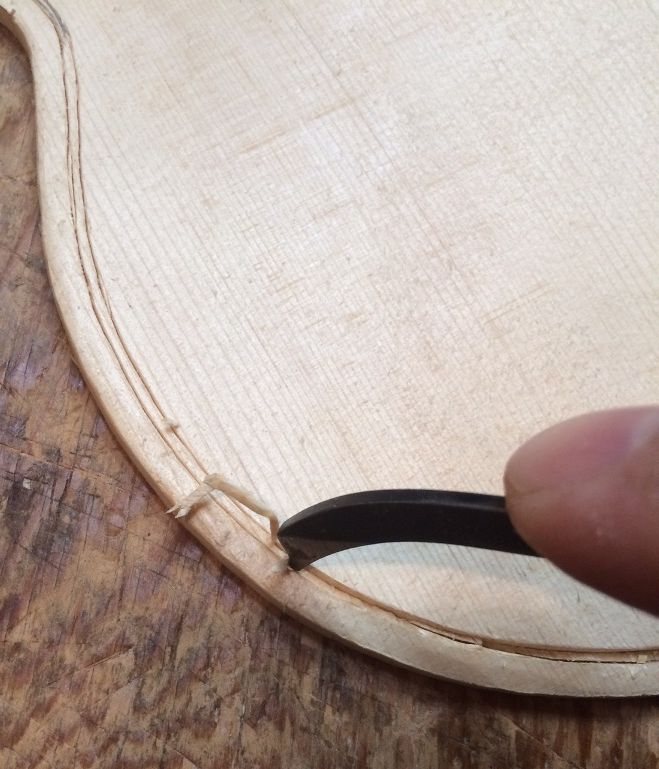
Finally, when the slots are complete, I can begin inserting the actual purfling strips. The strips come as 32″ long three-ply veneers, and are very brittle. I have to use the bending iron to prepare them for insertion into the slots.

plate ready for purfling for a 5-string bluegrass fiddle handmade in Oregon by Chet Bishop
Purfling slot completed in Douglas Fir front plate.


inserting purfling in a 5-string bluegrass fiddle front plate, handmade in Oregon by Chet Bishop
Ready to insert purfling strips in the Englemann Spruce plate…but not without bending them first!


Purfling, inserted dry, into front plate of 5-string fiddle handmade in Oregon by Chet Bishop
Purfling, inserted dry, on the Englemann Spruce front plate. Ready for hot hide glue!


Gluing the Purfling:

After the purfling strips are correctly fitted, dry, I carefully lift them out, one by one, and slip hot hide glue into the slot beneath each strip, then quickly force the strip back into the slot, ramming it home with a special tool.

When all is complete, I allow the purfling to dry, before moving on to cutting the channel, performing the final edgework, and fairing the channels into the arching…but those are stories for another day.  🙂

Completed purfling for two 5-string bluegrass fiddles handmade in Oregon by Chet Bishop
Both plates’ purfling complete, still wet from gluing.


Thanks for looking.

Need More Fiddles! Beginning Six New Five String Fiddles!

I Failed to “Keep Up!”

I shipped the last three fiddles I had made, so the “cupboard” is looking pretty bare!

Unfortunately, I spent a lot of time messing around, this year, trying to build a travel case for the Travel Bass I built last summer. (I really need to complete it. The bass isn’t going anywhere without the case.) Also, the last two fiddles I had made were literally hanging around the house, and so, I wasn’t feeling pressed to build more of them right away. I found it to be a busy year in a lot of other ways, too.

Sudden Changes

Two customers came, and rather abruptly, those two most recent fiddles  suddenly found homes.  I only have two five-string violin-size fiddles left, both of which I had made several years ago, and they both play very well. However, the ones I am building currently are my best work, and that is what I want to put in players’ hands.

The Plan

Therefore, I decided I had better “hit the Lutherie trail” in a big way. First, I selected six of my molds (five in the photo, below: the sixth shows up later.) Then, I glued the blocks in place, to begin a group of six new fiddles. Next, I plan to select and prepare materials, and match them together into “kits.” In this way, I know which top plate goes with which back plate. neck, and ribs, etc.

Afterward, I plan to begin building them in pairs, but I will always have another pair ready to begin, if things slow down at all.

5-string fiddle molds with blocks and a transparent template.
Five molds with blocks and a transparent template.

The Process:

Look closely, and you soon will see the transparent plexiglass template in the photographs above and below. Because the template is clear, it is hard to see, but it gives the precise shape I want for the outline of my blocks. I use a ballpoint pen to trace the shape onto the blocks.

Template tracing block shapes for 5-string bluegrass fiddle made by Chet Bishop
I use the template to trace the exact shape I want for my blocks.


Next, I use a saw to roughly cut out the shapes. Afterward, I use an oscillating spindle sander to shape them more precisely. Using an old candle, I rub parrafin wax on all the exposed edges of the molds, so that an accidental drop of glue can’t bond them to a rib. Initially, I glue the ribs only to the blocks and linings. Ultimately, I will remove the mold, before closing the body of the instrument.

Molds with blocks shaped for 5-string bluegrass fiddle by Chet Bishop
Here are the blocks, shaped and ready for ribs.

Wood Choices

Then, I cut the ribs from wood that match the back and neck, as closely as possible. Usually, I try to get them all out of the same billet of wood. Over the years,  I have harvested some of my wood, myself. However, A friend (the late Terry Howell) gave me a great deal of curly maple, in log form. Immediately, I had someone mill it up for me on a large portable bandsaw mill.  In other cases, I have simply bought wood from tonewood dealers.

I have used a variety of woods for the back plates. These (below) are all Big Leaf Maple. But, I have used a wide variety of other woods.  When I build classical orchestral instruments, I use only European Maple and Spruce.

I bought the wood (in the pictures below) from Bruce Harvie, of Orcas Island Tonewood Company. That piece of Big leaf maple on the right measures 2″ thick, about 6″ wide, and 16″ long, or more. The large billet allowed me to cut the ribs, neck and two-piece back all from the same billet. I cut up the Englemann Spruce billet on the left. to provide two tops and nine bass-bars.

Wood for 5-string bluegrass fiddles made in Oregon by Chet Bishop.
Englemann Spruce and Big Leaf Maple.


MAple wood for a 5-string bluegrass fiddle made in Oregon by Chet Bishop.
Same piece of Maple…closer view.

Processing the materials:

To begin with, I used a bandsaw to slice off the rib material. Then, I laid out the actual shape I needed for the back and neck. (I did not make the traced “shape” visible in the above photo. That is just the way tonewood dealers “spark the imagination” of their customers.)

I sliced the back plate shape in half lengthwise, originally. Next I planed the two edges perfectly smooth and flat. Finally, I glued the halves together, to form the back plate.

planing center joint of a back plate for a Chet Bishop five-string fiddle.
Hand-planing the center joint.


Maple back for 5-string bluegrass fiddle made in Oregon by Chet Bishop.
Same billet, made into a back plate blank. The rest became ribs and neck.


While the glue was drying on the plates, I traced out all the neck billets. I used a bandsaw to cut them out, to produce “neck blanks.”

Neck billets for 5-string fiddles made in Oregom by Chet Bishop.
Looks like a “bouquet of fiddle necks.” They will be matched with their respective backs and ribs.


In addition to the preparation of the heavier components, I used a bandsaw to slice rib material from appropriate wood to match the wood of the backs. For example, a darker maple back required darker maple ribs. I then sanded them to 1 mm final thickness, using the oscillating spindle sander.

Ribs for 5-string fiddle.
I was glad I had rib material that matched the color of the old wood for this fiddle. That back (below) was harvested in September, 1983.


Wood for 5-string fiddle made in Oregon by Chet Bishop
Matching ribs and neck to back wood.


After thinning the ribs, I used a knife to cut the ribs to size.

Wood for ribs for 5-string fiddle made in Oregon by Chet Bishop
Each set of ribs requires three pairs, in lengths for upper, center and lower bouts.

Douglas Fir

Usually, I make the top plates of my instruments from some type of spruce. (Sitka, Englemann, European or other species all work well.) But, sometimes (rarely) I use other woods: this one is Douglas Fir.

Otto Erdesz used Douglas fir for the front plates on many instruments. I have seen and played one of the violas he made of Douglas Fir. When I found some Douglas Fir with great tone qualities and very straight grain, I decided to try it, emulating his success. Thus far, I have only used Douglas Fir once, but it turned out to be an excellent fiddle, so, I am doing it again. 

Wood Kit for a 5-string bluegrass fiddle handmade in Oregon by Chet Bishop.
A Douglas Fir top plate with a Big Leaf Maple back, neck and ribs.


And, finally, I see the “kits” beginning to emerge!

Materials for 5-string fiddles handmade in Oregon by Chet Bishop
These Kits will help me keep focused and encouraged about building the six new fiddles.


I will try to provide updates and to post progress reports.


Thanks for looking.